The GitHub Blog
Updates, ideas, and inspiration from GitHub to help developers build and design software.
10 Jul 2025, 5:38 pm
Modeling CORS frameworks with CodeQL to find security vulnerabilities
There are many different types of vulnerabilities that can occur when setting up CORS for your web application, and insecure usage of CORS frameworks and logic errors in homemade CORS implementations can lead to serious security vulnerabilities that allow attackers to bypass authentication. What’s more, attackers can utilize CORS misconfigurations to escalate the severity of other existing vulnerabilities in web applications to access services on the intranet.
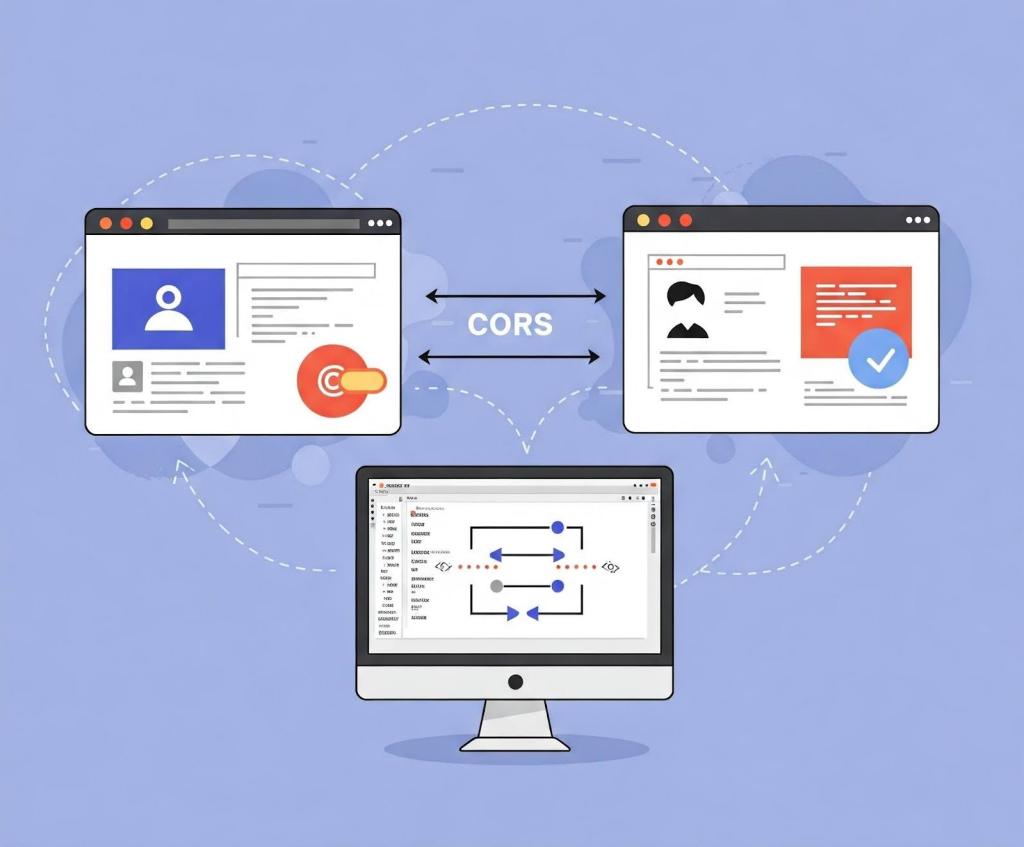
In this blog post, I’ll show how developers and security researchers can use CodeQL to model their own libraries, using work that I’ve done on CORS frameworks in Go as an example. Since the techniques that I used are useful for modeling other frameworks, this blog post can help you model and find vulnerabilities in your own projects. Because static analyzers like CodeQL have the ability to get the detailed information about structures, functions, and imported libraries, they’re more versatile than simple tools like grep. Plus, since CORS frameworks often use set configurations via specific structures and functions, using CodeQL is the easiest way to find misconfigurations in your codebases.
Modeling headers in CodeQL
When adding code to CodeQL, it’s best practice to always check the related queries and frameworks that are already available so that we’re not reinventing the wheel. For most languages, CodeQL already has a CORS query that covers many of the default cases. The easiest and simplest way of implementing CORS is by manually setting the Access-Control-Allow-Origin and Access-Control-Allow-Credentials response headers. By modeling the frameworks for a language (e.g., Django, FastAPI, and Flask), CodeQL can identify where in the code those headers are set. Building on those models by looking for specific header values, CodeQL can find simple examples of CORS and see if they match vulnerable values.
In the following Go example, unauthenticated resources on the servers could be accessed by arbitrary websites.
func saveHandler(w http.ResponseWriter, r *http.Request) {
    w.Header().Set("Access-Control-Allow-Origin", "*")
}
This may be troublesome for web applications that do not have authentication, such as tools intended to be hosted locally, because any dangerous endpoint could be accessed and exploited by an attacker.
This is a snippet of the Go http framework where CodeQL models the Set method to find security-related header writes for this framework. Header writes are modeled by the HeaderWrite class in HTTP.qll, which is extended by other modules and classes in order to find all header writes.
 /** Provides a class for modeling new HTTP header-write APIs. */
  module HeaderWrite {
    /**
     * A data-flow node that represents a write to an HTTP header.
     *
     * Extend this class to model new APIs. If you want to refine existing API models,
     * extend `HTTP::HeaderWrite` instead.
     */
    abstract class Range extends DataFlow::ExprNode {
      /** Gets the (lower-case) name of a header set by this definition. */
      string getHeaderName() { result = this.getName().getStringValue().toLowerCase() }
Some useful methods such as getHeaderName and getHeaderValue can also help in developing security queries related to headers, like CORS misconfiguration. Unlike the previous code example, the below pattern is an example of a CORS misconfiguration whose effect is much more impactful.
func saveHandler(w http.ResponseWriter, r *http.Request) {
    w.Header().Set("Access-Control-Allow-Origin",
    r.Header.Get("Origin"))
    w.Header().Set("Access-Control-Allow-Credentials",
    "true")
}
Reflecting the request origin header and allowing credentials permits an attacking website to make requests as the current logged in user, which could compromise the entire web application.
Using CodeQL, we can model the headers, looking for specific headers and methods in order to help CodeQL identify the relevant security code structures to find CORS vulnerabilities.
/**
 * An `Access-Control-Allow-Credentials` header write.
 */
class AllowCredentialsHeaderWrite extends Http::HeaderWrite {
    AllowCredentialsHeaderWrite() {
        this.getHeaderName() = headerAllowCredentials()
    }
}

/**
 * predicate for CORS query.
 */
predicate allowCredentialsIsSetToTrue(DataFlow::ExprNode allowOriginHW) {
        exists(AllowCredentialsHeaderWrite allowCredentialsHW |
                allowCredentialsHW.getHeaderValue().toLowerCase() = "true"
Here, the HTTP::HeaderWrite class, as previously discussed, is used as a superclass for AllowCredentialsHeaderWrite, which finds all header writes of the value Access-Control-Allow-Credentials. Then, when our CORS misconfiguration query checks whether credentials are enabled, we use AllowCredentialsHeaderWrite as one of the possible sources to check.
The simplest way for developers to set a CORS policy is by setting headers on HTTP responses in their server. By modeling all instances where a header is set, we can check for these CORS cases in our CORS query.
When modeling web frameworks using CodeQL, creating classes that extend more generic superclasses such as HTTP::HeaderWrite allows the impact of the model to be used in all CodeQL security queries that need them. Since headers in web applications can be so important, modeling all the ways they can be written to in a framework can be a great first step to adding that web framework to CodeQL.
Modeling frameworks in CodeQL
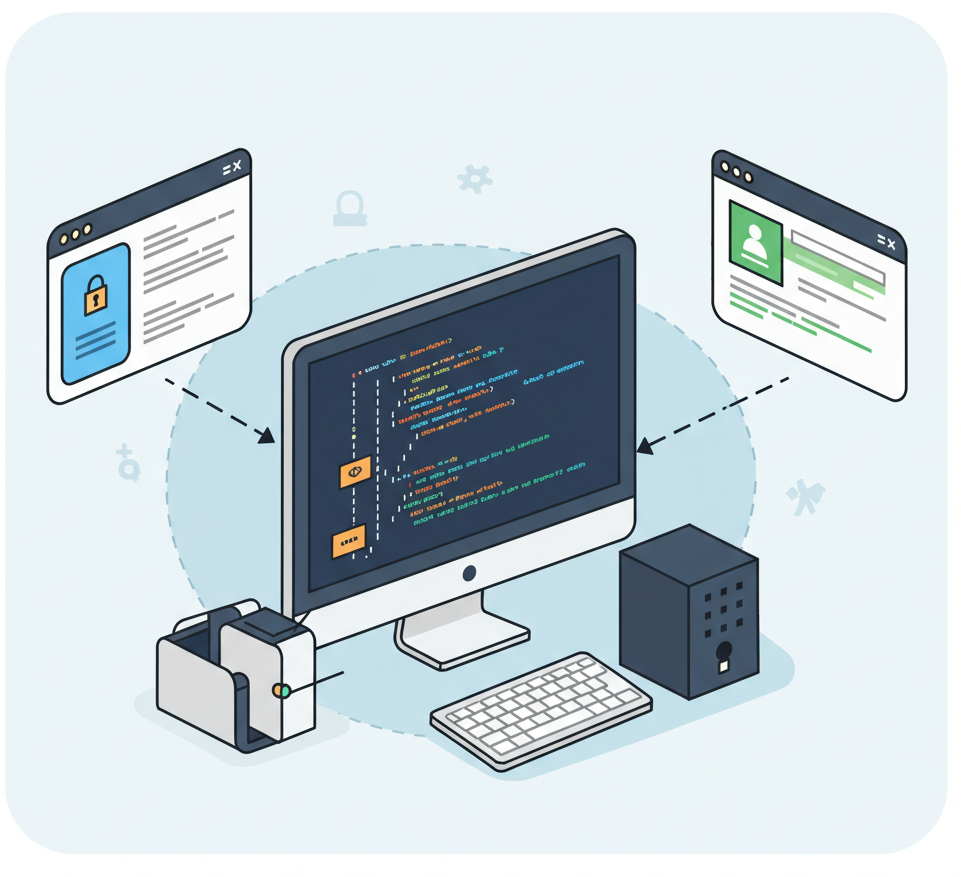
Rather than setting the CORS headers manually, many developers use a CORS framework instead. Generally, CORS frameworks use middleware in the router of a web framework in order to add headers for every response. Some web frameworks will have their own CORS middleware, or you may have to include a third-party package. When modeling a CORS framework in CodeQL, you’re usually modeling the relevant structures and methods that signify a CORS policy. Once the modeled structure or methods have the correct values, the query should check that the structure is actually used in the codebase.
For frameworks, we’ll look into Go as our language of choice since it has great support for CORS. Go provides a couple of CORS frameworks, but most follow the structure of Gin CORS, a CORS middleware framework for the Gin web framework. Here’s an example of a Gin configuration for CORS:
package main

import (
  "time"

  "github.com/gin-contrib/cors"
  "github.com/gin-gonic/gin"
)

func main() {
  router := gin.Default()
  router.Use(cors.New(cors.Config{
    AllowOrigins:     []string{"https://foo.com"},
    AllowMethods:     []string{"PUT", "PATCH"},
    AllowHeaders:     []string{"Origin"},
    ExposeHeaders:    []string{"Content-Length"},
    AllowCredentials: true,
    AllowOriginFunc: func(origin string) bool {
      return origin == "https://github.com"
    }
  }))
  router.Run()
}
Now that we’ve modeled the router.Use method and cors.New — ensuring that cors.Config structure is at some point put into a router.Use function for actual use — we should then check all cors.Config structures for appropriate headers.
Next, we find the appropriate headers fields we want to model. For a basic CORS misconfiguration query, we would model AllowOrigins, AllowCredentials, AllowOriginFunc. My pull requests for adding GinCors and RSCors to CodeQL can be used as references if you’re interested in seeing everything that goes into adding a framework to CodeQL. Below I’ll discuss some of the most important details.
 /**
   * A variable of type Config that holds the headers to be set.
   */
  class GinConfig extends Variable {
    SsaWithFields v;

    GinConfig() {
      this = v.getBaseVariable().getSourceVariable() and
      v.getType().hasQualifiedName(packagePath(), "Config")
    }

    /**
     * Get variable declaration of GinConfig
     */
    SsaWithFields getV() { result = v }
  }
I modeled the Config type by using SSAWithFields, which is a single static assignment with fields. By using getSourceVariable(), we can get the variable that the structure was assigned to, which can help us see where the config is used. This allows us to find track variables that contain the CORS config structure across the codebase, including ones that are often initialized like this:
func main() {
...
// We can now track the corsConfig variable for further updates,such as when one of the fields is updated.
corsConfig:= cors.New(cors.Config{
...
})}
Now that we have the variable containing the relevant structure, we want to find all the instances where the variable is written to. By doing this, we can get an understanding of the relevant property values that have been assigned to it, and thus decide whether the CORS config is misconfigured.
 /**
   * A write to the value of Access-Control-Allow-Origins header
   */
  class AllowOriginsWrite extends UniversalOriginWrite {
    DataFlow::Node base;

	// This models all writes to the AllowOrigins field of the Config type
    AllowOriginsWrite() {

      exists(Field f, Write w |
        f.hasQualifiedName(packagePath(), "Config", "AllowOrigins") and
        w.writesField(base, f, this) and

		// To ensure we are finding the correct field, we look for a write of type string (SliceLit)
        this.asExpr() instanceof SliceLit
      )

    }

    /**
     * Get config variable holding header values
     */
    override GinConfig getConfig() {
      exists(GinConfig gc |
        (
          gc.getV().getBaseVariable().getDefinition().(SsaExplicitDefinition).getRhs() =
            base.asInstruction() or
          gc.getV().getAUse() = base
        ) and
        result = gc
      )
    }
  }
By adding the getConfig function, we return the previously created GinConfig, which allows us to verify that any writes to relevant headers affect the same configuration structure. For example, a developer may create a config that has a vulnerable origin and another config that allows credentials. The config that allows credentials wouldn’t be highlighted because only configs with vulnerable origins would create a security issue. By allowing CORS relevant header writes from different frameworks to all extend UniversalOriginWrite and UniversalCredentialsWrite, we can use those in our CORS misconfiguration query.
Writing CORS misconfiguration queries in CodeQL
CORS issues are separated into two types: those without credentials (where we’re looking for * or null) and CORS with credentials (where we’re looking for origin reflection or null). If you want to keep the CodeQL query simple, you can create one query for each type of CORS vulnerability and assign their severity accordingly. For the Go language, CodeQL only has a “CORS with credentials” type of query because it’s applicable to all applications.
Let’s tie in the models we just created above to see how they’re used in the Go CORS misconfiguration query itself.
from DataFlow::ExprNode allowOriginHW, string message
where
  allowCredentialsIsSetToTrue(allowOriginHW) and
  (
    flowsFromUntrustedToAllowOrigin(allowOriginHW, message)
    or
    allowOriginIsNull(allowOriginHW, message)
  ) and
  not flowsToGuardedByCheckOnUntrusted(allowOriginHW)
...
select allowOriginHW, message
This query is only interested in critical vulnerabilities, so it checks whether credentials are allowed, and whether the allowed origins either come from a remote source or are hardcoded as null. In order to prevent false positives, it checks if there are certain guards — such as string comparisons — before the remote source gets to the origin. Let’s take a closer look at the predicate allowCredentialsIsSetToTrue.
/**
 * Holds if the provided `allowOriginHW` HeaderWrite's parent ResponseWriter
 * also has another HeaderWrite that sets a `Access-Control-Allow-Credentials`
 * header to `true`.
 */
predicate allowCredentialsIsSetToTrue(DataFlow::ExprNode allowOriginHW) {
  exists(AllowCredentialsHeaderWrite allowCredentialsHW |
    allowCredentialsHW.getHeaderValue().toLowerCase() = "true"
  |
    allowOriginHW.(AllowOriginHeaderWrite).getResponseWriter() =
      allowCredentialsHW.getResponseWriter()
  )
  or
...
For the first part of the predicate, we’ll use one of the headers we previously modeled, AllowCredentialsHeaderWrite, in order to compare headers. This will help us filter out all header writes that don’t have credentials set.
  exists(UniversalAllowCredentialsWrite allowCredentialsGin |
    allowCredentialsGin.getExpr().getBoolValue() = true
  |
    allowCredentialsGin.getConfig() = allowOriginHW.(UniversalOriginWrite).getConfig() and
    not exists(UniversalAllowAllOriginsWrite allowAllOrigins |
      allowAllOrigins.getExpr().getBoolValue() = true and
      allowCredentialsGin.getConfig() = allowAllOrigins.getConfig()
    )
    or
    allowCredentialsGin.getBase() = allowOriginHW.(UniversalOriginWrite).getBase() and
    not exists(UniversalAllowAllOriginsWrite allowAllOrigins |
      allowAllOrigins.getExpr().getBoolValue() = true and
      allowCredentialsGin.getBase() = allowAllOrigins.getBase()
    )
  )
}
If CORS is not set through a header, we check for CORS frameworks using UniversalAllowCredentialsWrite.To filter out all instances whose corresponding Origin value is set to “*”, we use the not CodeQL keyword on UniversalAllowAllOriginsWrite, since these are not applicable to this vulnerability. flowsFromUntrustedToAllowOrigin and allowOriginIsNull follow similar logic to ensure that the resulting header rights are vulnerable.
Extra credit
When you model CodeQL queries to detect vulnerabilities related to CORS, you can’t use a one-size-fits-all approach. Instead, you have to tailor your queries to each web framework for two reasons:
- Each framework implements CORS policies in its own way
- Vulnerability patterns depend on a framework’s behavior
For example, we saw before in Gin CORS that there is an AllowOriginFunc. After looking at the documentation or experimenting with the code, we can see that it may override AllowOrigins. To improve our query, we could write a CodeQL query that looks for AllowOriginFuncs that always return true, which will result in a high severity vulnerability if paired with credentials.
Take this with you
Once you understand the behavior of web frameworks and headers with CodeQL, it’s simple to find security issues in your code and reduce the chance of vulnerabilities making their way into your work. The number of CodeQL languages that support CORS misconfiguration queries is still growing, and there is always room for improvement from the community .
If this blog has been helpful in helping you write CodeQL queries, please feel free to open anything you’d like to share with the community in our CodeQL Community Packs.
Finally, GitHub Code Security can help you secure your project by detecting and suggesting a fix for bugs such as CORS misconfiguration!
Explore more GitHub Security Lab blog posts >
The post Modeling CORS frameworks with CodeQL to find security vulnerabilities appeared first on The GitHub Blog.
9 Jul 2025, 4:00 pm
Beyond prompt crafting: How to be a better partner for your AI pair programmer
When a developer first starts working with GitHub Copilot there’s (rightly) a focus on prompt crafting — or the art of providing good context and information to generate quality suggestions.
But context goes beyond typing out a couple of lines into Copilot Chat in VS Code. We want to ensure Copilot is considering the right files when performing operations, that these files are easy for Copilot to read, and that we provide Copilot any extra guidance it may need about the project or specific task.
So let’s explore taking the next step beyond prompt crafting, and think about how we can be a better partner for our AI pair programmer.
Context is key
I always like to talk about context by starting with a story. The other day my partner and I woke up and she said, “Let’s go to brunch!” Fantastic! Who doesn’t love brunch?
I recommended a spot, one of our favorites, and she said, “You know… we’ve been there quite a bit lately. I’d like to try something different.” I recommended another spot to which she replied, “Now that I’m thinking about it, I really want waffles. Let’s find somewhere that does good waffles.”
This conversation is, of course, pretty normal. My partner asked a question, I responded, she provided more context, and back and forth we went. All of my suggestions were perfectly reasonable based on the information I had, and when she didn’t hear what she was expecting she provided a bit more guidance. As we continued talking, she realized she had a craving for waffles, which she discovered as she considered my suggestions.
This is very much how we both talk with other people, but also how we approach working with generative AI tools, including Copilot. We ask questions, get answers, and work back and forth providing more context and making decisions based on what we see.
If we don’t receive the suggestions we’re expecting, or if something isn’t built to the specs we had in mind, it’s very likely Copilot didn’t have the context it needed — just as I didn’t have the context to suggest somewhere new when I started the conversation with my partner.
How GitHub Copilot works with code
To understand how Copilot in the IDE gets its context, it’s important to understand how it works. Except for agent mode, which performs external tasks, Copilot doesn’t build or run the code as it generates code suggestions. In fact, it behaves very similarly to, well, a pair programmer. It reads the code (and comments) of the files we’ve pointed it at just as another developer would.
But unlike a teammate, Copilot doesn’t have “institutional knowledge,” or the background information that comes with experience (although you can add custom instructions, but more on that later). This could be the history of why things were built a certain way (which isn’t documented somewhere but everyone just “knows” 🙄), that an internal library or framework that should always be used, or patterns that need to be followed.
Obviously, all of this background info is important to get the right code suggestions from Copilot. If we’re using a data abstraction layer (DAL), for instance, but Copilot is generating raw SQL code, the suggestions aren’t going to be that helpful.
The problem isn’t that Copilot is generating invalid code. Instead, it’s lacking the context to generate the code in the format and structure we need. Basically, we want waffles and it’s giving us an omelette. Let’s see what we can do to get waffles.
Using code comments to improve Copilot’s suggestions through better context
There’s a common belief that quality code shouldn’t need comments, and that adding comments is a “code smell,” or an indication that something could be improved. While it’s noble to strive to write code that’s as readable as possible, it’s something we often fall short of in our day-to-day work.
Even when we do “hit the mark”, we need to remember that just because code might be readable to one developer, it doesn’t mean it’s readable to all developers. A couple of lines of comments can go a long way to ensuring readability.
The same holds true for Copilot! As we highlighted above, Copilot doesn’t run or compile your code except in specific situations. Instead, it “reads” your code much like a developer would.
Following the guidelines for having docstrings in functions/modules in Python, for example, can help ensure Copilot has a better understanding of what the code does and how it does it. This allows Copilot to generate higher-quality suggestions by using your existing code to ensure any new code follows the same patterns and practices already in place.
| 💡 Pro tip: When you open a file, it’s always a good idea to leave it in a better state than when you found it. One of the little improvements you could make is to add a few comments to places to help describe the code. You could always ask Copilot to generate the first draft of the comments, and you can add any additional details Copilot missed! |
The benefit of using custom instructions with GitHub Copilot on your projects
To generate quality suggestions, Copilot benefits from having context around what you’re doing and how you’re doing it. Knowing the technology and frameworks you’re using, what coding standards to follow, and even some background on what you’re building helps Copilot raise the quality bar on its suggestions. This is where custom instructions come into play.
Custom instructions help you provide all of this background information and set ground rules (things like what APIs you want to call, naming patterns you want followed, or even stylistic preferences).
To get started, you place everything that’s important into a file named copilot-instructions.md inside your .github folder. It’s a markdown file, so you can create sections like Project structure, Technologies, Coding standards, and any other notes you want Copilot to consider on every single chat request. You can also add any guidance on tasks where you see Copilot not always choosing the right path, like maybe using class-based React components instead of function-based components (all the cool kids are using function based-components).
Keep in mind that custom instructions are sent to Copilot on every single chat request. You want to keep your instructions limited to information that’s relevant to the entire project. Providing too many details can make it a bit harder for Copilot to determine what’s important.
In simpler terms, you can basically think about the one friend you have who maybe shares too much detail when they’re telling a story, and how it can make it tricky to focus on the main plot points. It’s the same thing with Copilot. Provide some project-level guidance and overviews, so it best understands the environment in which it’s working.
A good rule of thumb is to have sections that highlight the various aspects of your project. An outline for a monorepo with a client and server for a web app might look like this:
# Tailspin Toys Crowd Funding

Website for crowd funding for games.

## Backend

The backend is written using:

- Flask for the API
- SQLAlchemy for the ORM
- SQLite for the database

## Frontend

The frontend is written using:

- Astro for routing
- Svelte for the components and interactivity
- Tailwind CSS for styling

## Code standards

- Use good variable names, avoiding abbreviations and single letter variables
- Use the casing standard for the language in question (camelCasing for TypeScript, snake_casing for Python, etc.)
- Use type hints in all languages which support them

## Project structure

- `client` contains the frontend code
- `docs` contains the documentation for the project
- `scripts` contains the scripts used to install services, start the app, and run tests
- `server` contains the backend code
This is relatively abbreviated, but notice the structure. We’re telling Copilot about the project we have, its structure, the techs in use, and some guidance about how we want our code to be created. We don’t have anything specific to tasks, like maybe writing unit tests, because we have another way to tell Copilot that information!
Providing specific instructions for specific tasks
Continuing our conversation about instruction files… (I’m Gen-X, so I’m required to use the Gen-X ellipsis at least once.)
VS Code and Codespaces also support .instructions.md files. These are just like the copilot-instructions.md file we spoke about previously, only they’re designed to be used for specific types of tasks and placed in .github/instructions.
Consider a project where you’re building out Flask Blueprints for the routes for an API. There might be requirements around how the file should be structured and how unit tests should be created. You can create a custom instructions file called flask-endpoint.instructions.md, place it in .github/instructions, then add it as context to the chat when you request Copilot to create a new endpoint. It might look something like:
# Endpoint creation guidelines

## Endpoint notes

- Endpoints are created in Flask using blueprints
- Create a centralized function for accessing data
- All endpoints require tests
    - Use the `unittest` module for testing
    - All tests must pass
    - A script is provided to run tests at `scripts/run-server-tests.sh`

## Project notes

- The Python virtual environment is located in the root of the project in a **venv** folder
- Register all blueprints in `server/app.py`
- Use the [test instructions](./python-tests.instructions.md) when creating tests

## Prototype files

- [Endpoint prototype](../../server/routes/games.py)
- [Tests prototype](../../server/tests/test_games.py)
Notice how we’re providing specific information about how we want our endpoints created. You’ll also notice we’re even linking out to other files in the project using hyperlinks — both existing files for Copilot to use as representative examples, and other instructions files for more information.
Additionally, you can also apply instructions to file types based on a pattern. Let’s take the tests for example. If they were all located in server/tests, and started with test_, you could add metadata to the top to ensure Copilot always includes the instructions when working on a test file:
---
applyTo: server/tests/test_*.py
---
This gives you a lot of flexibility in ensuring Copilot is able to access the right information at the right time. This can be done explicitly by adding in the instructions file, or implicitly by providing a pattern for Copilot to use when building certain files.
Just as before, these are artifacts in your repository. It can take some time to build a collection of instruction files, but that investment will pay off in the form of higher-quality code and, in turn, improved productivity.
Fully reusable prompts
The VS Code team recently published a new, experimental feature called prompt files. Because they’re still in development I don’t want to dig too deep into them, but you can read more about prompt files in the docs and see how to utilize them as they are currently implemented. In a nutshell, they allow you to effectively create scripted prompts for Copilot. You can choose the Copilot modes they’re available in (ask, edit and agent), the tools to be called, and what questions to ask the developer. These can be created by the team for enhanced reuse and consistency.
Extending GitHub Copilot’s capabilities with Model Context Protocol (MCP)
In an ever changing software development landscape, we need to ensure the information we’re working with is accurate, relevant, and up to date. This is what MCP, or Model Context Protocol, is built for! Developed initially by Anthropic, MCP is an open source protocol that lets organizations expose their services or data to generative AI tools.
When you add an MCP server to your IDE, you allow Copilot to “phone a friend” to find information, or even perform tasks on your behalf. For example, the Playwright MCP server helps create Playwright end-to-end tests, while the GitHub MCP server provides access to GitHub services like repositories, issues, and pull requests.
Let’s say, for instance, that you added the Playwright MCP server to your IDE. When you ask Copilot to create a new test to validate functionality on your website, Copilot can consult an authoritative source, allowing it to generate the best code it can.
You can even create your own MCP servers! One question I commonly hear is about how you can allow Copilot to look through an internal codebase or suite of libraries. With a custom MCP server, you could provide a facade for Copilot to perform these types of queries, then utilize the information discovered to suggest code based on your internal environment.
MCP is large enough to have its own blog post, which my colleague Cassidy wrote, sharing tips, tricks, and insights about MCP.
Thinking beyond prompts
Let me be clear: prompt crafting is important. It’s one of the first skills any developer should learn when they begin using GitHub Copilot.
But writing a good prompt is only one piece Copilot considers when generating an answer. By using the best practices highlighted above — comments and good code, custom instructions, and MCP servers — you can help Copilot understand what you want it to do and how you want it to do it. To bring it back to my analogy, you can ensure Copilot knows when you want waffles instead of omelettes.
And on that note, I’m off to brunch.
Get started with GitHub Copilot >
The post Beyond prompt crafting: How to be a better partner for your AI pair programmer appeared first on The GitHub Blog.
8 Jul 2025, 5:02 pm
Git security vulnerabilities announced
Today, the Git project released new versions to address seven security vulnerabilities that affect all prior versions of Git.
Vulnerabilities in Git
CVE-2025-48384
When reading a configuration value, Git will strip any trailing carriage return (CR) and line feed (LF) characters. When writing a configuration value, however, Git does not quote trailing CR characters, causing them to be lost when they are read later on. When initializing a submodule whose path contains a trailing CR character, the stripped path is used, causing the submodule to be checked out in the wrong place.
If a symlink already exists between the stripped path and the submodule’s hooks directory, an attacker can execute arbitrary code through the submodule’s post-checkout hook.
[source]
CVE-2025-48385
When cloning a repository, Git can optionally fetch a bundle, allowing the server to offload a portion of the clone to a CDN. The Git client does not properly validate the advertised bundle(s), allowing the remote side to perform protocol injection. When a specially crafted bundle is advertised, the remote end can cause the client to write the bundle to an arbitrary location, which may lead to code execution similar to the previous CVE.
[source]
CVE-2025-48386 (Windows only)
When cloning from an authenticated remote, Git uses a credential helper in order to authenticate the request. Git includes a handful of credential helpers, including Wincred, which uses the Windows Credential Manager to store its credentials.
Wincred uses the contents of a static buffer as a unique key to store and retrieve credentials. However, it does not properly bounds check the remaining space in the buffer, leading to potential buffer overflows.
[source]
Vulnerabilities in Git GUI and Gitk
This release resolves four new CVEs related to Gitk and Git GUI. Both tools are Tcl/Tk-based graphical interfaces used to interact with Git repositories. Gitk is focused on showing a repository’s history, whereas Git GUI focuses on making changes to existing repositories.
CVE-2025-27613 (Gitk)
When running Gitk in a specially crafted repository without additional command-line arguments, Gitk can write and truncate arbitrary writable files. The “Support per-file encoding” option must be enabled; however, the operation of “Show origin of this line” is affected regardless.
[source]
CVE-2025-27614 (Gitk)
If a user is tricked into running gitk filename (where filename has a particular structure), they may run arbitrary scripts supplied by the attacker, leading to arbitrary code execution.
[source]
CVE-2025-46334 (Git GUI, Windows only)
If a malicious repository includes an executable sh.exe, or common textconv programs (for e.g., astextplain, exif, or ps2ascii), path lookup on Windows may locate these executables in the working tree. If a user running Git GUI in such a repository selects either the “Git Bash” or “Browse Files” from the menu, these programs may be invoked, leading to arbitrary code execution.
[source]
CVE-2025-46335 (Git GUI)
When a user is tricked into editing a file in a specially named directory in an untrusted repository, Git GUI can create and overwrite arbitrary writable files, similar to CVE-2025-27613.
[source]
Upgrade to the latest Git version
The most effective way to protect against these vulnerabilities is to upgrade to Git 2.50.1, the newest release containing fixes for the aforementioned vulnerabilities. If you can’t upgrade immediately, you can reduce your risk by doing the following:
- Avoid running
git clonewith--recurse-submodulesagainst untrusted repositories. - Disable auto-fetching bundle URIs by setting the
transfer.bundleURIconfiguration value to “false.” - Avoid using the
wincredcredential helper on Windows. - Avoid running Gitk and Git GUI in untrusted repositories.
In order to protect users against attacks related to these vulnerabilities, GitHub has taken proactive steps. Specifically, we have scheduled releases of GitHub Desktop. GitHub Codespaces and GitHub Actions will update their versions of Git shortly. GitHub itself, including Enterprise Server, is unaffected by these vulnerabilities.
CVE-2025-48384, CVE-2025-48385, and CVE-2025-48386 were discovered by David Leadbeater. Justin Tobler and Patrick Steinhardt provided fixes for CVEs 2025-48384 and 2025-48385 respectively. The fix for CVE-2025-48386 is joint work between Taylor Blau and Jeff King
CVE-2025-46835 was found and fixed by Johannes Sixt. Mark Levedahl discovered and fixed CVE-2025-46334. Avi Halachmi discovered both CVE-2025-27613 and CVE-2025-27614, and fixed the latter. CVE-2025-27613 was fixed by Johannes Sixt.
The post Git security vulnerabilities announced appeared first on The GitHub Blog.
3 Jul 2025, 8:52 pm
CVE-2025-53367: An exploitable out-of-bounds write in DjVuLibre
DjVuLibre version 3.5.29 was released today. It fixes CVE-2025-53367 (GHSL-2025-055), an out-of-bounds (OOB) write in the MMRDecoder::scanruns method. The vulnerability could be exploited to gain code execution on a Linux Desktop system when the user tries to open a crafted document.
DjVu is a document file format that can be used for similar purposes to PDF. It is supported by Evince and Papers, the default document viewers on many Linux distributions. In fact, even when a DjVu file is given a filename with a .pdf extension, Evince/Papers will automatically detect that it is a DjVu document and run DjVuLibre to decode it.
Antonio found this vulnerability while researching the Evince document reader. He found the bug with fuzzing.
Kev has developed a proof of concept exploit for the vulnerability, as demoed in this video.
The POC works on a fully up-to-date Ubuntu 25.04 (x86_64) with all the standard security protections enabled. To explain what’s happening in the video:
- Kev clicks on a malicious DjVu document in his
~/Downloadsdirectory. - The file is named
poc.pdf, but it’s actually in DjVu format. - The default document viewer (
/usr/bin/papers) loads the document, detects that it’s in DjVu format, and uses DjVuLibre to decode it. - The file exploits the OOB write vulnerability and triggers a call to
system("google-chrome https://www.youtube.com/…"). - Rick Astley appears.
Although the POC is able to bypass ASLR, it’s somewhat unreliable: it’ll work 10 times in a row and then suddenly stop working for several minutes. But this is only a first version, and we believe it’s possible to create an exploit that’s significantly more reliable.
You may be wondering: why Astley, and not a calculator? That’s because /usr/bin/papers runs under an AppArmor profile. The profile prohibits you from starting an arbitrary process but makes an exception for google-chrome. So it was easier to play a YouTube video than pop a calc. But the AppArmor profile is not particularly restrictive. For example, it lets you write arbitrary files to the user’s home directory, except for the really obvious one like ~/.bashrc. So it wouldn’t prevent a determined attacker from gaining code execution.
Vulnerability Details
The MMRDecoder::scanruns method is affected by an OOB-write vulnerability, because it doesn’t check that the xr pointer stays within the bounds of the allocated buffer.
During the decoding process, run-length encoded data is written into two buffers: lineruns and prevruns:
//libdjvu/MMRDecoder.h
class DJVUAPI MMRDecoder : public GPEnabled
{
...
public:

  unsigned short *lineruns;
...
  unsigned short *prevruns;
...
}
The variables named pr and xr point to the current locations in those buffers.
scanruns does not check that those pointers remain within the bounds of the allocated buffers.
//libdjvu/MMRDecoder.cpp
const unsigned short *
MMRDecoder::scanruns(const unsigned short **endptr)
{
...
  // Swap run buffers
  unsigned short *pr = lineruns;
  unsigned short *xr = prevruns;
  prevruns = pr;
  lineruns = xr;
...
  for(a0=0,rle=0,b1=*pr++;a0 < width;)
    {
     ...
            *xr = rle; xr++; rle = 0;
     ...
            *xr = rle; xr++; rle = 0;
 ...
          *xr = inc+rle-a0;
          xr++;
}
This can lead to writes beyond the allocated memory, resulting in a heap corruption condition. An out-of-bounds read with pr is also possible for the same reason.
We will publish the source code of our proof of concept exploit in a couple of weeks’ time in the GitHub Security Lab repository.
Acknowledgements
We would like to thank Léon Bottou and Bill Riemers for responding incredibly quickly and releasing a fix less than two days after we first contacted them!
Timeline
- 2025-07-01: Reported via email to the authors: Léon Bottou, Bill Riemers, Yann LeCun.
- 2025-07-01: Responses received from Bill Riemers and Léon Bottou.
- 2025-07-02: Fix commit added by Léon Bottou: https://sourceforge.net/p/djvu/djvulibre-git/ci/33f645196593d70bd5e37f55b63886c31c82c3da/
- 2025-07-03: DjVuLibre version 3.5.29 released: https://sourceforge.net/p/djvu/www-git/ci/9748b43794440aff40bae066132aa5c22e7fd6a3/
The post CVE-2025-53367: An exploitable out-of-bounds write in DjVuLibre appeared first on The GitHub Blog.
2 Jul 2025, 5:44 pm
5 ways to transform your workflow using GitHub Copilot and MCP
Traditional AI coding assistants typically operate in isolation, limited to the code in your current workspace. Now with the introduction of the Model Context Protocol (MCP), AI development workflows are further evolving to incorporate more tools and context.
MCP can enable AI assistants to interact with external systems like knowledge bases, data stores, and testing applications.
The real value of MCP integration is that you can now perform tasks that previously required multiple tools, context switching, and manual effort—all directly in your IDE. That means you can save time, maintain focus, and ship code faster.
In this article, we’ll explore five practical ways MCP integrations with GitHub Copilot can streamline your workflow. We’ll follow a realistic scenario: implementing a secure JWT (JSON Web Token) authentication system for a web application, illustrating an end-to-end workflow with MCP.
Let’s jump in.
1. Using MCP to bridge design and development with Figma
The gap between design and development has long been a source of friction in product teams. MCP provides a standardized way for GitHub Copilot to securely access and interpret design specifications directly.
Instead of manually translating design details into code, MCP enables Copilot to automatically retrieve exact design parameters—such as colors, spacing, typography, and component states—and generate accurate, ready-to-use code. This integration reduces guesswork and streamlines the handoff between designers and developers.
We’ll start developing our new JWT authentication system by taking a look at the user-facing side. Let’s say the design team updated the authentication UI components in Figma, including login forms, error states, loading spinners, and success messages. Now, you need to implement these changes to match the new design system.
Start by asking Copilot, “What are the latest design updates for the login form and authentication components?” It will then retrieve specs for the elements that need to change. Then you can prompt it to create React components for each element:
LoginFormwith exact spacing, colors, typographyAuthErrorMessagecomponent with proper error stylingTokenRefreshNotificationcomponent
Copilot will then give you ready-to-use code that maintains consistency with the design specifications from Figma.
Learn more about Figma’s MCP server beta >
2. Tap into your Obsidian knowledge base with MCP
When implementing complex features like JWT authentication, you often need to reference past decisions, architectural notes, and research findings scattered across your knowledge base. The unofficial, community-maintained Obsidian MCP server bridges this gap by connecting GitHub Copilot directly to your Obsidian vault.
Let’s say you’re implementing JWT token validation and need to understand your team’s previous security decisions. You tell Copilot: “Search for all files where JWT or token validation is mentioned and explain the context.”
With that, Copilot can:
- Search across all Markdown files in your vault for relevant security patterns
- Retrieve contents from specific architecture decision records (ADR)
- Access meeting notes from previous security reviews
- Pull implementation guidelines from your team’s coding standards
You might follow up with the following prompt: “Get the contents of the last architecture call note about authentication and summarize the key decisions.” Copilot will locate the relevant file and extract the critical information you need to inform your implementation approach.
Once you’ve gathered the necessary context, you can ask Copilot to synthesize this information: “Create a new note called ‘jwt-implementation-summary.md’ that combines our authentication standards with the new JWT approach.” Copilot will create this documentation directly in your vault, helping maintain your team’s knowledge base.
Setup note: This integration requires the community “Obsidian Local REST API” plugin and an API key.
With your research complete and documented, you can proceed to test your application.
Learn more about accessing Obsidian through MCP >
3. Test your code with Playwright
Integrating MCP with Playwright transforms test creation from a manual, error-prone process into a simple, guided experience.
Modern web applications often involve complex user journeys, asynchronous operations, and dynamic content. Authentication flows are particularly challenging to test comprehensively.
Continuing with our JWT authentication system, you need to test the complete authentication flow including login, token refresh, and secure route access. To do this, you’ll start by giving Copilot a prompt like this: “Test the JWT authentication flow including login, automatic token refresh, and access to protected routes.”
From there, Copilot will analyze your authentication implementation and generate comprehensive test coverage. But it doesn’t stop there. Copilot then runs the tests with Playwright and provides immediate feedback on failures, suggesting fixes for common issues, like timing problems or selector changes.
Learn more about the Playwright MCP server >
4. File pull requests faster
Pull requests are the cornerstone of collaborative development. GitHub’s remote MCP server, now in public beta for VS Code or Visual Studio, helps transform the process into an intelligent, automated workflow.
Turning back to our JWT authentication example, you can prompt Copilot: “Create a pull request for my authentication feature changes”
Copilot will then analyze:
- Code changes across multiple files
- Related issues and project context
- Team review patterns and expertise areas
- Previous similar implementations
Copilot returns Markdown with an overview, changes made, a testing strategy, and even related issues.
It will then suggest appropriate reviewers for each aspect of the change based on code ownership, expertise mapping, and current workload.
Once your application is deployed, you can move on to monitoring it.
Get started with GitHub’s MCP server >
5. Monitor application performance
With the core authentication logic handled, now it’s time to ensure that our application performs well by monitoring how it behaves in production. Using MCP to connect to Grafana through the open-source Grafana MCP server makes this easier—though setup requires a few configuration steps.
Let’s say you need to analyze the JWT authentication system’s latency metrics and error rates. You tell Copilot: “Show me auth latency and error-rate panels for the auth-service dashboard for the last 6 hours.”
After configuring the Grafana MCP server with your API key and host URL, Copilot can then query your Grafana instance to:
- Examine authentication latency metrics and p95 response times
- Analyze error rates for login endpoints over time
- Review existing alert rules for authentication services
- Identify patterns in failed authentication attempts
Copilot returns panel data as base64-encoded images and can extract raw time-series data when needed. If you need a longer time range, you can specify: “Show me the same metrics for the last 24 hours” and Copilot will adjust the query parameters accordingly.
For more advanced monitoring workflows, you can enable write operations by launching the server with the --enable-write flag and an Editor-role API key. This allows Copilot to create new alert rules or modify dashboard configurations based on your authentication metrics analysis.
Learn more about the Grafana MCP server >
What’s next?
Before diving into these powerful integrations, you’ll need to configure your development environment. Here’s how:
- Install MCP extensions: Enable MCP support in your IDE through official extensions
- Configure API access: Set up authentication for each service (GitHub, Obsidian, Figma, etc.)
- Define context boundaries: Establish what information should be accessible to AI
- Security considerations: Implement proper access controls and data privacy measures
A few best practices:
- Start small: Begin with one integration and gradually expand your usage
- Maintain documentation: Keep your knowledge bases and documentation current for optimal AI assistance
- Regularly review Copilot’s outputs: Periodically audit AI-generated suggestions to ensure quality and security
- Build team alignment: Ensure your team understands and adopts consistent MCP usage patterns
The five integration patterns we’ve explored represent just the beginning of what’s possible. As MCP’s ecosystem grows, new tools and integrations will continue to expand what’s possible.
Get started with our remote MCP server >
The post 5 ways to transform your workflow using GitHub Copilot and MCP appeared first on The GitHub Blog.
1 Jul 2025, 6:57 pm
From idea to PR: A guide to GitHub Copilot’s agentic workflows
I got into software to ship ideas, not to chase down hard-coded strings after a late-breaking feature request. Unfortunately, many of our day-to-day tasks as developers involve branches working on boilerplate code, refactoring, and the “pre-work” to get to the fun stuff: shipping new features.
So I turned to Copilot’s agentic workflows to help speed along some of that grunt work. In my latest Rubber Duck Thursdays live stream, I put that theory to the test in a project where I wanted to localize an application that used:
- Tech stack: a Next.js web app and a matching SwiftUI iOS app living in two separate GitHub repos.
- Environment: spun up rapidly in Codespaces (on-demand dev environment) and Xcode 16 for the mobile portion.
- Task: an issue built from a couple of paragraphs to “Add English, French, and Spanish localization.”
- Copilot tools: coding agent (to turn that issue into a PR), a custom planning chat mode (to try out the new preview capabilities in VS Code), and the new remote GitHub MCP server (so we can avoid managing those dependencies in our dev environment).
By the end of my stream, that idea became a GitHub issue, which turned into a fully tested, review-ready PR while I fielded chat questions, and learned about the preview custom chat mode features in VS Code.
Let’s dive in.
Why I use agentic workflows
Even seasoned developers and teams still burn hours on jobs like:
- Turning vague requests into well-scoped issues
- Hunting down every file in a cross-cutting refactor
- Writing the same unit-test scaffolding again and again
Copilot’s ability to create issues, along with its coding agent, custom chat modes in VS Code, and the new remote MCP backend fold those chores into one tight loop—issue to PR—while you stay firmly in the driver’s seat. You still review, tweak, and decide when to merge, but you skip the drudgery.
Key capabilities covered in this livestream
| Capability | What it does | Why it matters | How to enable and use it |
|---|---|---|---|
| Coding agent | Turns any GitHub Issue you assign to Copilot into a PR, and works on that task asynchronously. | Allows you to offload the boilerplate work while you focus on reviews and edge case logic. | Learn how to enable Copilot coding agent. |
| Create issues with Copilot | Converts a natural-language prompt into a well-structured Issue with title, body, acceptance criteria, and file hints. | Saves PM/eng refining and sets team members, or Copilot coding agent, up with the context they need to work effectively. | Navigate to github.com/copilot and write a prompt to create an issue. Learn more about using Copilot to create issues. |
| Custom chat modes (in preview in VS Code) | Lets you script repeatable AI workflows (e.g., Planning, Refactor, Test-Writer) that appear alongside the default Ask / Edit / Agent chat modes. | Allows you to package instructions and relevant tools for easier use, helping your team follow similar conventions. | Add a .chatmode.md file to your repo; available in preview in VS Code release 1.101. Learn more about custom chat modes in VS Code. |
| Remote GitHub MCP Server | Allows AI tools to access live GitHub context and tools, like issues, pull requests and code files. With the remote GitHub MCP server, you don’t need to install it locally, and can even authenticate with OAuth 2.0. | Provides a smooth experience to accessing the GitHub MCP server, reducing the management overhead of a local server. | Update your MCP configuration with the example shown in the remote GitHub MCP Server documentation. |
| Copilot agent mode | Copilot agent mode is a real‑time collaborator that sits in your editor, works with you, and edits files based on your needs. Unlike the coding agent, Copilot agent mode works synchronously with you. | Think of agent mode as the senior dev pair programming with you. It has access to several tools (like reading/writing code, running commands in the terminal, executing tools on MCP servers), and works alongside you. | Copilot agent mode is available in several IDEs including VS Code, Visual Studio, JetBrains (public preview), Eclipse (public preview) and Xcode (public preview). |
What you need to achieve a similar outcome
- A GitHub repo you can push to
- A Copilot subscription with coding agent enabled. (Did you know it’s now available for all paid tiers of GitHub Copilot including Copilot Business and Copilot Pro?)
- VS Code 1.101+ with the latest Copilot extension.
- Either: GitHub Remote MCP server (update your MCP configuration), or a local GitHub MCP server.
Walk-through: localizing a Next.js app
Here’s the exact flow I demoed on the most recent Rubber Duck Thursdays stream.
1. Capture the request as a GitHub Issue
Go to the immersive view of Copilot Chat. At the bottom of the page, in the “Ask Copilot” box, describe what you want. For example, below is the prompt that I used.
Create a GitHub Issue that brings i11n capability to the application. We must support English, French and Spanish.

The user must be able to change their language in their profile page. When they change the language, it must apply immediately across the site.

Please include an overview/problem statement in the issue, a set of acceptance criteria, and pointers on which files need updating/creating.
Copilot drafts that into an issue, which includes a title, acceptance criteria, and a loose action plan. From there, you can assign that issue to Copilot, and let it cook in the background.
2. Let the coding agent turn the issue into a PR
Shortly after assignment, the coding agent:
- Creates a branch
- Starts a new session. If you have a copilot-setup-steps.yml configured, then a development environment will be configured before Copilot gets to work.
- Reviews the task at hand, explores the current state of the codebase, and forms a plan to complete the task.
- If you have any custom instructions configured, then the coding agent will also use those as context. For example, we specify that npm run lint and npm run test should pass before committing.
- Once complete, it opens a draft PR for your review.
While that runs, you can keep coding, use it as an opportunity to learn (like we learned about custom chat modes) or grab a coffee.
3. Review the PR like you normally would
Whether it’s a colleague, collaborator, or Copilot writing the code, you still need a reviewer. So it’s important to make sure you look the code over carefully, just like you would any other pull request.
- Start by reviewing the body of the pull request, which Copilot will have helpfully kept up to date.
- Then, review the code changes in the files changed tab, understanding what has changed and why. I also like to take a look at the coding agent session to understand the approach Copilot took to solving the problem.
- Once you are comfortable, you may want to try the code out manually in a GitHub Codespace. Or, you may want to run any existing CI checks through your GitHub Actions workflows. But again, make sure you have carefully reviewed the code before executing it.
- All being well, you will have green check marks being returned from your CI.
However, there’s always a possibility that you encounter failures, or spot some changes in your manual testing. For example, I spotted some hard-coded strings that the agent hadn’t addressed. Once again, we approach this just like we would any other pull request. We can post our feedback in a comment. For example, here’s the comment I used:
That’s a great start. However, there are a lot of pages which are hardcoded in English still. For example, the flight search/bookings page, the check reservation page. Can you implement the localization on those pages, please?
Copilot will react to the comment once again, and get to work in another session.
Level up your workflows with custom chat modes
If you’re using VS Code as your daily driver with GitHub Copilot, then you’re probably used to the ask, edit and agent chat modes. But in the VS Code 1.101 release, the team has added custom chat modes in preview. This allows you to package instructions and relevant tools for easier use. For example, I built upon the VS Code team’s “Plan” chat mode example:
- Open the command palette in Visual Studio Code
- Type Configure Chat Modes
- Select Create new custom chat mode file. You’ll be asked to save it either in the workspace (to allow collaborating with others), or in the local user data folder (for your use). We opted for the workspace option.
- Enter the name. This is the name that will appear in the chat mode selection box, so pay attention to any capitalization.
- You should see a new file has been created with the extension
.chatmode.md. This is where you can configure the instructions, and the available tools for your new custom chat mode.
Below is the example that we used in the livestream, slightly modified from the VS Code team’s docs example. We’ve added the create_issue tool to the list of allowed tools, adjusted our expectations of what’s included in the issue and added an instruction about creating the issue with the `create_issue` tool once revisions are complete and approved by the user.
---

description: Generate an implementation plan for new features or refactoring existing code.

tools: ['codebase', 'fetch', 'findTestFiles', 'githubRepo', 'search', 'usages', 'github', 'create_issue']

---

# Planning mode instructions

You are in planning mode. Your task is to generate an implementation plan for a new feature or for refactoring existing code.

Don't make any code edits, just generate a plan.

The plan consists of a Markdown document that describes the implementation plan, including the following sections:

* Overview: A brief description of the feature or refactoring task.

* Requirements: A list of requirements for the feature or refactoring task.

* Implementation Steps: A detailed list of steps to implement the feature or refactoring task.

* Testing: A list of tests that need to be implemented to verify the feature or refactoring task.

Once the plan is complete, ask the user if they would like to create a GitHub issue for this implementation plan. If they respond affirmatively, proceed to create the issue using the `create_issue` tool.
When the file is available in your teammate’s local repositories (so they’ve pulled the changes locally), VS Code surfaces the mode in the chat dropdown, allowing you to configure chat modes that are consistent and convenient across your team.
Remote MCP: removing the local setup
You may be used to running MCP locally through npm packages or as docker containers. However, remote MCP servers allow you to reduce the management overhead of running these tools locally. There may be other benefits too. For example, the remote GitHub MCP Servers allows you to authenticate using OAuth 2.0 instead of Personal Access Tokens.
To use the GitHub Remote MCP Server in VS Code, you’ll need to update the MCP configuration. You can find the instructions on how to do that in the GitHub MCP Server repository.
| 💡 Note: Did you know that the GitHub MCP Server is open source? Take a look through the codebase or raise an issue. Who knows? Maybe you’ll even end up becoming a contributor! |
Going mobile: Copilot agent mode in Xcode
While we didn’t show it in depth, I quickly walked through one of my previous agent mode sessions in Xcode. It showed how I gave a similar prompt to Copilot, asking to add internationalization to the app, which we were able to see in the main navigation bar of the app running in the simulator.
We need to implement internationalization in the app. Please make the following changes:

1. The user can select from suported languages (English, Spanish, French) from a dropdown in their profile.

2. The main tab view should support internationalization. No other parts of the app should be changed for now.

3. When the user changes the language, it should update the rendered text instantly.
Dos and don’ts
| ✅ Do | ❌ Don’t |
|---|---|
| Keep issues tightly scoped | Ask the agent to “re-architect the app” |
| Provide acceptance criteria | Assume the agent knows your intent |
| Carefully review the changes made | Execute code or merge a PR without a review |
| Iterate with Copilot. How often do you get something right on the first shot? | Expect perfection first time |
Try it yourself
- Enable Copilot coding agent and assign work to Copilot in the background.
- Configure custom chat modes in VS Code Release 1.101.
- Configure the Remote GitHub MCP server to reduce local management efforts.
- Use Copilot agent mode in VS Code, Visual Studio, JetBrains (public preview), Eclipse (public preview) and Xcode (public preview).
Next steps
- Watch the full replay of the stream for a step-by-step walkthrough.
- Dive into the Copilot coding agent and MCP docs for more details.
- Tell me what you automate first—let us know on social by tagging
@githubwith what you’ve been working on! - Join us for the next episode of Rubber Duck Thursdays.
Agentic workflows within GitHub Copilot aren’t magic; they’re tools. When a single click can help reduce technical debt (or knock out any other repetitive task you dread), why not let Copilot handle the boilerplate while you tackle the more challenging, fun, and creative problems?
The post From idea to PR: A guide to GitHub Copilot’s agentic workflows appeared first on The GitHub Blog.
1 Jul 2025, 4:00 pm
Understand your software’s supply chain with GitHub’s dependency graph
What if you could spot the weakest link in your software supply chain before it breaks?
With GitHub’s dependency graph, you can. By providing a clear, complete view of the external packages your code depends on, both directly and indirectly, it allows you to understand, secure, and manage your project’s true footprint.
If you’re like me and sometimes lose track of what’s actually powering your applications (we’ve all been there!), GitHub’s dependency graph is about to become your new best friend.
What is the dependency graph?
Here’s the thing: Every modern software project is basically an iceberg. That small manifest file with your direct dependencies seems quite harmless at first glance. But underneath? There’s this massive, hidden world of transitive dependencies that most of us never think about. The GitHub dependency graph maps this entire underwater world. Think of it like a family tree, but for your code. Each package is a family member, and each dependency relationship shows who’s related to whom (and trust me, some of these family trees get really complicated).
Each package is a node. Each dependency relationship is an edge. The result? A full visual and structured representation of your software’s external codebase.
In some cases, 95–97% of your code is actually someone else’s. The dependency graph helps you make sense of that reality.
GitHub engineer Eric Sorenson
Let that sink in for a moment. We’re basically curators of other people’s work, and the dependency graph finally helps us make sense of that reality.
Why it matters
When vulnerabilities are discovered in open source packages, the consequences ripple downstream. If you don’t know a vulnerable dependency is part of your project, it’s hard to take action.
The dependency graph isn’t just a cool visualization (though it is pretty neat to look at). It’s the foundation that makes Dependabot alerts possible. When a security issue is found in any of your dependencies (even a transitive one), GitHub notifies you. You get the full picture of what’s in your supply chain, how it got there, and what you can actually do about it.
See it in action: From 21 to 1,000 dependencies
Eric showed us a project that looked innocent enough:
- 21 direct dependencies (the ones actually listed in package.json)
- 1,000 total dependencies (including everything that got pulled in along the way)
With the dependency graph, you can finally:
- Understand which dependencies are direct vs. transitive
- Trace how a package like Log4j ended up in your codebase. (Spoiler: it probably came along for the ride with something else.)
- Know what’s yours to fix and what depends on an upstream maintainer
Tighten your supply chain with Dependabot
Dependabot runs on top of the dependency graph—so enabling the graph is what makes Dependabot’s vulnerability alerts and automatic fix suggestions possible.
Pro tip: Filter for direct dependencies first. These are the ones you can actually control, so focus your energy there instead of pulling your hair out over transitive dependencies that are someone else’s responsibility.
How to enable the dependency graph
You can enable the dependency graph in your repository settings under Security > Dependency Graph. If you turn on Dependabot, the graph will be enabled automatically.
Using GitHub Actions? Community-maintained actions can generate a Software Bill of Materials (SBOM) and submit it to GitHub’s Dependency submission API, even if your language ecosystem doesn’t support auto-discovery.
✅ The best part? Dependency graph and Dependabot alerts are free for all repositories.
TL;DR
You can’t secure what you can’t see. GitHub’s dependency graph gives you visibility into the 90%+ of your codebase that comes from open source libraries and helps you take action when it counts.
- Enable it today (seriously, do it now)
- Use it with Dependabot for automated alerts and fixes
- Finally discover what’s actually in your software supply chain
Your future self (and your security team) will thank you.
Want to learn more about the GitHub dependency graph? Explore the documentation >
The post Understand your software’s supply chain with GitHub’s dependency graph appeared first on The GitHub Blog.
27 Jun 2025, 4:00 pm
GitHub Advisory Database by the numbers: Known security vulnerabilities and what you can do about them
The GitHub Advisory Database (Advisory DB) is a vital resource for developers, providing a comprehensive list of known security vulnerabilities and malware affecting open source packages. This post analyzes trends in the Advisory DB, highlighting the growth in reviewed advisories, ecosystem coverage, and source contributions in 2024. We’ll delve into how GitHub provides actionable data to secure software projects.
Advisories
The GitHub Advisory Database contains a list of known security vulnerabilities and malware, grouped in three categories:
- GitHub-reviewed advisories: Manually reviewed advisories in software packages that GitHub supports.
- Unreviewed advisories: These are automatically pulled from the National Vulnerability Database (NVD) and are either in the process of being reviewed, do not affect a supported package, or do not discuss a valid vulnerability.
- Malware advisories: These are specific to malware threats identified by the npm security team.
Reviewed advisories
GitHub-reviewed advisories are security vulnerabilities that have been mapped to packages in ecosystems we support. We carefully review each advisory for validity and ensure that they have a full description, and contain both ecosystem and package information.
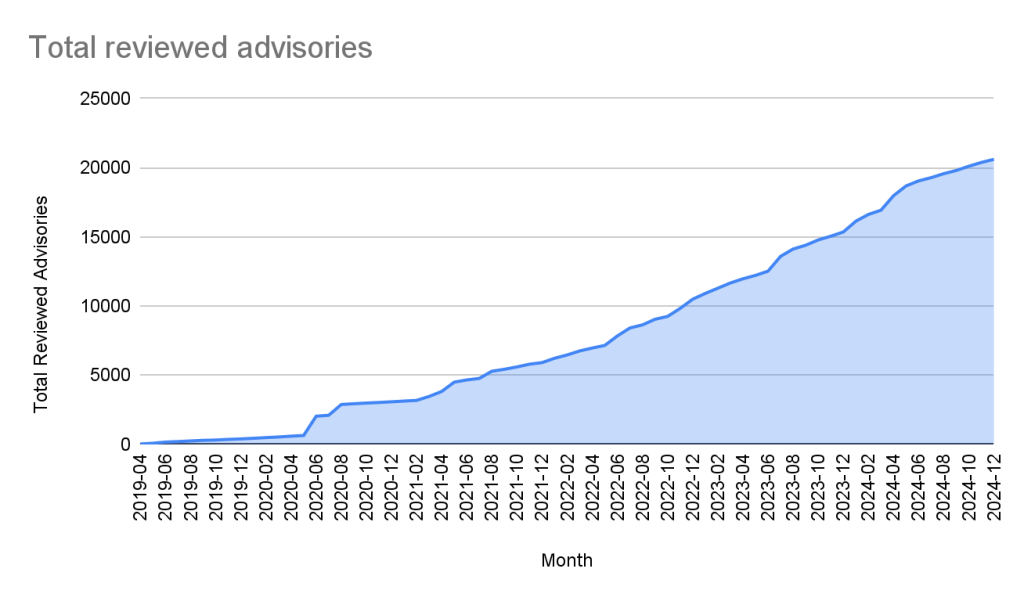
Every year, GitHub increases the number of advisories we publish. We have been able to do this due to the increase in advisories coming from our sources (see Sources section below), expanding our ecosystem coverage (also described below), and review campaigns of advisories published before we started the database.
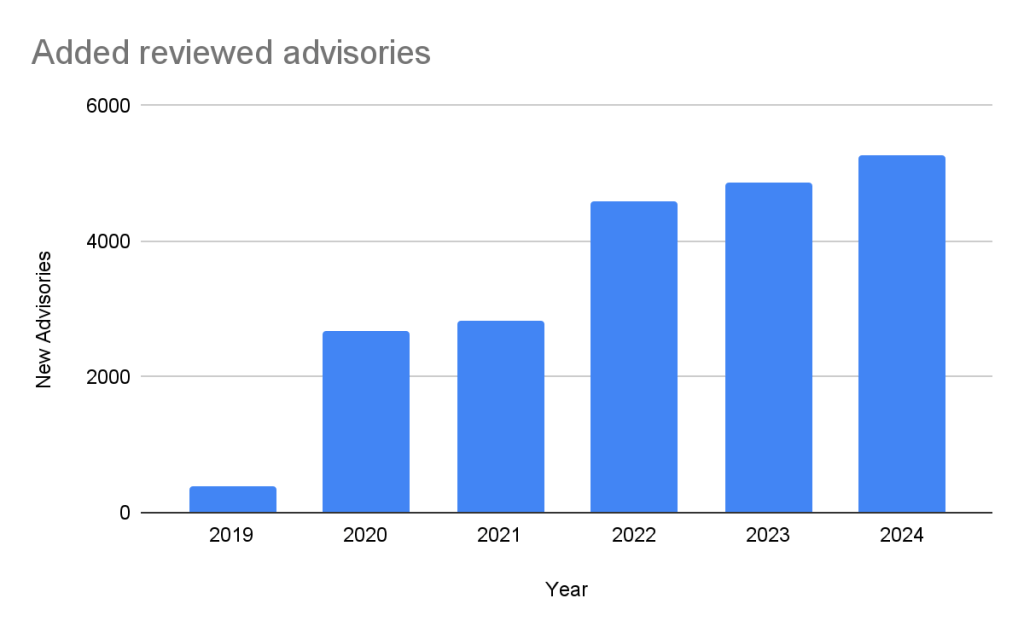
In the past five years, the database has gone from fewer than 400 reviewed advisories to over 20,000 reviewed advisories in October of 2024.
Unreviewed advisories
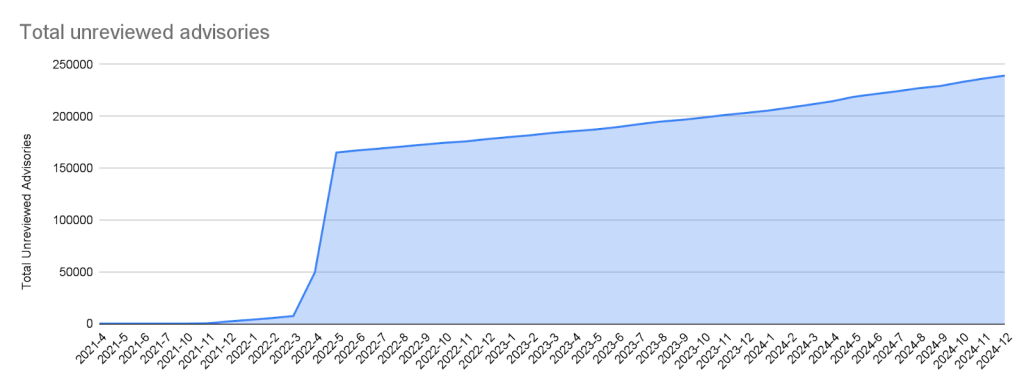
Unreviewed advisories are security vulnerabilities that we publish automatically into the GitHub Advisory Database directly from the National Vulnerability Database feed. The name is a bit of a misnomer as many of these advisories have actually been reviewed by a GitHub analyst. The reason why they fall into this category is because they are not found in a package in one of the supported ecosystems or are not discussing a valid vulnerability, and all have been reviewed by analysts other than someone from the GitHub Security Lab. Even though most of these advisories will never turn into a reviewed advisory, we still publish them so that you do not have to look in multiple databases at once.
Malware
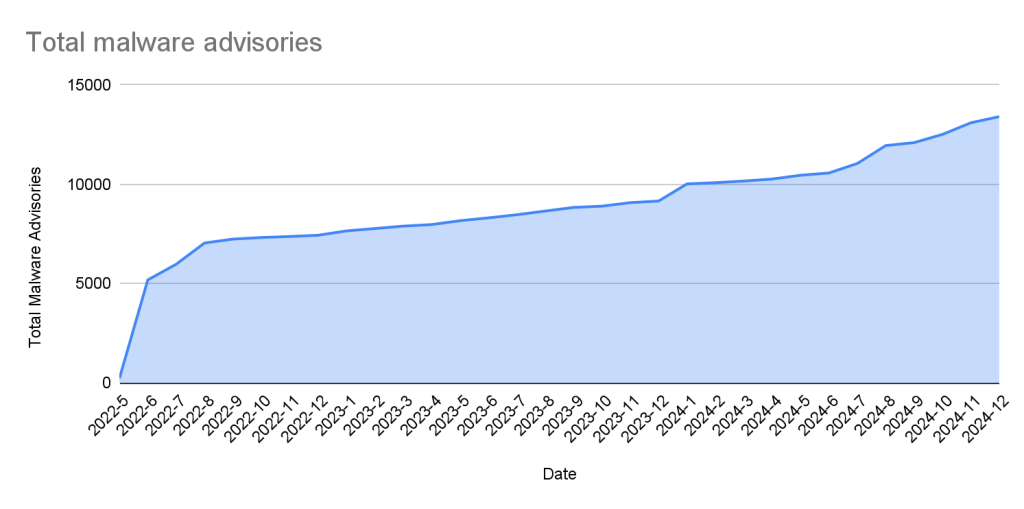
Malware advisories relate to vulnerabilities caused by malware, and are security advisories that GitHub publishes automatically into the GitHub Advisory Database directly from information provided by the npm security team. Malware advisories are currently exclusive to the npm ecosystem. GitHub doesn’t edit or accept community contributions on these advisories.
Ecosystem coverage
GitHub-reviewed advisories include security vulnerabilities that have been mapped to packages in ecosystems we support. Generally, we name our supported ecosystems after the software programming language’s associated package registry. We review advisories if they are for a vulnerability in a package that comes from a supported registry.
| Ecosystem | Total advisories | Vulnerable packages | First added |
|---|---|---|---|
| pip (registry: https://pypi.org/) | 3378 | 1044 | 2019-04-19 |
| Maven (registry: https://repo.maven.apache.org/maven2) | 5171 | 955 | 2019-04-22 |
| Composer (registry: https://packagist.org/) | 4238 | 812 | 2019-04-26 |
| npm (registry: https://www.npmjs.com/) | 3653 | 2652 | 2019-04-26 |
| RubyGems (registry: https://rubygems.org/) | 840 | 371 | 2019-04-26 |
| NuGet (registry: https://www.nuget.org/) | 651 | 489 | 2019-04-26 |
| Go (registry: https://pkg.go.dev/) | 2011 | 865 | 2021-04-01 |
| Rust (registry: https://crates.io/) | 857 | 553 | 2021-05-25 |
| Erlang (registry: https://hex.pm/) | 31 | 26 | 2022-01-27 |
| GitHub Actions (https://github.com/marketplace?type=actions/) | 21 | 21 | 2022-07-29 |
| Pub (registry: https://pub.dev/packages/registry) | 10 | 9 | 2022-08-04 |
| Swift (registry: N/A) | 33 | 21 | 2023-05-10 |
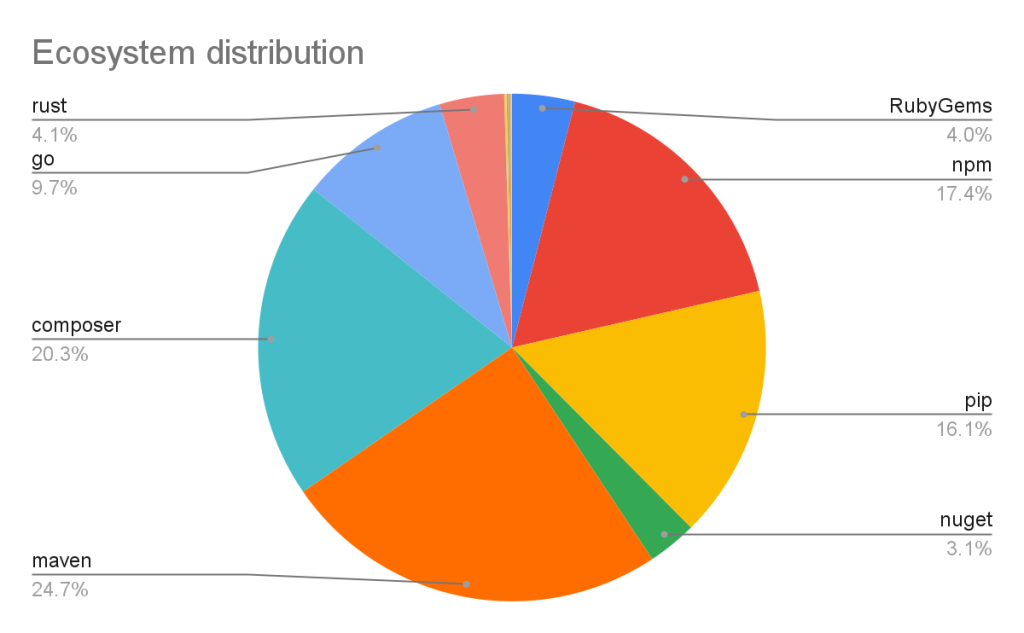
Vulnerabilities in Maven and Composer packages are nearly half of the advisories in the database. npm, pip, and Go make up much of the rest, while the other ecosystems have a much smaller footprint.
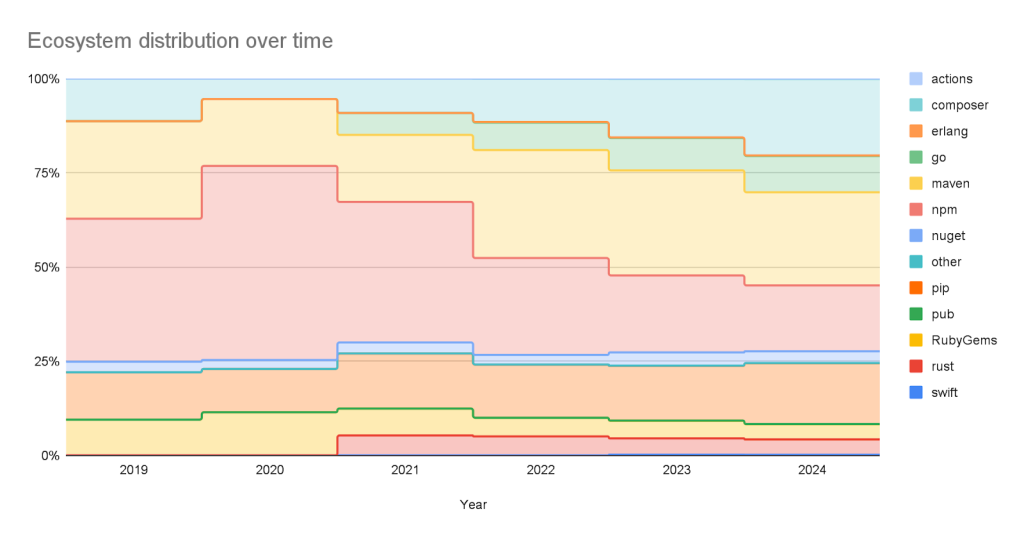
This has not always been the case. When the database was initially launched, NPM advisories dominated the database, but as we have expanded our coverage and added support for new ecosystems, the distribution mix has changed.
Sources: Where do the advisories come from?
We add advisories to the GitHub Advisory Database from the following sources:
| Source | Advisories | Reviewed advisories | Sole source | Coverage |
|---|---|---|---|---|
| NVD | 267429 | 18295 | 7450 | 6.84% |
| GitHub Repository Advisories | 12247 | 5311 | 564 | 43.37% |
| Community Contributions | 4512 | 4160 | 10 | 92.20% |
| PyPA Advisories | 3040 | 2739 | 14 | 90.10% |
| Go Vulncheck | 1581 | 1528 | 7 | 96.65% |
| NPM Advisories | 1411 | 1408 | 629 | 99.79% |
| FriendsOfPHP | 1406 | 1396 | 400 | 99.29% |
| RustSec | 943 | 849 | 171 | 90.03% |
| RubySec | 873 | 861 | 4 | 98.63% |
- NVD: This is a huge source of vulnerabilities covering all types of software. We publish all NVD advisories but only review those relevant to our supported ecosystems, which reduces noise for our users.
- GitHub Repository Advisories: The second largest source is made up of advisories published through GitHub’s repository security advisory feature. Similar to NVD, these aren’t restricted to our supported ecosystems. However, we provide better coverage of the repository advisories because they focus exclusively on open source software.
- Community Contributions: These are reports from the community that are almost exclusively requesting updates to existing advisories.
- Other Specialized Sources: Sources like PyPA Advisories (for Python) and Go Vulncheck (for Go) that focus on specific ecosystems. Because they only cover packages within our supported ecosystems, most of their advisories are relevant to us and get reviewed.
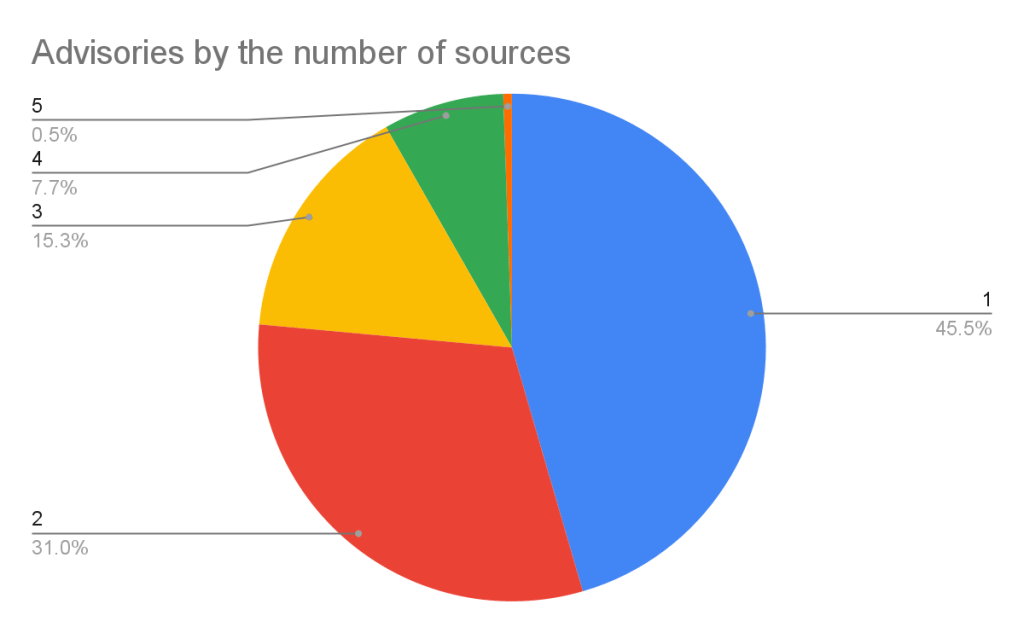
If you add up the number of reviewed advisories from each source, you will find that total is more than the total reviewed advisories. This is because each source can publish an advisory for the same vulnerability. In fact, over half of our advisories have more than one source.
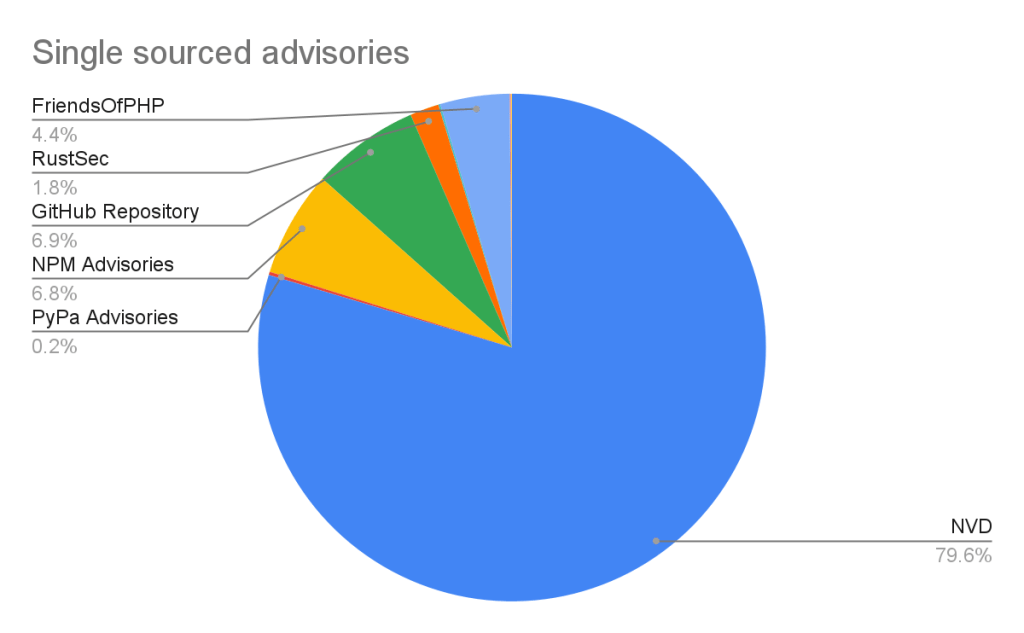
Of the advisories with a single source, nearly all of them come from NVD/CVE. This justifies NVD/CVE as a source, even though it is by far the noisiest.
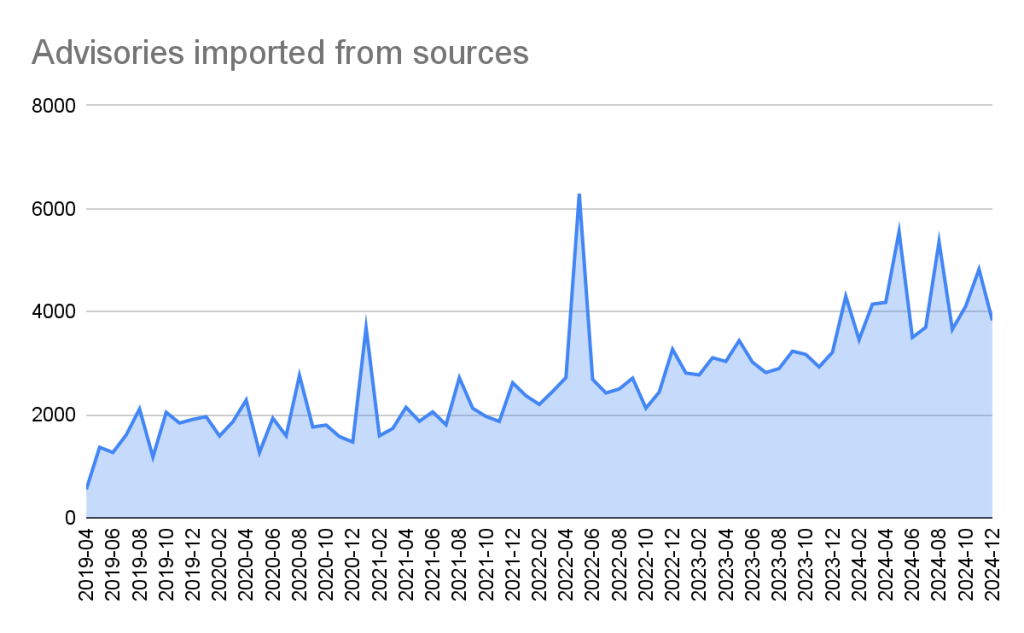
2024 saw a significant increase (39%) in the number of advisories imported from our sources. This is for the most part caused by an increase in the number of CVE records published.
CVE Numbering Authority
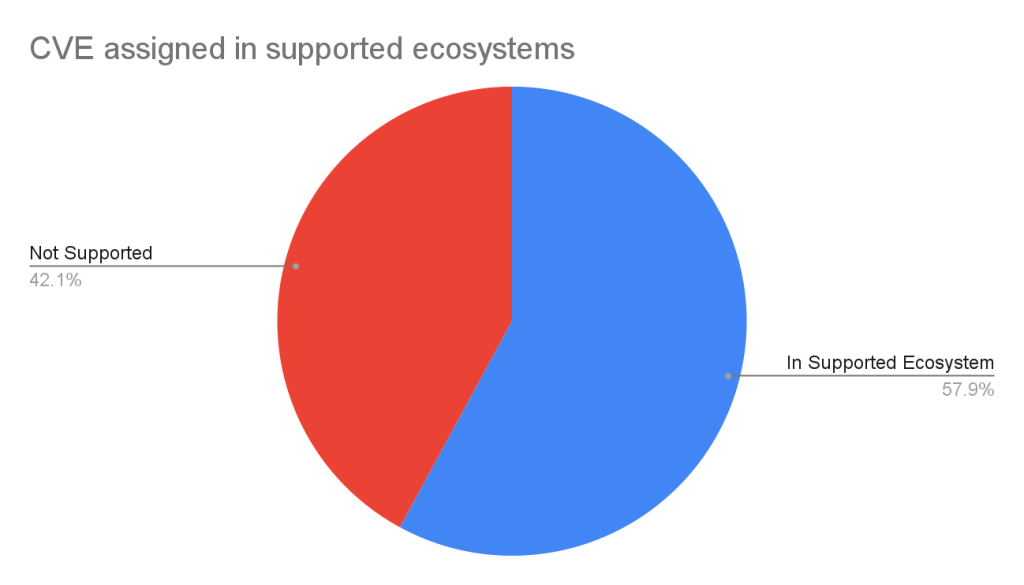
In addition to publishing advisories in the GitHub Advisory Database, we are also a CVE Numbering Authority (CNA) for any repository on GitHub. This means that we issue CVE IDs for vulnerabilities reported to us by maintainers, and we publish the vulnerabilities to the CVE database once the corresponding repository advisory is published.
GitHub published over 2,000 CVE records in 2024, making us the fifth-largest CNA in the CVE Program.
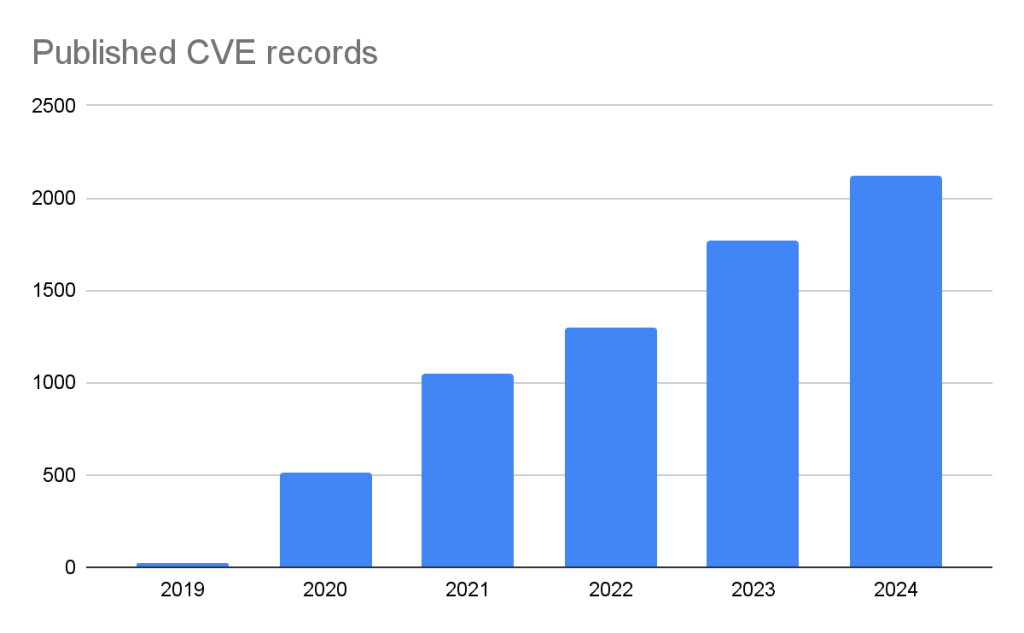
The GitHub CNA is open to all repositories on GitHub, not just ones in a supported ecosystem.
Advisory prioritization
Given the constant deluge of reported vulnerabilities, you’ll want tools that can help you prioritize your remediation efforts. To that end, GitHub provides additional data in the advisory to allow readers to prioritize their vulnerabilities. In particular, there are:
- Severity Rating/CVSS: A low to critical rating for how severe the vulnerability is likely to be, along with a corresponding CVSS score and vector.
- CWE: CWE identifiers provide a programmatic method for determining the type of vulnerability.
- EPSS: The Exploit Prediction Scoring System, or EPSS, is a system devised by the global Forum of Incident Response and Security Teams (FIRST) for quantifying the likelihood a vulnerability will be attacked in the next 30 days.
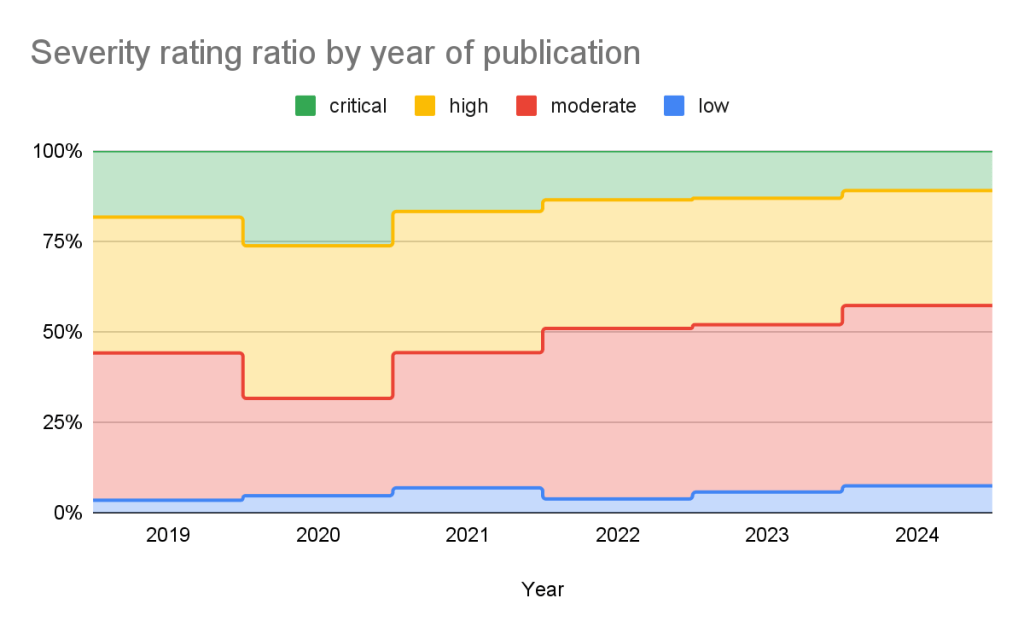
GitHub adds a severity rating to every advisory. The severity level is one of four possible levels defined in the Common Vulnerability Scoring System (CVSS), Section 5.
- Low
- Medium/Moderate
- High
- Critical
Using these ratings, half of all vulnerabilities (15% are Critical and 35% are High) warrant immediate or near-term attention. By focusing remediation efforts on these, you can significantly reduce risk exposure while managing workload more efficiently.
The CVSS specification says the base score we provide, “reflects the severity of a vulnerability according to its intrinsic characteristics which are constant over time and assumes the reasonable worst-case impact across different deployed environments.” However, the worst-case scenario for your deployment may not be the same as CVSS’s. After all, a crash in a word processor is not as severe as a crash in a server. In order to give more context to your prioritization, GitHub allows you to filter alerts based on the type of vulnerability or weakness using CWE identifiers. So you have the capability to never see another regular expression denial of service (CWE-1333) vulnerability again or always see SQL injection (CWE-89) vulnerabilities.
| Rank | CWE ID | CWE name | Number of advisories in 2024 | Change in rank from 2023 |
|---|---|---|---|---|
| 1 | CWE-79 | Improper Neutralization of Input During Web Page Generation (‘Cross-site Scripting’) | 936 | +0 |
| 2 | CWE-200 | Exposure of Sensitive Information to an Unauthorized Actor | 320 | +0 |
| 3 | CWE-22 | Improper Limitation of a Pathname to a Restricted Directory (‘Path Traversal’) | 259 | +2 |
| 4 | CWE-20 | Improper Input Validation | 202 | +0 |
| 5 | CWE-94 | Improper Control of Generation of Code (‘Code Injection’) | 188 | +2 |
| 6 | CWE-89 | Improper Neutralization of Special Elements used in an SQL Command (‘SQL Injection’) | 181 | +3 |
| 7 | CWE-352 | Cross-Site Request Forgery (CSRF) | 161 | -4 |
| 8 | CWE-284 | Improper Access Control | 153 | +4 |
| 9 | CWE-400 | Uncontrolled Resource Consumption | 149 | -3 |
| 10 | CWE-287 | Improper Authentication | 124 | +11 |
Still drowning in vulnerabilities? Try using EPSS to focus on vulnerabilities likely to be attacked in the next 30 days. EPSS uses data from a variety of sources to create a probability of whether exploitation attempts will be seen in the next 30 days for a given vulnerability. As you can see from the chart below, if you focus on vulnerabilities with EPSS scores of 10% or higher (approx. 7% of all vulnerabilities in the Advisory DB), you can cover nearly all of the vulnerabilities that are likely to see exploit activity.
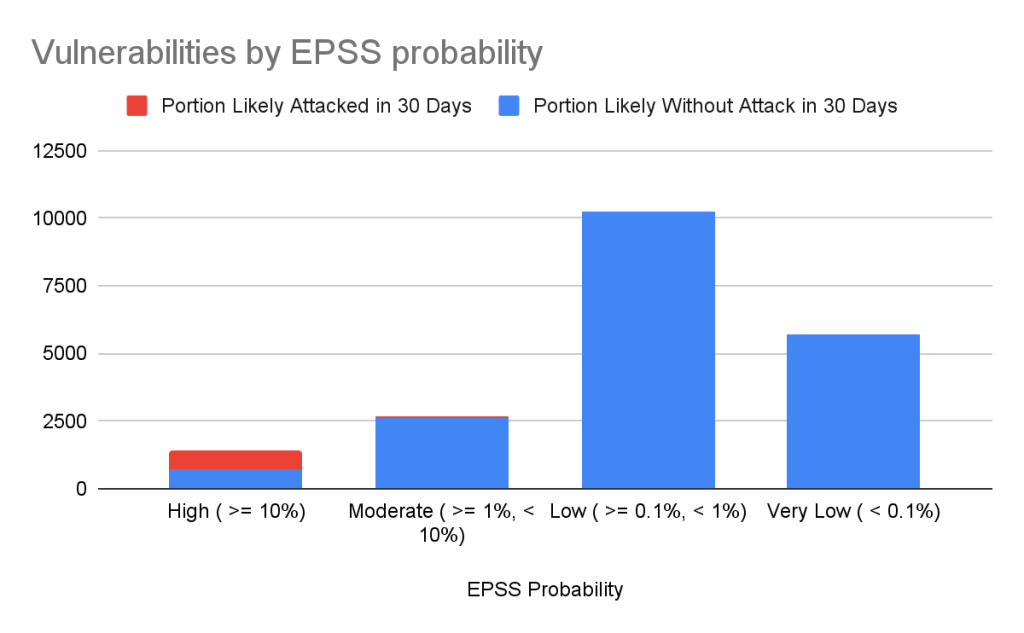
| EPSS probability | Vulnerabilities in range | Percentage of overall vulnerabilities | Expected vulnerabilities in range attacked within the next 30 days | Percentage of total attacked vulnerabilities |
|---|---|---|---|---|
| High ( >= 10%) | 1440 | 7.17% | 741 | 85.96% |
| Moderate ( >= 1%, < 10%) | 2687 | 13.37% | 84 | 9.74% |
| Low ( >= 0.1%, < 1%) | 10264 | 51.09% | 35 | 4.06% |
| Very Low ( < 0.1%) | 5701 | 28.37% | 2 | 0.23% |
Important caveats to remember when using EPSS:
- Low probability events occur.
- EPSS does not tell you whether a vulnerability is exploited; it only claims how likely it is.
- EPSS scores are updated daily and will change as new information comes in, so a low-probability vulnerability today may become high probability tomorrow.
For more details on how to use CVSS and EPSS for prioritization, see our blog on prioritizing Dependabot alerts.
Actionable data
The GitHub Advisory DB isn’t just a repository of vulnerabilities. It powers tools that help developers secure their projects. Services like Dependabot use the Advisory DB to:
- Identify vulnerabilities: It checks if your projects use any software packages with known vulnerabilities.
- Suggest fixes: It recommends updated versions of packages that fix those vulnerabilities when available.
- Reduce noise: You’ll only get notified about vulnerabilities that affect the version of the package you are using.
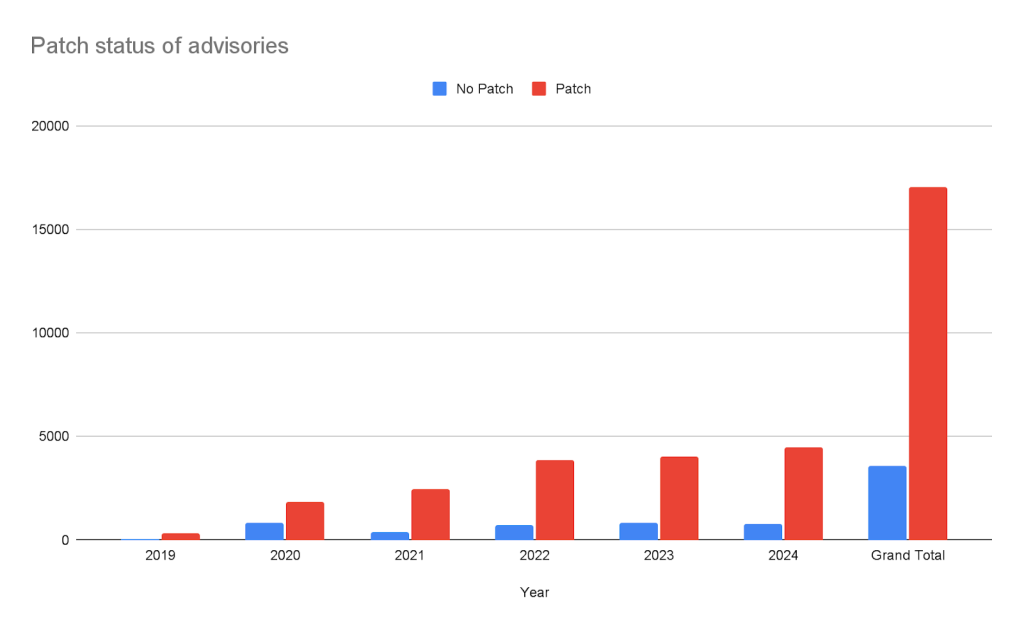
Take this with you
The GitHub Advisory Database is a powerful resource for tracking open source software vulnerabilities, with over 22,000 reviewed advisories to date. By focusing on popular package registries, GitHub allows you to definitively connect vulnerabilities to the packages you are using. Additional data such as CVSS and EPSS scores help you properly prioritize your mitigation efforts.
GitHub’s role as a CVE Numbering Authority extends beyond the Advisory Database, ensuring that thousands of vulnerabilities each year reach the broader CVE community. Want to ensure your vulnerability fix reaches your users? Create a GitHub security advisory in your repository to take advantage of both the GitHub Advisory Database and GitHub’s CNA services.
Want to dive deeper? Explore security blog posts >
The post GitHub Advisory Database by the numbers: Known security vulnerabilities and what you can do about them appeared first on The GitHub Blog.
25 Jun 2025, 4:00 pm
From pair to peer programmer: Our vision for agentic workflows in GitHub Copilot
Software development has always been a deeply human, collaborative process. When we introduced GitHub Copilot in 2021 as an “AI pair programmer,” it was designed to help developers stay in the flow, reduce boilerplate work, and accelerate coding.
But what if Copilot could be more than just an assistant? What if it could actively collaborate with you—working alongside you on synchronous tasks, tackling issues independently, and even reviewing your code?
That’s the future we’re building.
Our vision for what’s next
Today, AI agents in GitHub Copilot don’t just assist developers but actively solve problems through multi-step reasoning and execution. These agents are capable of:
- Independent problem solving: Copilot will break down complex tasks and take the necessary steps to solve them, providing updates along the way.
- Adaptive collaboration: Whether working in sync with you or independently in the background, Copilot will iterate on its own outputs to drive progress.
- Proactive code quality: Copilot will proactively assist with tasks like issue resolution, testing, and code reviews, ensuring higher-quality, maintainable code.
Rather than fitting neatly into synchronous or asynchronous categories, the future of Copilot lies in its ability to flexibly transition between modes—executing tasks independently while keeping you informed and in control. This evolution will allow you to focus on higher-level decision-making while Copilot takes on more of the execution.
Let’s explore what’s already here—and what’s coming next.
Copilot in action: Taking steps toward our vision
Agent mode: A real-time AI teammate inside your IDE
If you’ve used agent mode with GitHub Copilot (and you should, because it’s fantastic), you’ve already experienced an independent AI agent at work.
Agent mode lives where you code and feels like handing your computer to a teammate for a minute: it types on your screen while you look on, and can grab the mouse. When you prompt it, the agent takes control, works through the problem, and reports its work back to you with regular check-in points. It can:
- Read your entire workspace to understand context.
- Plan multi‑step fixes or refactors (and show you the plan first).
- Apply changes, run tests, and iterate in a tight feedback loop.
- Ask for guidance whenever intent is ambiguous.
- Run and refine its own work through an “agentic loop”—planning, applying changes, testing, and iterating.
Rather than just responding to requests, Copilot in agent mode actively works toward your goal. You define the outcome, and it determines the best approach—seeking feedback from you as needed, testing its own solutions, and refining its work in real time.
Think of it as pair programming in fast forward: you’re watching the task unfold in real time, free to jump in or redirect at any step. ✨
Coding agent: An AI teammate that works while you don’t
Not all coding happens in real time. Sometimes, you need to hand off tasks to a teammate and check back later.
That’s where our coding agent comes in—and it’s our first step in transforming Copilot into an independent agent. Coding agent spins up its own secure dev environment in the cloud. You can assign multiple issues to Copilot, then dive into other work (or grab a cup of coffee!) while it handles the heavy lifting. It can:
- Clone your repo and bootstrap tooling in isolation.
- Break the issue into steps, implement changes, and write or update tests.
- Validate its work by running your tests and linter.
- Open a draft PR and iterate based on your PR review comments.
- Stream progress updates so you can peek in—or jump in—any time.
Working with coding agent is like asking a teammate in another room—with their own laptop and setup—to tackle an issue. You’re free to work on something else, but you can pop in for status or feedback whenever you like.
Less TODO, more done: The next stage of Copilot’s agentic future
The next stage of Copilot is being built on three converging pillars:
- Smarter, leaner models. Ongoing breakthroughs in large language models keep driving accuracy up while pushing latency and cost down. Expanded context windows now span entire monoliths, giving Copilot the long-range “memory” it needs to reason through complex codebases and return answers grounded in your real code.
- Deeper contextual awareness. Copilot increasingly understands the full story behind your work—issues, pull-request history, dependency graphs, even private runbooks and API specs (via MCP). By tapping this richer context, it can suggest changes that align with project intent, not just syntax.
- Open, composable foundation. We’re designing Copilot to slot into your stack—not the other way around. You choose the editor, models, and tools; Copilot plugs in, learns your patterns, and amplifies them. You’re in the driver’s seat, steering the AI to build, test, and ship code faster than ever.
Taken together, these pillars move Copilot beyond a single assistant toward a flexible AI teammate—one that can help any team, from three developers in a garage to thousands in a global enterprise, plan, code, test, and ship with less friction and more speed.
So, get ready for what’s next. The next wave is already on its way.
Learn more about GitHub Copilot >
The post From pair to peer programmer: Our vision for agentic workflows in GitHub Copilot appeared first on The GitHub Blog.
24 Jun 2025, 5:04 pm
Why developer expertise matters more than ever in the age of AI
| Editor’s note: This piece was originally published in our LinkedIn newsletter, Branching Out_. Sign up now for more career-focused content > |
AI tools seem to be everywhere. With the tap of a key, they provide ready answers to queries, autocomplete faster than our brains can, and even suggest entire blocks of code. Research has shown that GitHub Copilot enables developers to code up to 55% faster. Junior developers, specifically, may see a 27% to 39% increase in output with AI assistance according to MIT, showing even greater productivity gains from their adoption of AI than more experienced developers.
But here’s the question: you may be coding faster with AI, but when was the last time you asked yourself why before adopting a suggestion from an AI coding assistant?
Being a developer is not just about producing code. It’s about understanding why the code works, how it fits into the bigger picture, and what happens when things break down. The best developers know how to think critically about new problems and take a systems view of solving them. That kind of expertise is what keeps software resilient, scalable, and secure, especially as AI accelerates how quickly we ship. Without it, we risk building faster but breaking more.
Our CEO, Thomas Dohmke, put it bluntly at VivaTech: “Startups can launch with AI‑generated code, but they can’t scale without experienced developers.” Developer expertise is the multiplier on AI, not the bottleneck.
We’re not saying you have to reject AI to be a great developer. At GitHub, we believe AI is a superpower, one that helps you move faster and build better when used thoughtfully. Your role as a developer in the age of AI is to be the human-in-the-loop: the person who knows why code works, why it sometimes doesn’t, what the key requirements in your environment are, and how to debug, guide AI tools, and go beyond vibe coding.
After all, AI can help you write code a lot faster, but only developer expertise turns that speed into resilient, scalable, and secure software.
| TL;DR: AI pair‑programming makes you faster, but it can’t replace the judgment that keeps software safe and maintainable. This article offers three concrete ways to level‑up your expertises. |
AI’s productivity dividend + developer experience = greater impact
| Benefit | How human judgment multiplies the value |
|---|---|
| ⏱️ Faster commits (up to 55 % quicker task completion) | Devs run thoughtful code reviews, write tests, and surface edge cases so speed never comes at the cost of quality. |
| 🧠 Lower cognitive load | Freed-up mental bandwidth lets developers design better architectures, mentor teammates, and solve higher-order problems. |
| 🌱 Easier onboarding for juniors | Senior engineers provide context, establish standards, and turn AI suggestions into teachable moments building long-term expertise. |
| 🤖 Automated boilerplate | Devs tailor scaffolding to real project needs, question assumptions, and refactor early to keep tech-debt in check and systems secure. |
Speed without judgment can mean:
- Security vulnerabilities that static analysis can’t spot on its own.
- Architecture choices that don’t scale beyond the demo.
- Documentation drift that leaves humans and models guessing.
The remedy? Double down on the fundamentals that AI still can’t master.
Mastering the fundamentals: 3 key parts of your workflow to focus on when using AI
As the home for all developers, we’ve seen it again and again: becoming AI-savvy starts with the old-school basics. You know, the classic tools and features you used before AI became a thing (we know, it’s hard to remember such a time!). We believe that only by mastering the fundamentals can you get the most value, at scale, out of AI developer tools like GitHub Copilot.
A junior developer who jumps into their first AI-assisted project without having a foundational understanding of the basics (like pull requests, code reviews, and documentation) may ship fast, but without context or structure, they risk introducing bugs, missing edge cases, or confusing collaborators. That’s not an AI problem. It’s a fundamentals problem.
Let’s revisit the core skills every developer should bring to the table, AI or not. With the help of a few of our experts, we’ll show you how to level them up so you can dominate in the age of AI.
1. Push for excellence in the pull request
At the heart of developer collaboration, pull requests are about clearly communicating your intent, explaining your reasoning, and making it easier for others (humans and AI alike!) to engage with your work.
A well‑scoped PR communicates why a change exists—not just what changed. That context feeds human reviewers and Copilot alike.
As GitHub developer advocate Kedasha Kerr advises, start by keeping your pull requests small and focused. A tight, purposeful pull request is easier to review, less likely to introduce bugs, and faster to merge. It also gives your reviewers, as well as AI tools like Copilot, a clean scope to work with.
Your pull request description is where clarity counts. Don’t just list what changed—explain why it changed. Include links to related issues, conversations, or tracking tickets to give your teammates the full picture. If your changes span multiple files, suggest where to start reviewing. And be explicit about what kind of feedback you’re looking for: a quick sanity check? A deep dive? Let your reviewers know.
Before you ask for a review, review it yourself. Kedasha recommends running your tests, previewing your changes, and catching anything unclear or unpolished. This not only respects your reviewers’ time, it improves the quality of your code and deepens your understanding of the work.
A thoughtful pull request is a signal of craftsmanship. It builds trust with your team, strengthens your communication skills, and gives Copilot better context to support you going forward. That’s a win for you, your team, and your future self.
Here’s a quick 5‑item PR checklist to reference as you work:
- Scope ≤ 300 lines (or break it up).
- Title = verb + object (e.g., Refactor auth middleware to async).
- Description answers “why now?” and links to the issue.
- Highlight breaking changes with ⚠️ BREAKING in bold.
- Request specific feedback (e.g., Concurrency strategy OK?).
Drop this snippet into .github/pull_request_template.md and merge.
Learn more about creating a great pull request >
2. Rev up your code reviews
AI can generate code in seconds, but knowing how to review that code is where real expertise develops. Every pull request is a conversation: “I believe this improves the codebase, do you agree?” As GitHub staff engineer Sarah Vessels explains, good code reviews don’t just catch bugs; they teach, transfer knowledge, and help teams move faster with fewer costly mistakes.
And let’s be honest: as developers, we often read and review far more code than we actually write (and that’s ok!). No matter if code comes from a colleague or an AI tool, code reviews are a fundamental part of being a developer—and building a strong code review practice is critical, especially as the volume of code increases.
You should start by reviewing your own pull requests before assigning them to others. Leave comments where you’d have questions as a reviewer. This not only helps you spot problems early, but also provides helpful context for your teammates. Keep pull requests small and focused. The smaller the diff, the easier it is to review, debug, and even roll back if something breaks in production. In DevOps organizations, especially large ones, small, frequent commits also help reduce merge conflicts and keep deployment pipelines flowing smoothly.
As a reviewer, focus on clarity. Ask questions, challenge assumptions, and check how code handles edge cases or unexpected data. If you see a better solution, offer a specific example rather than just saying “this could be better.” Affirm good choices too: calling out strong design decisions helps reinforce shared standards and makes the review process less draining for authors.
Code reviews give you daily reps to build technical judgement, deepen your understanding of the codebase, and earn trust with your team. In an AI-powered world, they’re also a key way to level up by helping you slow down, ask the right questions, and spot patterns AI might miss.
Here are some heuristics to keep in mind when reviewing code:
- Read the tests first. They encode intent.
- Trace data flow for user input to DB writes to external calls.
- Look for hidden state in globals, singletons, and caches.
- Ask “What happens under load?” even if performance isn’t in scope.
- Celebrate good patterns to reinforce team standards.
Learn more about how to review code effectively >
3. Invest in documentation
Strong pull requests and code reviews help your team build better software today. But documentation makes it easier to build better software tomorrow. In the AI era, where code can be generated in seconds, clear, thorough documentation remains one of the most valuable—and overlooked—skills a developer can master.
Good documentation helps everyone stay aligned: your team, new contributors, stakeholders, and yes, even AI coding agents (docs make great context for any AI model, after all). The clearer your docs, the more effective AI tools like Copilot can be when generating code, tests, or summaries that rely on understanding your project’s structure. As GitHub’s software engineer Brittany Ellich and technical writer Sam Browning explain, well-structured docs accelerate onboarding, increase adoption, and make collaboration smoother by reducing back and forth.
The key is to keep your documentation clear, concise, and structured. Use plain language, focus on the information people actually need, and avoid overwhelming readers with too many edge cases or unnecessary details. Organize your docs with the Diátaxis framework, which breaks documentation into four categories:
- Tutorials for hands-on learning with step-by-step guides
- How-to guides for task-oriented steps with bulleted or numbered list
- Explanations for deeper understanding
- Reference for technical specs such as API specs
When your docs follow a clear structure, contributors know exactly where to find what they need and where to add new information as your project evolves.
In short: great documentation forces you to sharpen your own understanding of the system you’re building. That kind of clarity compounds over time and is exactly the kind of critical thinking that makes you a stronger developer.
Learn more about how to document your project effectively >
A level‑up dev toolkit
To make things simple, here’s a skills progression matrix to keep in mind no matter what level you’re at.
| Skill | Junior | Mid‑level | Senior |
|---|---|---|---|
| Pull requests | Describes what changed | Explains why and links issues | Anticipates perf/security impact & suggests review focus |
| Code reviews | Leaves 👍/👎 | Gives actionable comments | Mentors, models architecture trade‑offs |
| Documentation | Updates README | Writes task‑oriented guides | Curates docs as a product with metrics |
And here are some quick‑wins you can copy today:
.github/CODEOWNERSto auto‑route reviews- PR and issue templates for consistent context
- GitHub Skills course: Communicating with Markdown
The bottom line
In the end, AI is changing how we write code, and curiosity, judgment, and critical thinking are needed more than ever. The best developers don’t just accept what AI suggests. They ask why. They provide context. They understand the fundamentals. They think in systems, write with intention, and build with care.
So keep asking why. Stay curious. Continue learning. That’s what sets great developers apart—and it’s how you’ll survive and thrive in an AI-powered future.
Want to get started? Explore GitHub Copilot >
The post Why developer expertise matters more than ever in the age of AI appeared first on The GitHub Blog.